
Forum Replies Created
-
AuthorPosts
-
in reply to: Old photos #133515
Nice picture David! Now we need a picture of that hat on top of your mellon, behind a nice deer. Maybe some brightly colored leaves on the ground for good effect…
in reply to: PVC Kids Quiver Build-Along #133479Since the PVC Bow Build-along and this thread may get separated from each other over time…
Here is a link to the PVC Bow Build-along sister thread to this build-along:
If you have any questions, feel free to ask…
in reply to: PVC Kids Quiver Build-Along #133478The next task we need to complete in order to finish the quiver is to dress up the top end. To do this we need some duct tape, and the ball of twine we used to wrap the handle of the bow. I like to wrap the twine from the top edge down to the first slot used to receive the back strap.
Step 9- Build the lip around the edge of quiver mouth. I like to make a lip around the top of the quiver. It serves as a stop for the twine wrap, and gives the mouth of the quiver a nice rounded edge. Cut a piece of duct tape about 13 inches long and lay it flat (sticky side down) on a cutting board. Then, using a sharp blade and a straight edge, cut strips about 1/8 inch wide.

Carefully apply these strips to the edge of the mouth, and build it up about 3 pieces of tape thick. I usually start in the middle of the back and lay pieces, end to end, around the mouth until I have built it up 3 pieces thick.

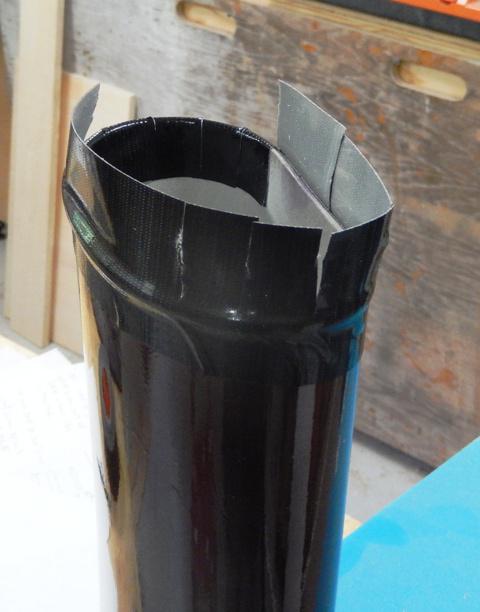
Step 10- Wrap duct tape around mouth of quiver. Cut a piece of tape that will wrap all the way around the mouth of the quiver and overlap at least 1/2 inch. Wrap the tape so that about 1/3 of the tape is on the quiver, and the other 2/3 of the tape is hanging in the air. Then, using a sharp scissors or blade, slice the tape down to within 1/8 inch of the edge. I make several tabs along the sharp curvature of the sides, and maybe just 1 long tab along the mild curvature of the back and front. This helps to reduce wrinkling. Then carefully fold these tabs down tightly until the adhere to the inside surface of the quiver.
In the following picture, you will notice that I have folded down the tabs along one side of the quiver, while the other tabs are yet to be folded down. You will also notice the lip that has formed.
Note- In the next step, we will wrap the jute twine around the top of the quiver. Before doing this, I like to make a loop of twine about 6 inches long. I use this to pull the tag end of the twine underneath the wrap, once it is finished.
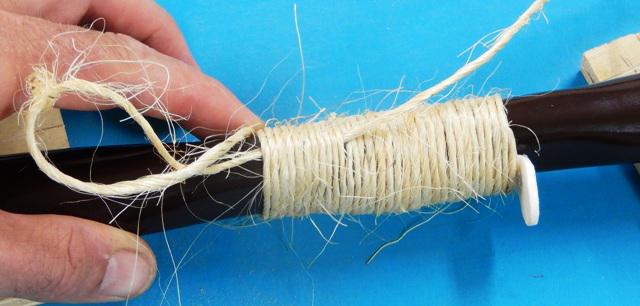
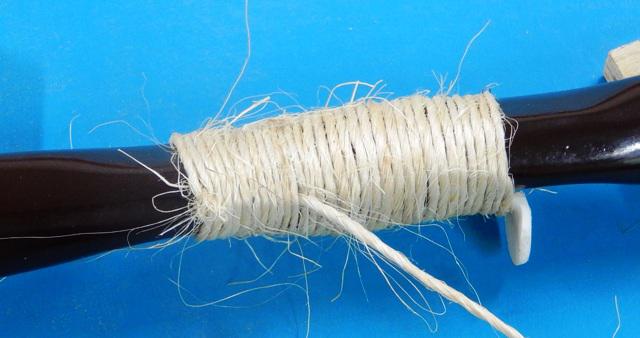
Step 11- Wrap the top of the quiver. I like to tape the first end of the string down to the quiver, along with the twine loop mentioned in the note above using the same piece of tape. Once these are taped down, I begin to wrap the twine around the quiver, getting it up tight to the lip, and making sure each successive wrap is tight and up against the last wrap. Continue wrapping until the wrap extends down to the first strap slot.
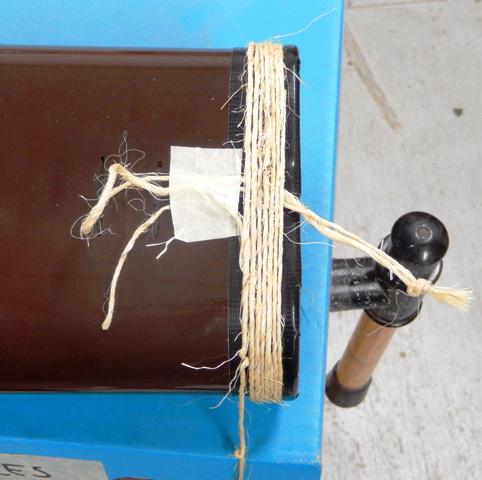
Cut the twine with about 6 inches extra and pass the tag end through the loop. Pull the loop through until the tag end emerges from the top of the wrap.
Cut the tag ends as close to the wrap as possible, and tuck them under a bit.
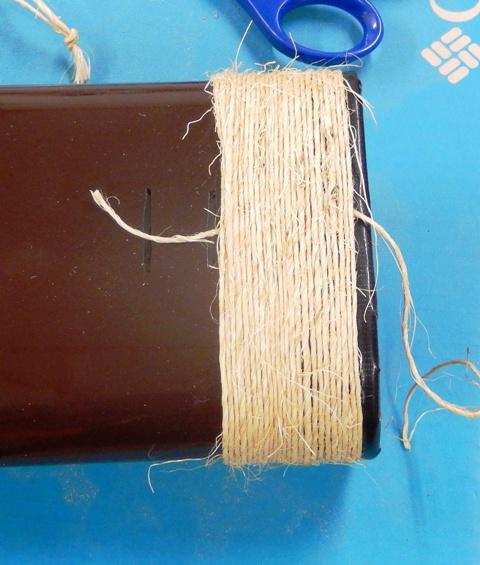
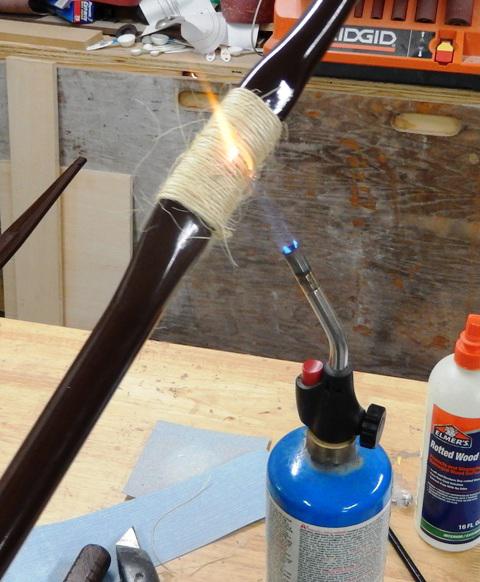
Step 12- There is usually quite a bit of loose fiber frizz on the twine. To eliminate it, I carefully burn it off with my propane torch. Be careful not to heat the quiver up as you do this. To minimize heat, apply the flame tangentially to the wrap. After burning off the frizz, briskly rub the twine to raise more fiber. Repeat the burn off.

Step 13- Seal the twine. I like to coat the twine with wood glue or the like to seal it, make it stick together, and harden it up. When you apply the glue it will look goopy. But don’t worry, it will soak in and dry clear. Apply the glue liberally and wipe off any that looks like it will run or drip.


We have now arrived at the final steps!
Step 14- Prepare the strap. Cut a piece of 1″ wide nylon webbing about 36 inches long. I like to touch the ends of the webbing to my propane torch flame to seal the thread and keep it from fraying. Then fold one end over on itself twice, starting with about 1/4 inch. This will form the stop to keep the strap from pulling out of the quiver. Stitch this fold so that it will not unwind using the same needles and thread used to make the saddle stitch on the bottom of the quiver.

Note- Depending on how thick your forearms are, you may need to enlist the help of your young archer for the last step.
Step 15- Take the straight end of the strap in your hand and reach down into the bottom of the quiver. Push the strapping through the bottom hole. Bring it around (be sure the strap is not twisted) and pass it over the top of the quiver and push it out the top slot. Then push the strap back into the quiver though the middle slot.

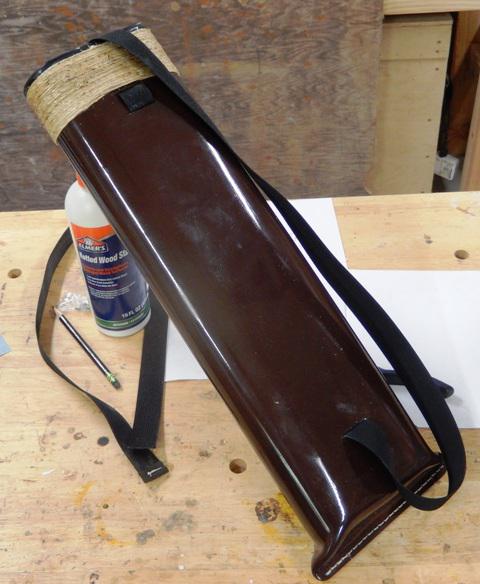
You are finished!
Well… As you have seen in the pictures at the beginning of this thread, many of the quivers have names and artwork etched into them. If I know to whom the quiver will be given ahead of time, I will often add their name and their totem. I have found that most every kid has an animal (real or mystical) that they are drawn to. I like to affix said creature to the quiver so that they can enjoy grand adventures together!
To do this, I draw the artwork (by hand, or by computer) onto a standard piece of paper. I then tape said paper to the back of the quiver and etch the artwork into it using a dremel model 290 engraving tool.
It is a very easy process. If you want to try it, I suggest you paint a piece of scrap PVC and practice on it. It will take you about a minute to figure out what to do.
And that’s it!
Here are the bows and quivers I made while taking the pictures for this build-along. The 24″ arrows, gloves, and arm guards are from the youth section of the 3Rivers catalog. I find that these items are very reasonably priced compared to the adult versions. I expect it is 3Rivers way of paying forward.
 in reply to: Tuning a new batch #133466
Both bare shafts are stuck in the target nock left as compared to the fletched arrows. This might indicate a weak shaft… But as heavy has your points are, I expect they will sink all the way though whatever you hit with them!
in reply to: PVC Kids Bow Build-Along #133465Your welcome! I hope that if you (or others) make a bow, you will post pictures…
in reply to: PVC Kids Quiver Build-Along #133454There is just one step left before we get into painting the quiver. When I made this quiver, I neglected to complete the next step before painting and had to finish it after painting. It worked out OK, just the same.
Step 6- Cut the shoulder strap slots. The shoulder strap is affixed to the quiver in such a way that it can be adjusted as your young archer grows. The slots should be cut to match the strapping you procure. The strapping should just pass through the slot without much room to spare. The dimensions between slots I give work with my strapping, you should experiment on some scrap to make sure you dimension the slot spacing to work with your strapping.
Two slots should be cut at the top of the quiver. The first about 2 inches from the top, and the second about 3/4″ below the first. This is where the adjustability comes from as the strap can be lengthened or shortened through these two slots. Test your strapping in some scrap to make sure that it won’t slide under pressure once fed through the slots. You may have to adjust the spacing between the top slots. If your strapping slips, putting the slots closer together can solve that problem.

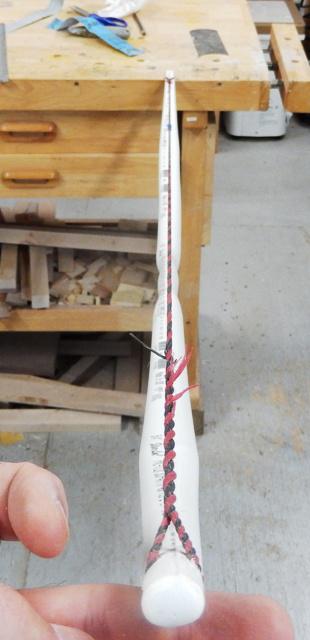
The third slot should be cut about 3″ from the bottom of the quiver. As I mentioned, I forgot to cut this slot before painting, and you can see that it looks white inside as a result.

Step 7- Paint the quiver. First I go over the entire quiver with some 150 grit sandpaper to clean up and de-gloss the surface. You can paint the quiver at this point, but I have found that coating the quiver with PVC purple primer really makes the paint adhere well. Purple primer is nasty stuff, so you will have to decide for yourself if the results are worth the cost of working with the primer.

On the plus side, I have found that only one coat of paint is required to get a good finish if PVC primer is applied before painting. I will apply the paint, wait 5 minutes or so, and then take the quiver out in the sun to touch up the spots I invariably miss.
In the picture you will notice a string loop tied in the holes at the bottom of the quiver. I hung the quiver by this string to paint it.
I like to let the quiver set for a day or so to allow the paint time to harden up. In truth, it will get harder for several weeks after painting. A day or two is enough to allow us to continue working on it.
I don’t bother trying to paint the inside of the quiver.
Now it’s time to start adding those finishing touches that can really make the difference. Kids notice things, whether we notice that they notice, or not. The details that tie the bow and the quiver together in appearance, help to tie them together in the mind of the child.
Step 8- Lace the bottom. I like to lace the bottom together using a saddle stitch. Here is a video tutorial on this easy stitch : https://www.youtube.com/watch?v=VLa3ehDCUi0
Here is my needle and thread and needle nose pliers for stubborn stitches where I need help to get the needle pulled through.

I like to use artificial sinew, but anything will work. Once the entire bottom has been stitched, I like to back stitch 4 or 5 stitches to secure the thread. I will heat up a flathead screwdriver with my propane torch to melt the ends of the sinew to keep it from unlacing.

 in reply to: PVC Kids Bow Build-Along #133445
I thought I’d add a link to the PVC kids quiver build-along so that these two threads can be connected for easy reference…
oops. I put a link here, but it didn’t work. So I deleted it. I’ll ask Robin to do it.
And thanks for the kind words Robin! I hope some folks will find these build-alongs useful.
in reply to: PVC Kids Quiver Build-Along #133442The materials needed to make a PVC quiver include a piece of 4″ PVC drain pipe, jute twine, some thread, some duct tape, and some 1″ nylon strap. I bought a lifetime supply of 1″ nylon strap from Amazon for about 10 dollars.
The tooling needed to make the quiver include a heat gun, hand saw, a bench vice (or just some clamps and wood blocks), and the kitchen oven.
Step 1- The first thing to do is to cut a 20″ piece of pipe. I started out using a piece of pipe closer to 24″ because that was the longest piece I could put in our oven. After making a bunch of these quivers, I found that a piece 20″ long was plenty.
Step 2- Form the quiver. I put a cookie sheet in the oven and heat the oven to 210 deg. Once the oven is at that temperature, I put the tube in and set the timer for 8 minutes. When the timer goes off, I look to see if the pipe has slumped into an oval shape. The longer you leave the tube in the oven, the more it will slump.

Note- All ovens are not created equal. I found that just a small change in temperature means the difference between the PVC not getting soft on the one hand, and getting discolored from overheating on the other. You may want to experiment with some scraps to determine what temperature you should set your oven to. The perfect temperature will allow the PVC to get really soft, yet stay in the oven for a long time without getting discolored.
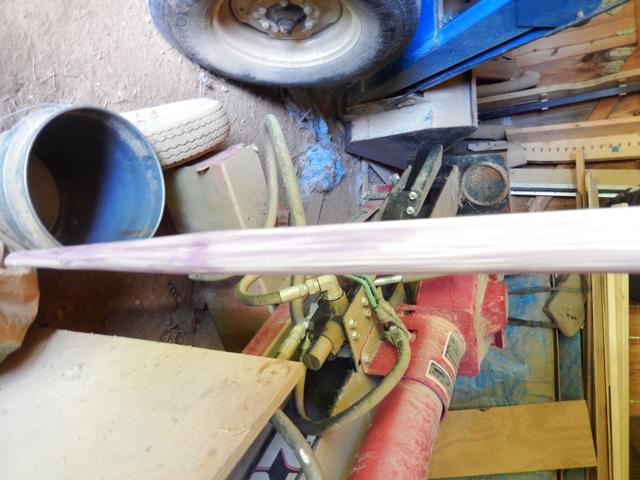
Once the tube has slumped to a nice oval shape (a bit flat on the side that rests on the cookie sheet) I take it from the oven and place it on the floor. I immediately put the flattening board through the quiver and hold the two ends down to really flatten the back. I hold this position for about a minute or so, till the PVC hardens up.

Once this step is done, look the tube over. Was the flattening board straight down the back when you pressed it down? Is the tube as flat as you wanted? Does it look good? If the answers to these questions make you happy, then we can proceed with the next steps. If not, pop it back in the oven, soften it up, and re-flatten the back.
The next step is the only really tricky step in making a quiver. I’ve had to repeat this step a few times to get it right. In fact, while trying to figure out how to make this quiver, I started out with a 24″ piece and before I finally got it right, I had about 6″ left.
In fact, I have found that my results vary depending on which side of the quiver goes against which side of my bench vice. So experiment around till you find what works best.
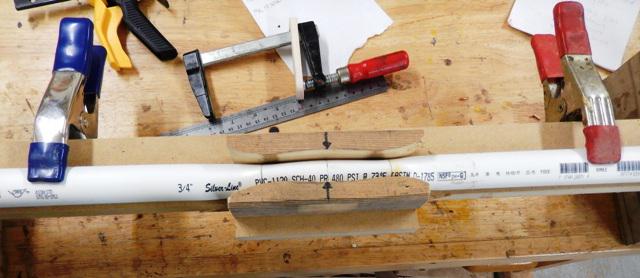
Step 3- Form the bottom seam. Before forming the bottom seam, you need to decide which end will be the bottom. To do this, I usually just determine which side looks best. Which has the most pleasing oval shape? least uneven edge? etc.
Once you have picked what will be the bottom, heat the last 3″ of the quiver till it is soft using the heat gun. Rotate the quiver around so that all areas reach the same temperature.
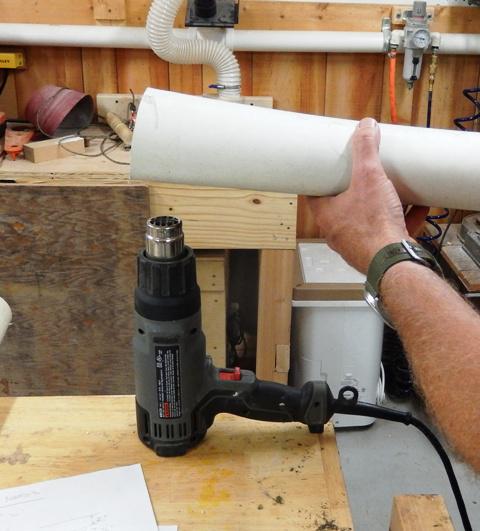
Once the bottom is soft, clamp it in your bench vice, or between two pieces of wood and a clamp. The point is to get the edges to come together and make a flat seam. Let it cool down for at least 5 minutes before taking the quiver out of the clamp.

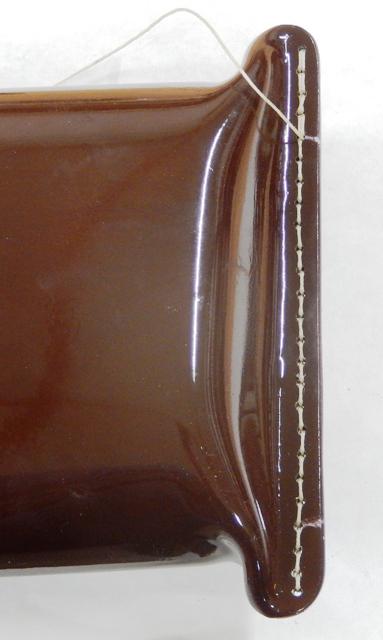
When I first got this to work, I was surprised, and pleased, with how the bottom sort of flared out and had a “leathery” look. It was an unexpected bonus. Hopefully you will see the same thing as you form the bottom seam.
Step 4- Clean up the bottom seam. When you take the quiver out of the vice or clamp, you should see a nice flat seam with a jagged edge. To make this right, draw a line across it (leaving about 1/2″ flat seam) and cut the jagged part off using a hand or band saw.

Things are starting to take shape! You could, I suppose, stop working on the bottom at this point. It will serve its purpose. No arrows will fall through. But with just a little more work, we can give the quiver a finer look.
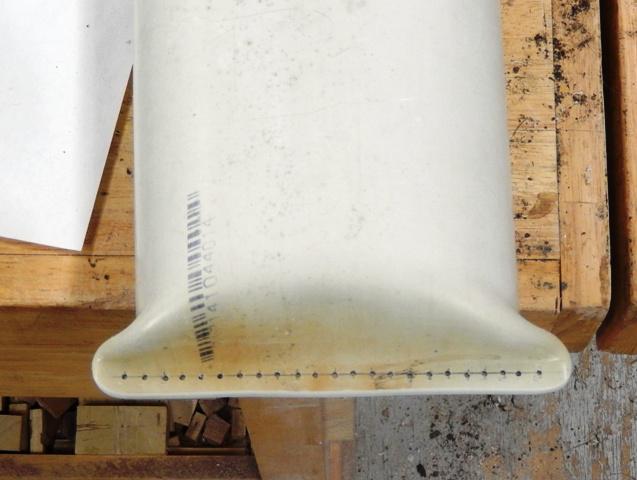
Step 5- Finish the bottom seam. In order to make this quiver look like something special, we need to round out the edges and drill holes for the saddle stitch we will sew once the quiver has been painted.
Before I start rounding and sanding though, I will usually draw a line down the center of the flat area and then mark hole locations along the line 1/4 inch apart.

Then, using a 5/64 drill bit and my dremel, I will drill these holes. I use files and sandpaper to do the rounding. Round the corners over to match each other, and round the long bottom edge to feel smooth to your finger.
 in reply to: Old photos #133395
There is a video in the Fred bear collection of Mr. Negley’s elephant hunt in Africa.
I watched it again yesterday as I put some feathers on a few arrows. Yep, same fellow as in the previous picture. You’d-a thunk as many times as I’ve watched those videos while making strings and arrows, I’d-a recognized him. Oh well…
I hear beer helps wash those things out. Ouch!
It also helps lubricate my shooting, and conversations about archery 🙂
Good luck Ralph!
in reply to: PVC Kids Bow Build-Along #133360There are as many ways to wrap a grip as there are archers to think of them. That said, I haven’t been too innovative with my PVC bow grips. I just want something that works, looks good, and is cheap. Jute twine fits the bill.
The one thing I don’t like about it, is that the diameter of the twine varies through the spool, which makes the grips a bit uneven. For a few cents more, jute cord can be had that is much more uniform.
The technique I use for serving my strings is the same technique I use for putting on these grips. Here is a video that shows the technique: https://www.youtube.com/watch?v=0hwQiKAWl2k
Step 18- Wrap the grip. Tape the end of the twine to the back of the bow.

Then proceed to wrap the twine for about 4 inches down the handle. Cut the twine with about 2 feet extra past the wrap.

Then using the technique mentioned above to serve a string, back the grip off 10 wraps or so, do the serving loop thing, and then pull it tight.
Step 19- Finish the grip. The twine has lots of free fibers hanging off it. The fastest and best way I’ve found to get rid of them is to burn them off with a torch. Be careful not to point the torch at the grip, or any part of the bow. Ease the flame to the side of the grip and burn the fibers off. Touch the bow often to make sure it is not getting too hot.
Once the fibers have been burned off, rub your hand over the grip to raise more fibers. Burn them off. Repeat as necessary.
The last thing I do to the grip is to wipe something like tite-bond glue over the entire grip. It will soak in and harden up the grip so that it doesn’t move or give way. After it dries, it disappears.
Here is a picture of one of the two bows I built as I took pictures for this build-along.
And here are the two bows and quivers I built. I will add this picture to the end of the quiver build along as well to tie the two build-alongs together.

You will see that each set is equipped with arrows, an arm guard, and fingers. I usually buy these from 3Rivers and can provide links to their website if needed. Kids gear like this is very reasonably priced. I expect the cost is subsidized by the company as their way to pay forward.
I buy the small and regular size gloves and keep a couple of each on hand. You never know who’s gonna show up 🙂
I will send the PDF document to Robin and hopefully when she has time, she will attach it to this thread. This document contains the cheat sheets for both the bow and quiver, as well as the jigs shown in this build-along.
If y’all have any questions, feel free to ask!
in reply to: PVC Kids Bow Build-Along #133309For those of you who haven’t tried it, making a bow string is one of the easiest skills to learn in support of our archery hobbies. Aside from being pretty easy, it’s also satisfying and economical. A spool of B50 costs less than 10 dollars, a string making jig can be made or purchased for $25.00. After making 3 or 4 strings, you’ve repaid your investment and still have enough material to make another dozen strings.
With that said, here are the specifications for the strings I put on these bows:
· 12 strand B-50 (2 bundles of 6 strands)
· 0.018″ Diameter Nylon serving
· 3″ upper loop (Circumference)
· 2.5″ lower loop (Circumference)
· 55 Inch long
I buy kids arrow from 3Rivers to complete these outfits. I find that the 12 strands of B-50 wrapped with the 0.018″ nylon serving fits the arrow nocks well.
Step 14- String the bow. Once you have checked the bow for straightness and acquired a string, it’s time to put the two together. I like to keep the brace height of these bows (as measured from the belly side) to about 5 inches. So put the string on the bow, and check the brace height. Twist the string tighter, or untwist it a bit, to get close to 5 inches. Look down the bow and see how straight it is.
Perfection is not required. That said, a little fooling around with the bow can bring it in line if you find that it appears a bit twisted. You can put the bow back on the flattening board and go through the heating process at the handle, or you can simply heat the handle up a bit and adjust it by hand. Either way works.
Occasionally, you will find a bend mid-limb. This will have to be adjusted by hand. Gently heat the area up, make an adjustment, cool, restring, check again. Repeat as necessary.
Once you get it right, it should look something like this:
While you have the strung bow in hand, look it over and see if you can identify what will be the top limb. I just look to see if one limb is a bit weaker than the other by checking the distance from the string to one end of the handle, vs. the same measurement on the other end of the handle. Whichever distance is greater usually indicates the top limb.
Once you’ve identified the top limb, pull the bow. How does it feel? Turn the bow over and repeat. Any difference?
Once the bow has been painted, we’ll set about adding an arrow rest and handle wrap. We will string the bow again at that time to confirm the upper limb.
Step 15- Paint the bow. Does the bow need to be painted? Nope. But it sure adds to its mojo. I used to simply sand the bow with 150 grit paper to get rid of the gloss and then paint them. After a few months of hard use, they get pretty banged up. Paint doesn’t stick well to PVC. Eventually, I found that if I primed the bow with purple PVC primer and then painted the bow right away, the paint really bonded well.
Purple PVC primer is nasty stuff, so you will have to decide for yourself if it is worth the risks to use it. I wear gloves and use a paper towel to wipe then entire bow down with the primer. I work outside. Here’s what the bow looks like after it has been primed:
I found that it takes much less paint for a primed bow. One coat with a couple touch ups for missed spots is plenty. Before I started priming, I had to spray several coats to get the same quality finish.
I usually give the bows a couple days to cure after painting. This allows the paint to harden up enough so it won’t chip from handling. While I wait, I usually take this time to make the arrow rests.
You can of course shoot these bows without arrow rests. But I figure the safety benefits of the rest justify the effort to make it. Of course it limits the handedness of the bow, so you will have to decide if you want an arrow rest.
Step 16- Fabricate the arrow rest. The arrow rest is made from the scrap pipe left after cutting 2 bows from the 10 foot piece of pipe. Mark a line 3 inches from the end of the pipe, all the way around. Then Mark a straight line from the end of the pipe down to the line you just marked. Rotate the pipe 90 deg and repeat the same line.

You can make 4 arrow rests from the pipe you just marked. I usually make two and throw the rest away.
It is best to cut the long 3 inch lines first as you will have something to hold onto while doing it. Then cut the arrow rests free from the pipe by cutting the circumferential line.
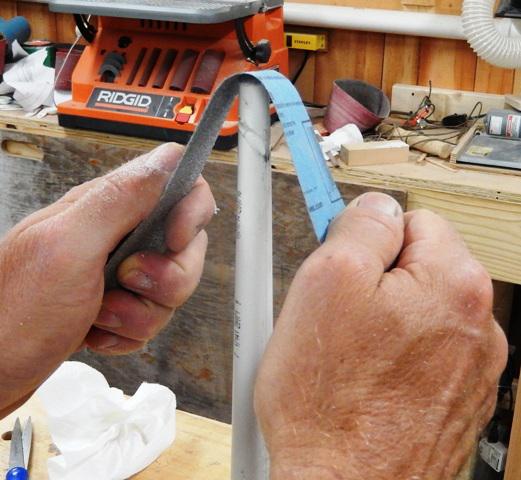
Now fire up your heat gun and warm one end of the arrow rest so that you can bend it flat. Then round it off and taper the long section.
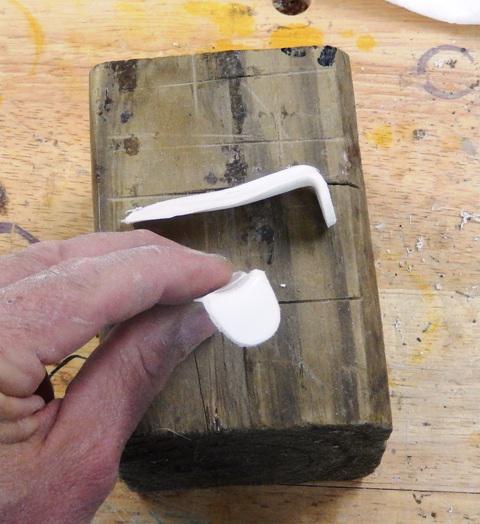
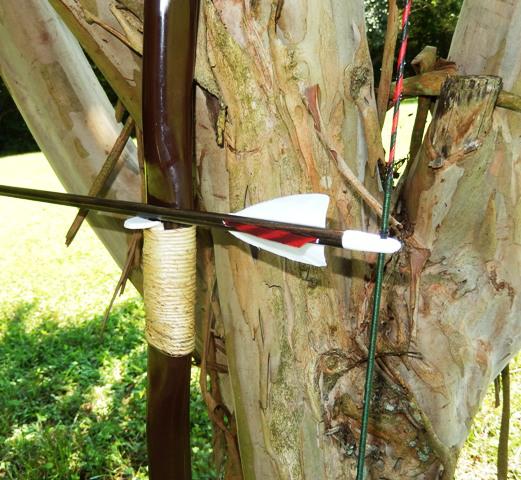
In the picture you will notice that the shelf is rounded. I round it on a sanding belt, and smooth all the edges with sand paper. You will also notice that the arrow rest has a bit of a bend in the middle. After it has been shaped, I heat the long part of the rest up and hold it against the bow where it will eventually get affixed so that it takes the shape of the bow.
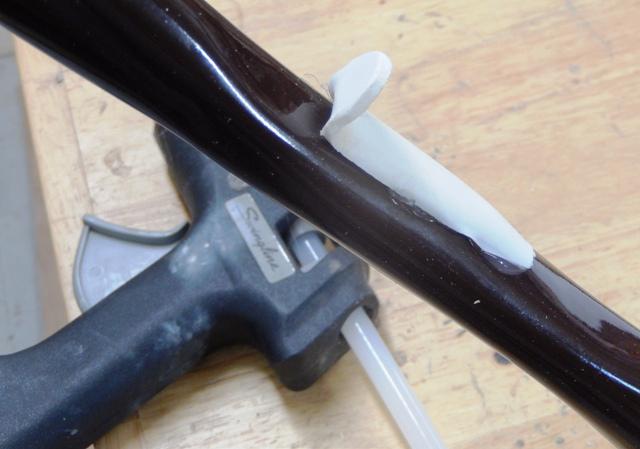
Step 17- Affix arrow rest to the bow. To do this, you must decide where the arrow rest goes. It is best to string the bow and identify the weak limb. You will also need to make your best guess as to the handedness of your young archer (or put a rest on both sides). Once you have determined where you will put the rest, apply a little hot glue to the rest and stick it to the bow. The hot glue just needs to keep the rest in position, It doesn’t have to be a strong bond. In the following steps, we will wrap the handle and so the entire rest will be under the wrap except for the arrow shelf.
The next and final steps will involve adding the grip wrap to the bow.
in reply to: Old photos #133292I can’t speak for Mr. Pope, but I’m not that dapper 🙂
in reply to: PVC Kids Bow Build-Along #133291Now things are really going to start taking shape!
The next thing I like to do is finish out the tips and cut the string nocks in. Before I do that though, I’ll pick the bow up and give it a look see. I’ll look down the bow and see what the limbs are looking like, how the handle area is looking, how the whole bow lines up. I’m not ready to address those areas yet, but I like to know what’s ahead of me, so I can mull it over if needed. Once I give the whole bow a look over, I’ll get to work on the tips.
Note – I know I messed up my step count a ways back, but I’m just going to keep counting along. Actual numbers aren’t that important anyway.
Step 11- Round out the tip. The tip of the bow is solid now, owing to the epoxy putty we packed it with. This means we are free to shape the tip however we like. I usually just try for a well rounded look. I place the bow in my bench vice and start sanding the tip with 60 grit paper. I’ll finish with some 150 grit paper and never go any finer than that. I sand all the way around the tip bringing all the lines together. It takes just a minute or two:
Step 12- Cut the string nocks in. Start by marking a line across the tip about 3/4″ from the end. Continue this line around the sides of the limb at a 45° angle. I use my tri-square to mark the sides of the limb. I will then look at the belly and free hand the marks around on it.
Once I am satisfied with the marks, I will take my 5/32 chainsaw file and cut the string nocks. I cut the nocks on the tip side of the line. It makes the job easier to have a vice into which you can clamp the bow. If you don’t, maybe the future owner of the bow can lend a hand. That said, I have cut many nocks without the help of either.

Once the nock is cut into the bow, I like to fit a string to it and make sure it lays nicely in it. You can give the string a tug and see how the limb bends and how the nock works.

We are not yet ready to string the bow. We still need to form the handle. This step will allow us to not only form the handle, but align the limbs as well. There are a couple ways to get the handle made. Each has its merits, I have done it both ways and am not yet sure which way I like best.
The first way is to simply heat the handle area up and form the grip like a sculptor would, with our hands. The advantages of this method include such things as you can make the grip a bit more bulbus, you can make sure everything is aligned as you go, and it doesn’t require any jigs.
The other way is to have a set of jigs that allow you to squeeze the handle into a preformed shape. The advantages of this method include such things as getting the same grip bow after bow and not needing to handle the hot PVC with your hands.
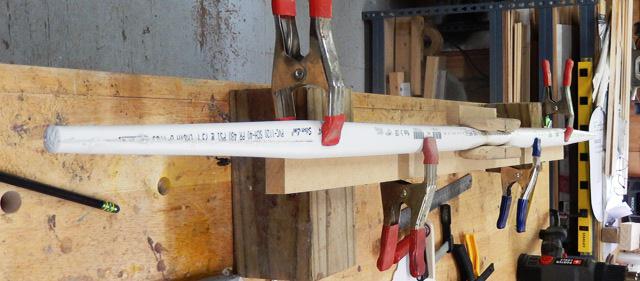
Step 13- Form the grip. However you choose to make the grip, I find having a flattening board helps to get things lined up correctly. The idea is to clamp the bow to a flat board with a straight edge. Clamp one limb to the board nice and straight, and then work the other limb to the edge and clamp it as well.
Once the handle is heated up, this clamping setup will assure the back of the bow is flat, and that the limbs line up side-to-side. The heated handle becomes soft and allows the limbs to enter a straight alignment without any stress between them.
Heat the handle are and about 2 inches past on each side. Heat the sides and belly of the handle, don’t worry about the back, which is against the board. Heat the PVC till it gets flexible, but it doesn’t have to be so hot as when we were making the limbs. We don’t want to lose too much of the taper in the limbs. As the pipe gets hot, it returns to its round shape. So just try to concentrate the heat in the area we will be shaping.
In the following picture you can see how I identified the handle forms with an arrow so I always align them the same way.
In the following picture you can see how the bow is aligned on the flattening board to make is straight and true.
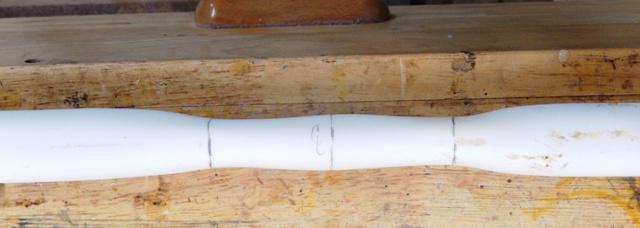
And here is how the finished handle will look.
The next steps will involve putting a string on the bow to check our work…
in reply to: PVC Kids Bow Build-Along #133249Step 6- Repeat for the other limb. When the first limb was formed, there was no orientation to the bow yet. After you heat up the other side, make sure the already formed limb is belly up.
Once you have formed both limb tapers, you will have something that is beginning to look like a bow. Feel free to flex it and see how it bends. Look down the bow and see how straight it is, tip to tip. It will likely be a little bendy through the handle. That’s ok, it will get fixed later. At this point, we want to keep the limbs as straight as possible, even if they don’t align with each other.
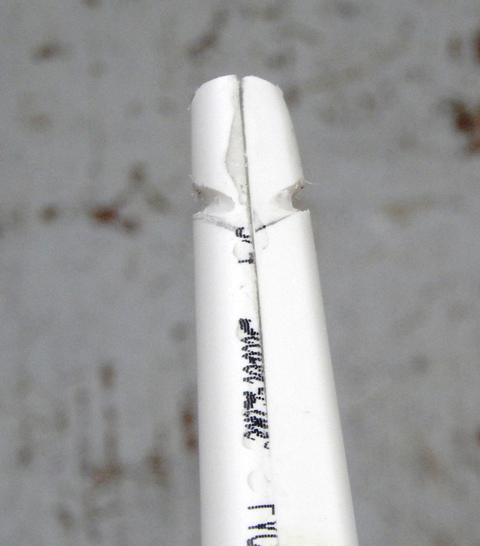
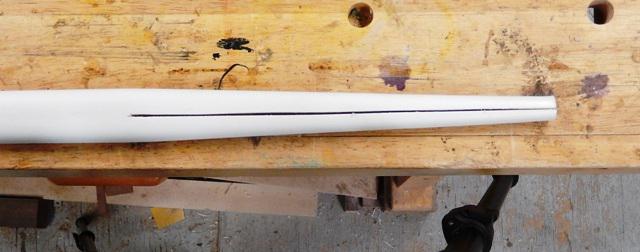
Step 6- Cut the taper wedge out of the limb. What we’re going to do now is finish out the tips of the bow by tapering the limb side to side. In the following picture, I have marked a triangular wedge that will get cut out. The wedge point is 10 inches deep into the bow and the base of the wedge is marked about 1/4 inch from each side.

Generally I use my bandsaw to cut the wedge out. I have cut plenty with a handsaw too. When I make bows with kids, I let them use the handsaw. It does just as fine a job, if not better. The width of the handsaw helps to keep the cuts straight. A hacksaw will not work as the frame of the saw is not as deep as the cut and will hang up.
Once the wedge has been cut, I clean the edges of the cut with a knife to remove any debris that’s holding on.
Step 7- Close the wedge. Using our trusty heat gun, we will heat the area around the point of the wedge just enough to allow us to close the wedge and form a nice taper. These heat guns are designed to sit on their ends and point straight up. Set your heat gun like so, so that you can work on your bow limb with both hands. Heat the sides a little more than the back and belly. It takes a while for the heat to transfer through the PVC, so go slow. Apply a little heat, see if you can close the wedge, a little more heat, repeat, wait for the heat to transfer deep into the PVC, try again.
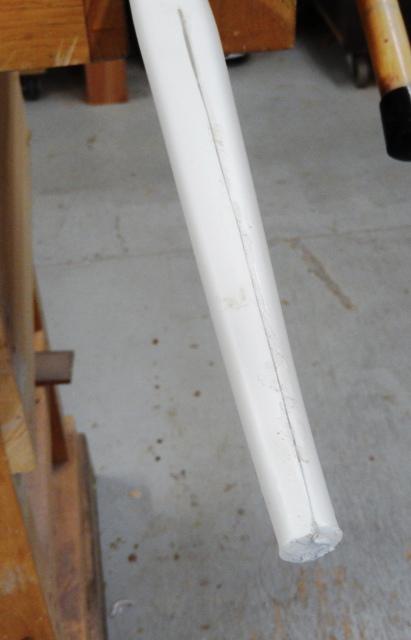
As the wedge closes, look down the limb and make sure you keep the taper straight with the limb. The seam in the taper should run straight down the middle of the limb as you look down it. Hold it closed till the plastic sets. It should look like this when finished:
Now close the wedge on the other limb.
Step 8- Fill the tips with Epoxy. The tips of the limbs are hollow. You can leave them this way, but I prefer to close them up so that when I sand the tips everything looks solid. To do this mix up a bit of the PVC epoxy putty, spread the tip wedge open a bit, and fill both sides of the tip for about 1 inch with the putty. Press the tip together until epoxy squeezes out the end and sides. Do this for both tips.
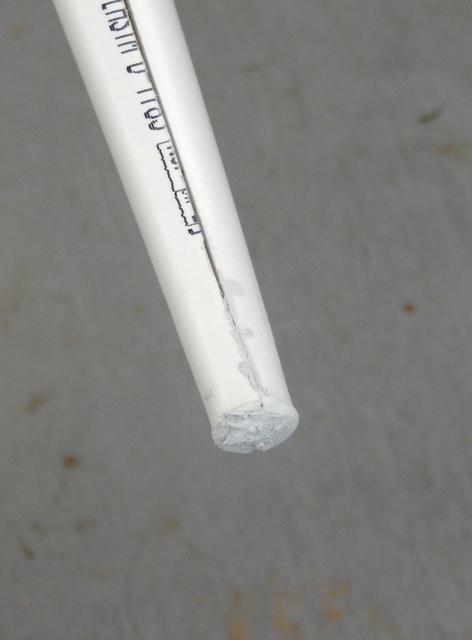
Step 9- Braze the seam with hot glue. Open the seam a little bit so that you can inject hot glue into the entire seam, both back and belly. Once the seam is filled with glue, press the sides together until it set well. You can see the glue spilling over the seam in the following picture:

Step 10- Trim the hot glue. I have used a razor to trim the hot glue in the past. This time, after trimming the hot glue with a razor and taking the pictures, I got onto it with my cabinet scraper. I found the scraper did a really nice job of evening things up.
It’s almost impossible to get perfect alignment, side to side, between the edges of the seam as you glue the taper together. The cabinet scraper really helped to smooth these edges together.
I never know exactly how it’s going to go when I make a bow, PVC or otherwise. The one thing I can count on, though, is that I will encounter something new, or figure out a little trick. I always look forward to finding out what will come up when I make a bow. In this case, it was applying the cabinet scraper to these limb taper seams. Unfortunately, I didn’t think to take a picture after using the scraper.
At this point, I usually take a break. The PVC epoxy needs at least an hour to cure. If I am in no rush, I usually don’t come back to it till the next day.
-
AuthorPosts