
Home › Forums › Bows and Equipment › PVC Kids Bow Build-Along
-
AuthorPosts
-
-
I’ve had a number of folks ask me how to make these PVC kids bows. I’ve helped a few learn and I’ve “told” others how. I thought I might do a build-along here so that in the future, I can just reference this thread. When I get this one done, I thought I’d do a sister tread about PVC bow quivers too. Finally, if our web mom approves and can help, I thought I’d provide a PDF with drawings of the fixtures I use and cheat sheets with all the measurements for making the bow. That way a person doesn’t have to take notes, and I don’t have to spew a bunch of numbers in the build-along.
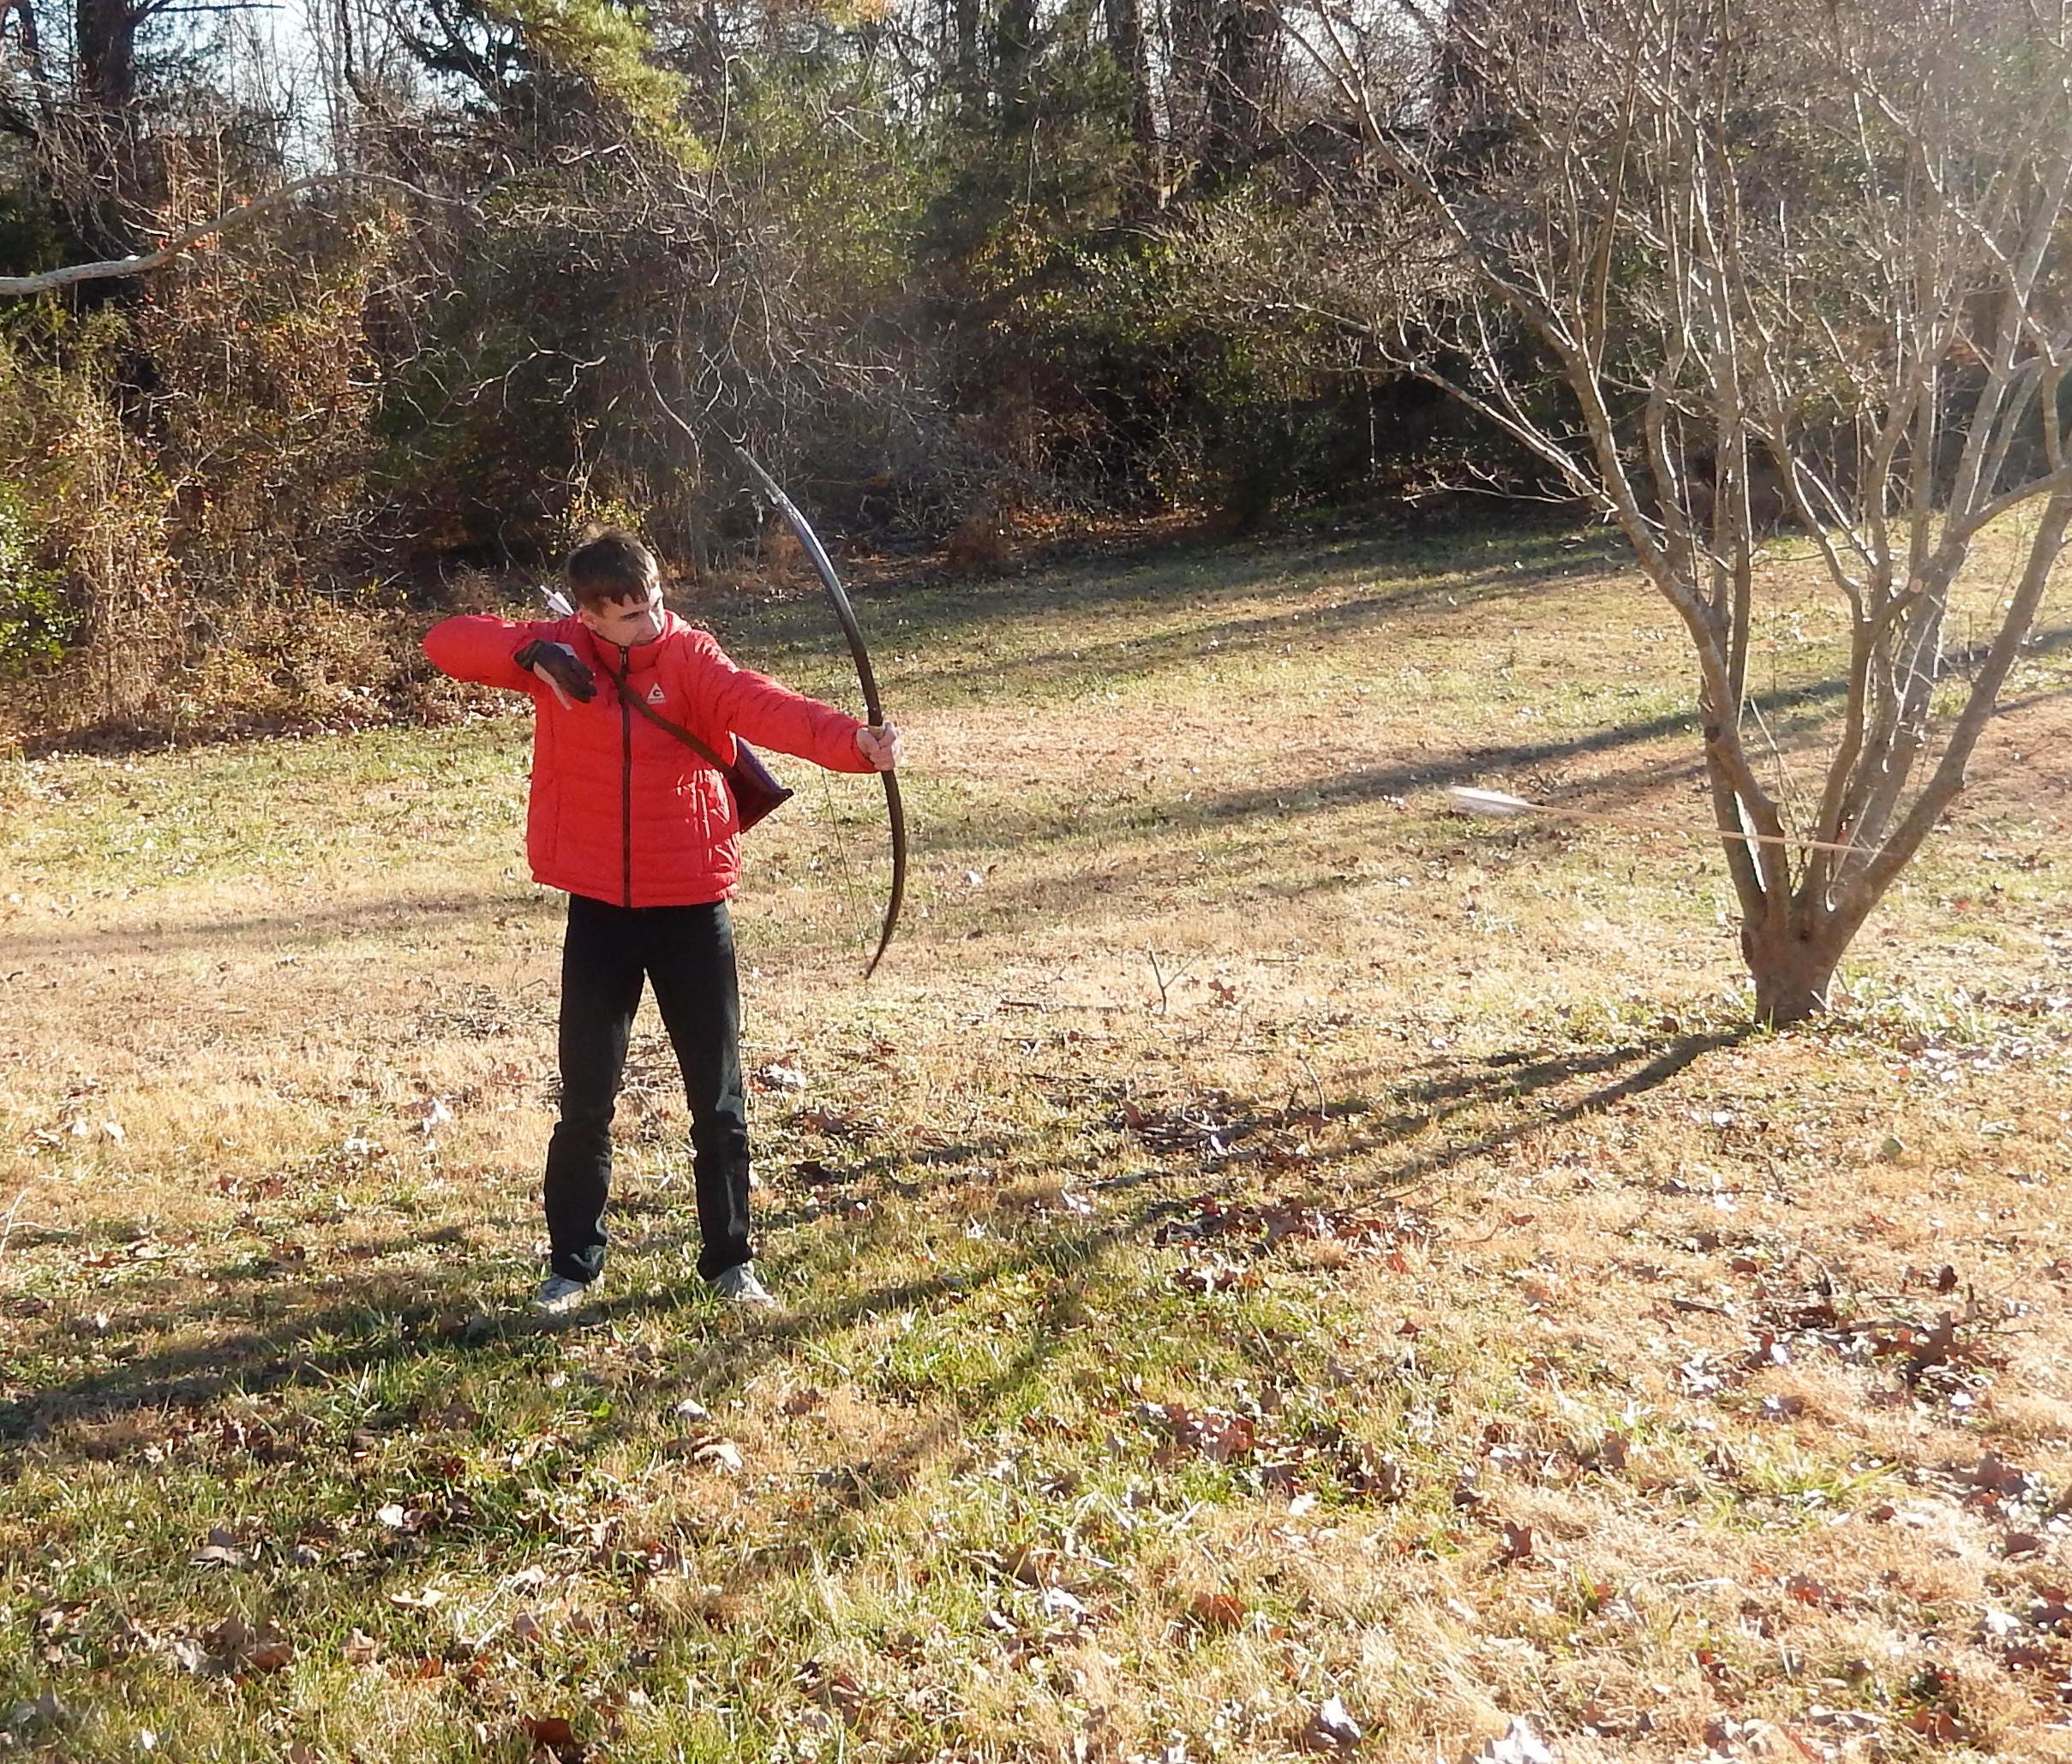
I wish I had known about these bows when my kids were coming up. They are as efficient as the recurve bows I spent a bunch on for my wee-ones, but are way more fun to shoot. Here’s a picture of a fine young fellow braving 10 deg temperatures to fling some arrows for like 4 hours Christmas morning…
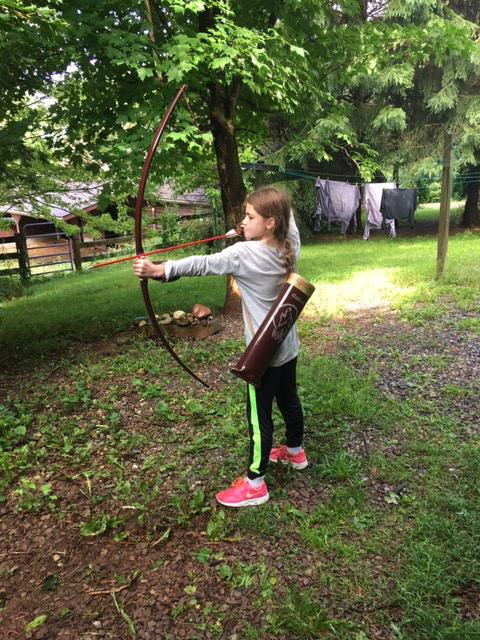
And here’s a picture of a young lady getting to know her tack:
When I hand a child (eager to become an archer) one of these bows, they grab them from me instinctively. There is no doubt in their mind how this thing works. It’s magic. Every time I see this same reaction, I know the longbow must be burned into our genes. We grasp for the history of our glorious weapon. 5000 years? 8000 years? Tip of the iceberg I say. Try 400,000 years. I am sure our brother Neanderthals (with whom we share quite a bit of DNA) knew the bow. They roamed our world for many ages before we came along, and they ate a LOT of meat.
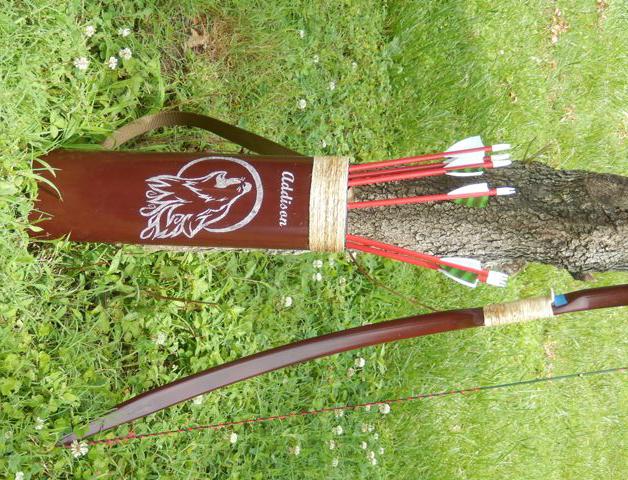
Here’s the kit she got:
And here’s a quiver that went to another upstanding young lady:

I share these pictures with you in the hopes that you might find this idea of giving a complete outfit to a young person appealing. Two bows can be made from one 10 foot piece of 3/4″ PVC. Five Quivers can be made from one 10 foot piece of 4″ PVC drain pipe. I find that a bow like this works for kids ages 10 and up.
The beauty of a PVC bow is that it is cheap and nearly indestructible. A serviceable bow can be made in an hour or less if you forgo the paint, arrow rest, and handle wrap. That said, dressing a bow up sure adds to the sparkle in that young persons eye. And after all is said and done, is there anything better in this world than a happy kid?
-
Thanks, Steve. This looks amazing! I’ll bet those kids were so excited.
You have my permission to post anything we might need for this build along, as well as the quiver build along too. I would suggest you take high resolution images (we can scale them down for web) in case Don wants to use either of these in the magazine. I know I’d like to run them as articles on the web site.
Can’t wait to see what you put together.
Robin (Webmom)
-
Copy that. All the pictures I took were high resolution. I cropped them and reduced resolution for the forum. I can provide original pictures as required.
Will you be able to attach a PDF to this thread like we did with the sanding block thread?
-
Yes, just email me the pdf and tell me where you want it in the build-along.
-
-
-
Steve, it looks great and I can’t wait to see the how to. I bet lots of folks will be interested.
Jim
-
Stephen
Those pvcs bows and quivers look great- I wish I had one when I was a kid.!
Scout
-
Before I get started, I need to acknowledge and thank Nicholas Tomihama. Nick has a YouTube channel called “Backyard Bowyer” which details how he makes PVC bows. If you look at his channel, you will need to go back a few years to see bow work as his newer efforts have moved into other areas. I bought his book titled Simple PVC Pipe Bows from which I learned most of the basics. If you want to round out your understanding of making these bows, I encourage you to look at his work.
-
So let’s get organized…
It’s always fun to jump into things and paint ourselves into the proverbial corner. But once we are stuck there, it doesn’t seem so much fun anymore. Everything we do requires some sort of investment of materials and time commitment. Awareness of these things, before we begin, allows us a greater chance for success. So let’s see what we need…
The jigs you will see in this build-along are made from simple pine boards available at your local wood yard. High quality wood is not required, but selecting straight and true pieces will help you build the best jigs.
In order to get the most rigid jig I could make, I glued 3/4 boards together to make the jig. I expect that if you simply make it from a 2X4, it will suffice.
The pipe used to make the bow is 3/4″ schedule 40 PVC. Using a thinner walled pipe will result in a weaker bow. I encourage you to use schedule 40 pipe.
The first thing you will need to do is gather materials and tools.
For jigs you will need a taper jig, a heating trough, a flattening board, and handle forms. As I mentioned earlier, I will add a PDF to this build-along with plans for making this stuff. A couple hours should be plenty to slap it together.
For tooling, you will need a heat gun, a glue gun, a propane torch, and a few clamps, and some gloves (pipe gets hot!). This does not include the tools you will need to make the jigs, such as a handsaw, screw driver, etc. Here is a picture of the $30.00 heat gun I use:

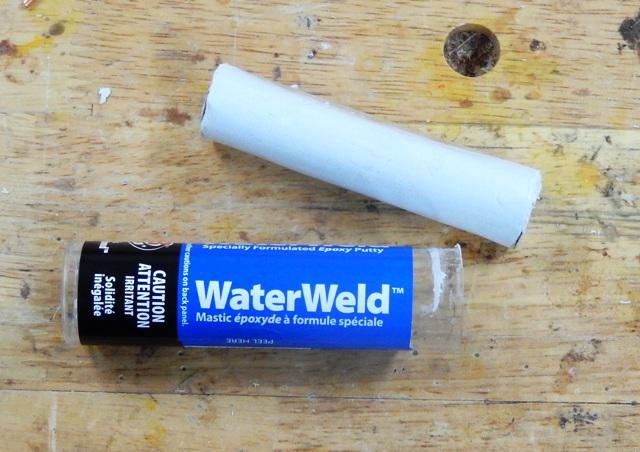
For materials, you will need 3/4″ schedule 40 PVC pipe, twine, PVC epoxy, tape, spray paint, PVC purple primer (optional) and string material. I use B50 to make the strings. Here is a picture of the PVC epoxy I use. It is made by JB Weld and is available at places like home depot and lowes:
Please note, I will give the specifications for the string but I won’t go into detail as to the building of a string. There is plenty of information available for string building out there already.
All right, with all that said, let’s get to work!
-
Step 1- Cut your pipe to length. I cut my pipe to 58 inches (The taper jig is sized for this length of bow. If you change the bow length, you will need to make adjustments to your taper jig). Doing so yields a bow of approximately 56 inches end-to-end. Maybe a little longer. After making a few bows I discovered that as the PVC is heated, it shrinks. I expect this is because the pipe is drawn during manufacture and cools under stress. When you heat the pipe, it will shrink as the stress is relieved. You will also notice that as you heat the pipe it will wiggle around a bit. Once the pipe is fully heated and soft, it should lay straight in the heating trough.
Step 2- Mark the handle area. I put the handle in the middle of the bow, and I make it 4 inches long. I mark all the way around the pipe as you will be rotating it in the heating trough and need to know where to stop with the heat gun.

Note – We will form the bow one limb at a time.
Step 3- To heat the pipe, lay it in the heating trough and slowly rotate it as you move the heat gun from the tip to the handle. It should take about 5 minutes to heat the pipe up. From time to time, press on the pipe to determine if it has become soft. Once the pipe is completely soft, I continue to heat it for another minute or so.
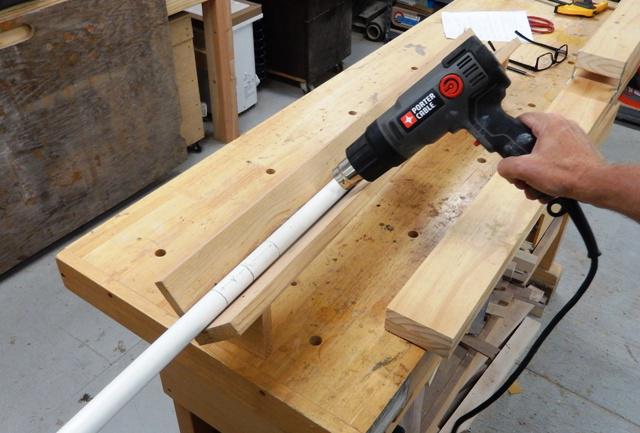
Note – Don’t worry if the pipe doesn’t form right the first time you try it. Just heat it up and try again.
Here is where the fun starts!
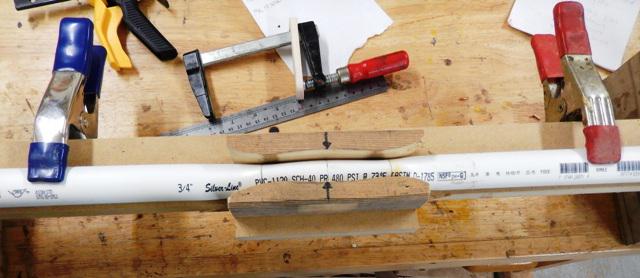
Step 4- Raise the taper arm of the jig up so that you can slide the pipe between the T-brackets and up to the end of the jig. The taper arm hinge point is not centered in the wood. This provides a “cam action” which allows the full size pipe to be placed under the taper arm, and then as the taper arm is lowered, the pipe is compressed into the desired taper. As the taper arm is lowered, it will tend to pull the pipe with it. With this in mind, I usually extend the pipe 1/4 inch past the end of the jig so that when the taper arm is all the way down, the pipe is even with the end of the jig.
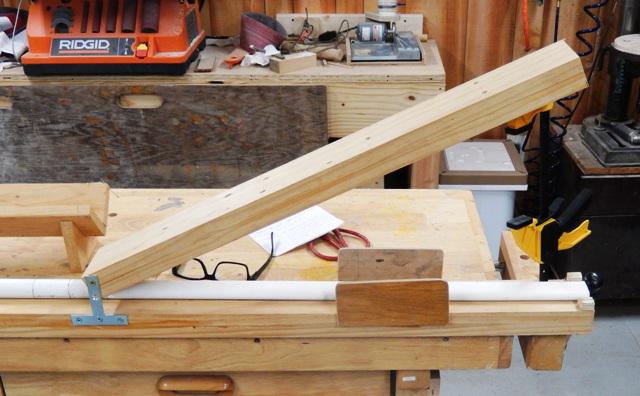
Step 5- Make sure the pipe is laying straight on the taper jig. Press the taper arm down till it stops and clamp. You will have 30 seconds or so before the pipe starts to stiffen, so don’t take too long to get the pipe laying straight. If it gets stiff, no worries, just heat it up again. Leave the clamp on the jig for at least 5 minutes before unclamping.
-
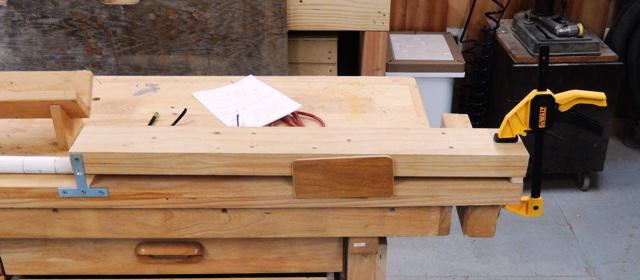
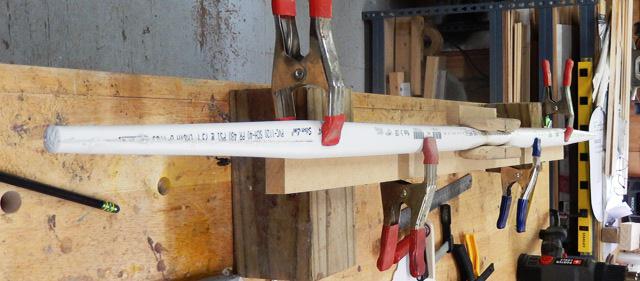
Step 6- Repeat for the other limb. When the first limb was formed, there was no orientation to the bow yet. After you heat up the other side, make sure the already formed limb is belly up.
Once you have formed both limb tapers, you will have something that is beginning to look like a bow. Feel free to flex it and see how it bends. Look down the bow and see how straight it is, tip to tip. It will likely be a little bendy through the handle. That’s ok, it will get fixed later. At this point, we want to keep the limbs as straight as possible, even if they don’t align with each other.
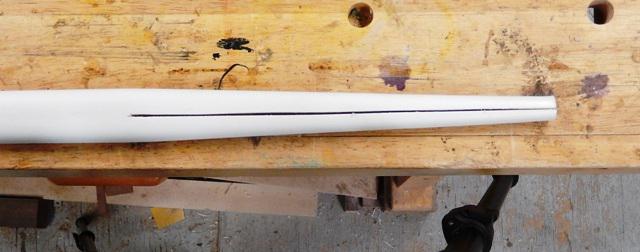
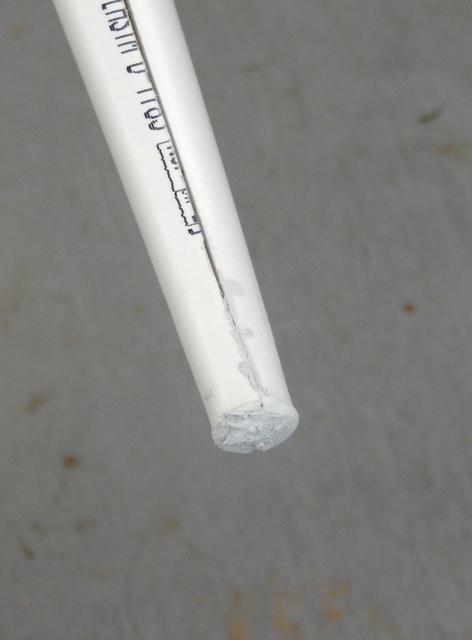
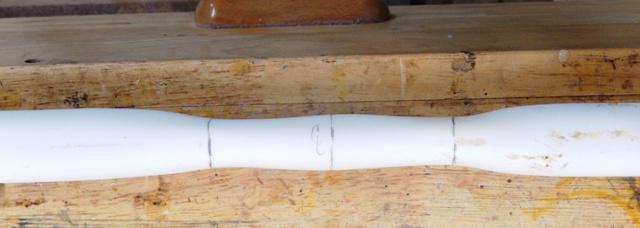
Step 6- Cut the taper wedge out of the limb. What we’re going to do now is finish out the tips of the bow by tapering the limb side to side. In the following picture, I have marked a triangular wedge that will get cut out. The wedge point is 10 inches deep into the bow and the base of the wedge is marked about 1/4 inch from each side.

Generally I use my bandsaw to cut the wedge out. I have cut plenty with a handsaw too. When I make bows with kids, I let them use the handsaw. It does just as fine a job, if not better. The width of the handsaw helps to keep the cuts straight. A hacksaw will not work as the frame of the saw is not as deep as the cut and will hang up.
Once the wedge has been cut, I clean the edges of the cut with a knife to remove any debris that’s holding on.
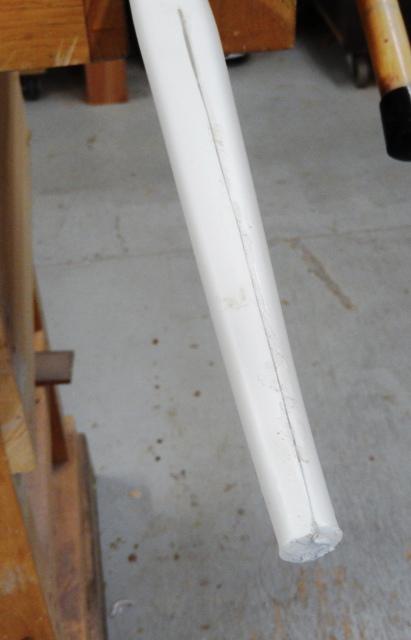
Step 7- Close the wedge. Using our trusty heat gun, we will heat the area around the point of the wedge just enough to allow us to close the wedge and form a nice taper. These heat guns are designed to sit on their ends and point straight up. Set your heat gun like so, so that you can work on your bow limb with both hands. Heat the sides a little more than the back and belly. It takes a while for the heat to transfer through the PVC, so go slow. Apply a little heat, see if you can close the wedge, a little more heat, repeat, wait for the heat to transfer deep into the PVC, try again.
As the wedge closes, look down the limb and make sure you keep the taper straight with the limb. The seam in the taper should run straight down the middle of the limb as you look down it. Hold it closed till the plastic sets. It should look like this when finished:
Now close the wedge on the other limb.
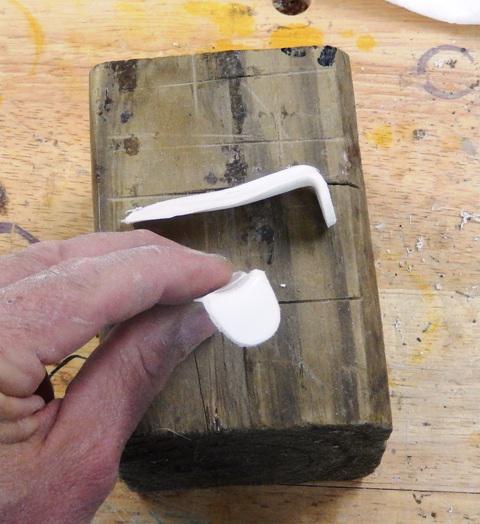
Step 8- Fill the tips with Epoxy. The tips of the limbs are hollow. You can leave them this way, but I prefer to close them up so that when I sand the tips everything looks solid. To do this mix up a bit of the PVC epoxy putty, spread the tip wedge open a bit, and fill both sides of the tip for about 1 inch with the putty. Press the tip together until epoxy squeezes out the end and sides. Do this for both tips.
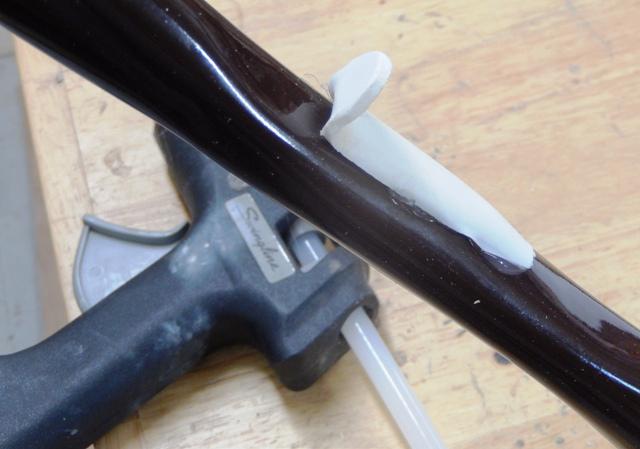
Step 9- Braze the seam with hot glue. Open the seam a little bit so that you can inject hot glue into the entire seam, both back and belly. Once the seam is filled with glue, press the sides together until it set well. You can see the glue spilling over the seam in the following picture:

Step 10- Trim the hot glue. I have used a razor to trim the hot glue in the past. This time, after trimming the hot glue with a razor and taking the pictures, I got onto it with my cabinet scraper. I found the scraper did a really nice job of evening things up.
It’s almost impossible to get perfect alignment, side to side, between the edges of the seam as you glue the taper together. The cabinet scraper really helped to smooth these edges together.
I never know exactly how it’s going to go when I make a bow, PVC or otherwise. The one thing I can count on, though, is that I will encounter something new, or figure out a little trick. I always look forward to finding out what will come up when I make a bow. In this case, it was applying the cabinet scraper to these limb taper seams. Unfortunately, I didn’t think to take a picture after using the scraper.
At this point, I usually take a break. The PVC epoxy needs at least an hour to cure. If I am in no rush, I usually don’t come back to it till the next day.
-
Now things are really going to start taking shape!
The next thing I like to do is finish out the tips and cut the string nocks in. Before I do that though, I’ll pick the bow up and give it a look see. I’ll look down the bow and see what the limbs are looking like, how the handle area is looking, how the whole bow lines up. I’m not ready to address those areas yet, but I like to know what’s ahead of me, so I can mull it over if needed. Once I give the whole bow a look over, I’ll get to work on the tips.
Note – I know I messed up my step count a ways back, but I’m just going to keep counting along. Actual numbers aren’t that important anyway.
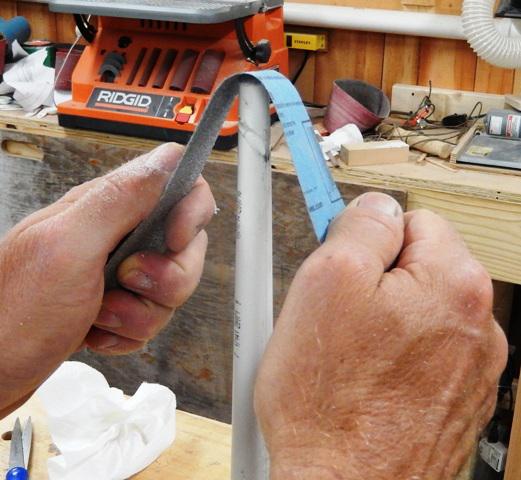
Step 11- Round out the tip. The tip of the bow is solid now, owing to the epoxy putty we packed it with. This means we are free to shape the tip however we like. I usually just try for a well rounded look. I place the bow in my bench vice and start sanding the tip with 60 grit paper. I’ll finish with some 150 grit paper and never go any finer than that. I sand all the way around the tip bringing all the lines together. It takes just a minute or two:
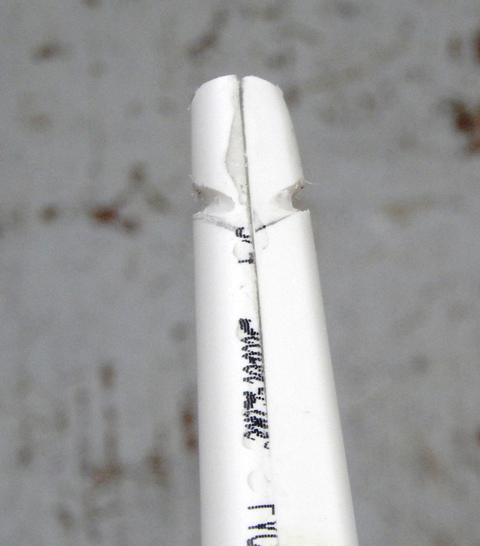
Step 12- Cut the string nocks in. Start by marking a line across the tip about 3/4″ from the end. Continue this line around the sides of the limb at a 45° angle. I use my tri-square to mark the sides of the limb. I will then look at the belly and free hand the marks around on it.
Once I am satisfied with the marks, I will take my 5/32 chainsaw file and cut the string nocks. I cut the nocks on the tip side of the line. It makes the job easier to have a vice into which you can clamp the bow. If you don’t, maybe the future owner of the bow can lend a hand. That said, I have cut many nocks without the help of either.

Once the nock is cut into the bow, I like to fit a string to it and make sure it lays nicely in it. You can give the string a tug and see how the limb bends and how the nock works.

We are not yet ready to string the bow. We still need to form the handle. This step will allow us to not only form the handle, but align the limbs as well. There are a couple ways to get the handle made. Each has its merits, I have done it both ways and am not yet sure which way I like best.
The first way is to simply heat the handle area up and form the grip like a sculptor would, with our hands. The advantages of this method include such things as you can make the grip a bit more bulbus, you can make sure everything is aligned as you go, and it doesn’t require any jigs.
The other way is to have a set of jigs that allow you to squeeze the handle into a preformed shape. The advantages of this method include such things as getting the same grip bow after bow and not needing to handle the hot PVC with your hands.
Step 13- Form the grip. However you choose to make the grip, I find having a flattening board helps to get things lined up correctly. The idea is to clamp the bow to a flat board with a straight edge. Clamp one limb to the board nice and straight, and then work the other limb to the edge and clamp it as well.
Once the handle is heated up, this clamping setup will assure the back of the bow is flat, and that the limbs line up side-to-side. The heated handle becomes soft and allows the limbs to enter a straight alignment without any stress between them.
Heat the handle are and about 2 inches past on each side. Heat the sides and belly of the handle, don’t worry about the back, which is against the board. Heat the PVC till it gets flexible, but it doesn’t have to be so hot as when we were making the limbs. We don’t want to lose too much of the taper in the limbs. As the pipe gets hot, it returns to its round shape. So just try to concentrate the heat in the area we will be shaping.
In the following picture you can see how I identified the handle forms with an arrow so I always align them the same way.
In the following picture you can see how the bow is aligned on the flattening board to make is straight and true.
And here is how the finished handle will look.
The next steps will involve putting a string on the bow to check our work…
-
For those of you who haven’t tried it, making a bow string is one of the easiest skills to learn in support of our archery hobbies. Aside from being pretty easy, it’s also satisfying and economical. A spool of B50 costs less than 10 dollars, a string making jig can be made or purchased for $25.00. After making 3 or 4 strings, you’ve repaid your investment and still have enough material to make another dozen strings.
With that said, here are the specifications for the strings I put on these bows:
· 12 strand B-50 (2 bundles of 6 strands)
· 0.018″ Diameter Nylon serving
· 3″ upper loop (Circumference)
· 2.5″ lower loop (Circumference)
· 55 Inch long
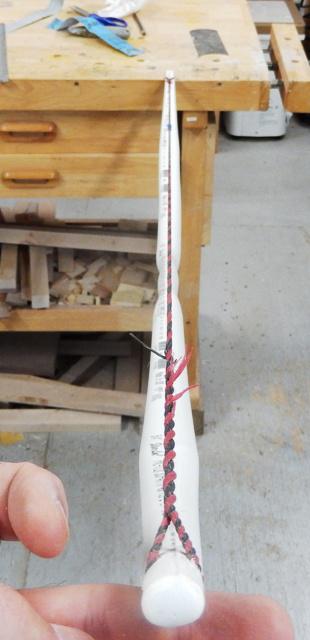
I buy kids arrow from 3Rivers to complete these outfits. I find that the 12 strands of B-50 wrapped with the 0.018″ nylon serving fits the arrow nocks well.
Step 14- String the bow. Once you have checked the bow for straightness and acquired a string, it’s time to put the two together. I like to keep the brace height of these bows (as measured from the belly side) to about 5 inches. So put the string on the bow, and check the brace height. Twist the string tighter, or untwist it a bit, to get close to 5 inches. Look down the bow and see how straight it is.
Perfection is not required. That said, a little fooling around with the bow can bring it in line if you find that it appears a bit twisted. You can put the bow back on the flattening board and go through the heating process at the handle, or you can simply heat the handle up a bit and adjust it by hand. Either way works.
Occasionally, you will find a bend mid-limb. This will have to be adjusted by hand. Gently heat the area up, make an adjustment, cool, restring, check again. Repeat as necessary.
Once you get it right, it should look something like this:
While you have the strung bow in hand, look it over and see if you can identify what will be the top limb. I just look to see if one limb is a bit weaker than the other by checking the distance from the string to one end of the handle, vs. the same measurement on the other end of the handle. Whichever distance is greater usually indicates the top limb.
Once you’ve identified the top limb, pull the bow. How does it feel? Turn the bow over and repeat. Any difference?
Once the bow has been painted, we’ll set about adding an arrow rest and handle wrap. We will string the bow again at that time to confirm the upper limb.
Step 15- Paint the bow. Does the bow need to be painted? Nope. But it sure adds to its mojo. I used to simply sand the bow with 150 grit paper to get rid of the gloss and then paint them. After a few months of hard use, they get pretty banged up. Paint doesn’t stick well to PVC. Eventually, I found that if I primed the bow with purple PVC primer and then painted the bow right away, the paint really bonded well.
Purple PVC primer is nasty stuff, so you will have to decide for yourself if it is worth the risks to use it. I wear gloves and use a paper towel to wipe then entire bow down with the primer. I work outside. Here’s what the bow looks like after it has been primed:
I found that it takes much less paint for a primed bow. One coat with a couple touch ups for missed spots is plenty. Before I started priming, I had to spray several coats to get the same quality finish.
I usually give the bows a couple days to cure after painting. This allows the paint to harden up enough so it won’t chip from handling. While I wait, I usually take this time to make the arrow rests.
You can of course shoot these bows without arrow rests. But I figure the safety benefits of the rest justify the effort to make it. Of course it limits the handedness of the bow, so you will have to decide if you want an arrow rest.
Step 16- Fabricate the arrow rest. The arrow rest is made from the scrap pipe left after cutting 2 bows from the 10 foot piece of pipe. Mark a line 3 inches from the end of the pipe, all the way around. Then Mark a straight line from the end of the pipe down to the line you just marked. Rotate the pipe 90 deg and repeat the same line.

You can make 4 arrow rests from the pipe you just marked. I usually make two and throw the rest away.
It is best to cut the long 3 inch lines first as you will have something to hold onto while doing it. Then cut the arrow rests free from the pipe by cutting the circumferential line.
Now fire up your heat gun and warm one end of the arrow rest so that you can bend it flat. Then round it off and taper the long section.
In the picture you will notice that the shelf is rounded. I round it on a sanding belt, and smooth all the edges with sand paper. You will also notice that the arrow rest has a bit of a bend in the middle. After it has been shaped, I heat the long part of the rest up and hold it against the bow where it will eventually get affixed so that it takes the shape of the bow.
Step 17- Affix arrow rest to the bow. To do this, you must decide where the arrow rest goes. It is best to string the bow and identify the weak limb. You will also need to make your best guess as to the handedness of your young archer (or put a rest on both sides). Once you have determined where you will put the rest, apply a little hot glue to the rest and stick it to the bow. The hot glue just needs to keep the rest in position, It doesn’t have to be a strong bond. In the following steps, we will wrap the handle and so the entire rest will be under the wrap except for the arrow shelf.
The next and final steps will involve adding the grip wrap to the bow.
-
There are as many ways to wrap a grip as there are archers to think of them. That said, I haven’t been too innovative with my PVC bow grips. I just want something that works, looks good, and is cheap. Jute twine fits the bill.
The one thing I don’t like about it, is that the diameter of the twine varies through the spool, which makes the grips a bit uneven. For a few cents more, jute cord can be had that is much more uniform.
The technique I use for serving my strings is the same technique I use for putting on these grips. Here is a video that shows the technique: https://www.youtube.com/watch?v=0hwQiKAWl2k
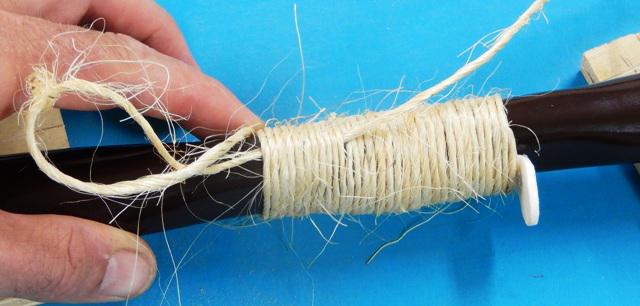
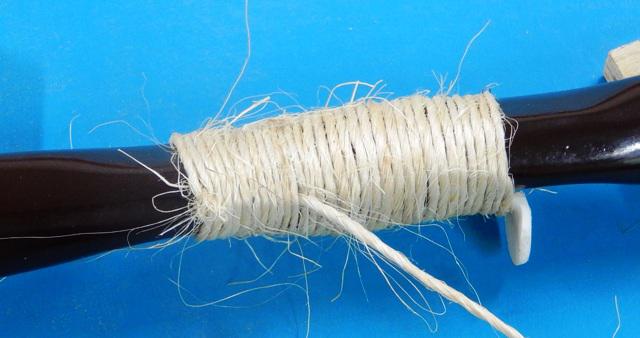
Step 18- Wrap the grip. Tape the end of the twine to the back of the bow.

Then proceed to wrap the twine for about 4 inches down the handle. Cut the twine with about 2 feet extra past the wrap.

Then using the technique mentioned above to serve a string, back the grip off 10 wraps or so, do the serving loop thing, and then pull it tight.
Step 19- Finish the grip. The twine has lots of free fibers hanging off it. The fastest and best way I’ve found to get rid of them is to burn them off with a torch. Be careful not to point the torch at the grip, or any part of the bow. Ease the flame to the side of the grip and burn the fibers off. Touch the bow often to make sure it is not getting too hot.
Once the fibers have been burned off, rub your hand over the grip to raise more fibers. Burn them off. Repeat as necessary.
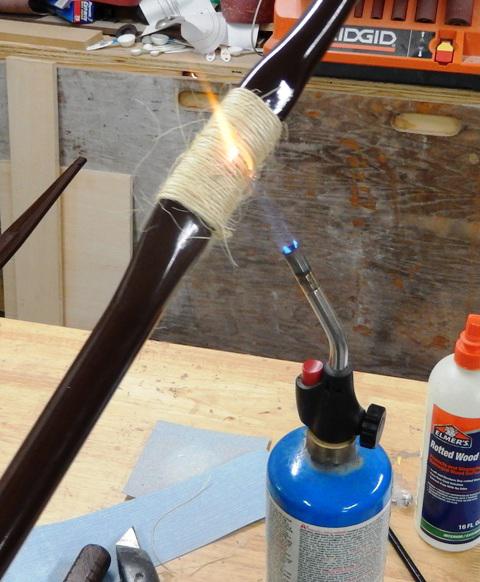
The last thing I do to the grip is to wipe something like tite-bond glue over the entire grip. It will soak in and harden up the grip so that it doesn’t move or give way. After it dries, it disappears.
Here is a picture of one of the two bows I built as I took pictures for this build-along.
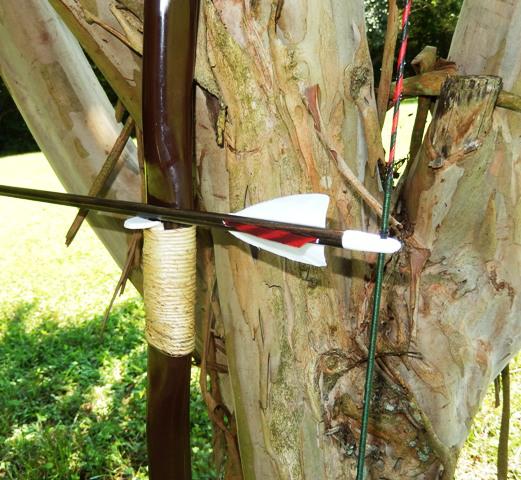
And here are the two bows and quivers I built. I will add this picture to the end of the quiver build along as well to tie the two build-alongs together.

You will see that each set is equipped with arrows, an arm guard, and fingers. I usually buy these from 3Rivers and can provide links to their website if needed. Kids gear like this is very reasonably priced. I expect the cost is subsidized by the company as their way to pay forward.
I buy the small and regular size gloves and keep a couple of each on hand. You never know who’s gonna show up 🙂
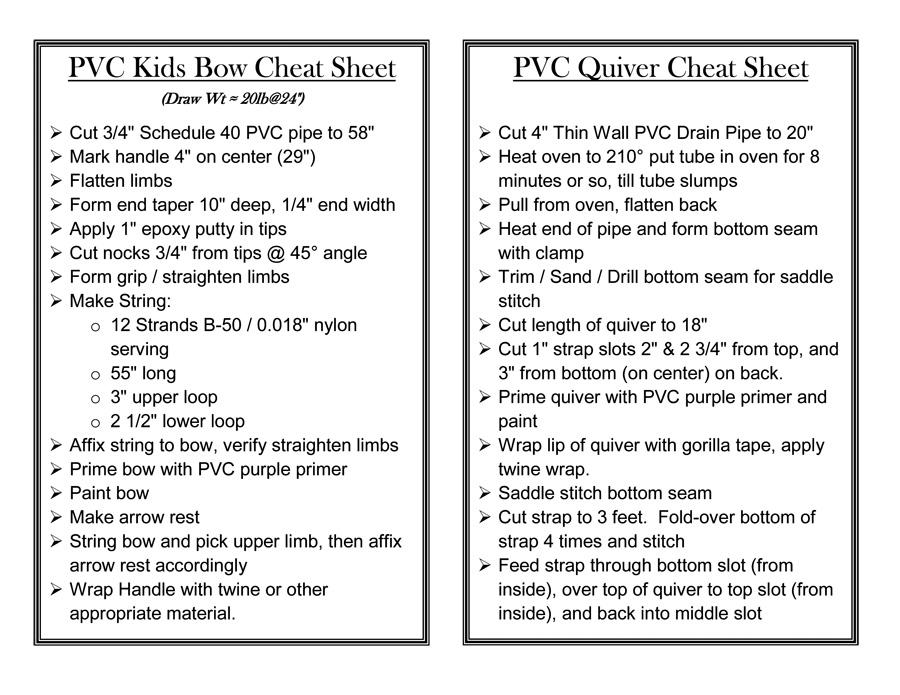
I will send the PDF document to Robin and hopefully when she has time, she will attach it to this thread. This document contains the cheat sheets for both the bow and quiver, as well as the jigs shown in this build-along.
If y’all have any questions, feel free to ask!
-
Steve, thank you very much for an excellent build-along! You have a gift for explaining things clearly and easily, and we appreciate the work you put into this piece. So here are the files:
Full PDF document for download
And each page of the document shown below. (For printing, you’ll have better/clearer text by downloading the full pdf.)


-
I thought I’d add a link to the PVC kids quiver build-along so that these two threads can be connected for easy reference…
oops. I put a link here, but it didn’t work. So I deleted it. I’ll ask Robin to do it.
And thanks for the kind words Robin! I hope some folks will find these build-alongs useful.
-
-
Steve, amazing stuff. Thanks so much for sharing it with everyone!
Jim
-
Your welcome! I hope that if you (or others) make a bow, you will post pictures…
-
-
AuthorPosts
- You must be logged in to reply to this topic.