
It was nearly noon. I was soaked to the bone and hadn’t even seen an elk. Conditions were perfect for hypothermia: pouring rain, windy, and just above freezing. My energy was dropping, and I was beginning to shiver. I quickly set up my tarp. Taking shelter, I reached into my pack and grabbed a small, insulated jar. Popping the top, I stabbed the spoon in and gorged on a generous helping of steaming, calorie rich, home-made Shepherd’s pie. Not a bad pick-me-up for being six miles in and on day eight of the hunt!
I know after a few days of freeze-dried meals stomachs can begin to rebel, toilet logs become like old friends, and tents become more difficult to share. Who knows what they cram into those little silver freeze-dried packages? Is it glue? Is it drain cleaner? As with most aspects of hunting, the more I can do myself, the better I feel (in this case, both intestinally and otherwise). Thus, eating lightweight and healthy food I prepared myself can add an element of satisfaction and pride to my hunts, complemented by a little relief.
There are many benefits to making your own trail grub. The most tangible for me is that I actually enjoy the process. I find daydreaming about my future adventures while making these meals to be a great and productive way to pass some foul-weather days during our long Canadian winters when temperatures outside may be windy and colder than minus-40.
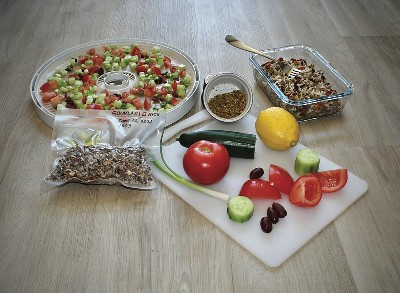
A typical meal: Greek souvlaki, raw, dehydrated, and re-hydrated. The author just added dried, ground venison seasoned with his favorite souvlaki spice recipe to the ingredients in the photo. Note the skinned cucumber and the tomato with the pulp removed.
Doing it yourself also gives you the freedom to observe any dietary restrictions and to control the volume and quality of your food. If you eat a lot, pack large meals. There is no need to feel unsatisfied after eating again. Be it low sodium, avoiding heartburn, an allergy, a hatred for a specific ingredient, or the ever popular (at least in this crowd) vegan diet, you can do whatever turns your crank. And in these crazy times, I have also found myself looking at my prepared meals and feeling a little comfort knowing that I have a couple of weeks’ worth of food tucked away for an unexpected event.
Now be advised, I do not claim to be a food safety expert. What I present about preparing dehydrated meals is simply what works for me, much of which has been learned through trial and error. I strongly recommend that you read and follow the owner’s manual for your dehydrator regarding the categories of items you will be drying. In regard to food safety, each of us must do our own research and decide our individual tolerance for risk. You should always adhere to food handling best practices, cook meats you intend to dry to well-done, and use your own judgement. Common sense should prevail. Maybe it isn’t such a great idea to see how those expired scallops dehydrate! Getting sick out on the land is no joke. And above all, if in doubt, do a little research. Or just don’t do it. That now said, I trust this primer will be enough to point you down the right track.
A dehydrator is the only truly necessary piece of equipment required to get started. I recommend purchasing a dehydrator with a variable temperature setting. This way the unit can produce quality dried meals, various snacks, and jerky. I like a unit with both racks and sheets so you can process chunky items, liquids, and small pieces that would slip through the racks as they shrink up.
A vacuum sealer, though not a necessity, is handy for compressing meals into the smallest possible space. It is also great for increasing the time your meals will keep, especially in humid climates. Choose heavy-duty commercial vac bags, as even a dried grain of rice can be enough to poke holes in household-grade bags. I also prefer sous vide rated bags, as I can simply pour my boiling water straight in and rehydrate in the bag (but beware of burns from hot contents in plastic bags).
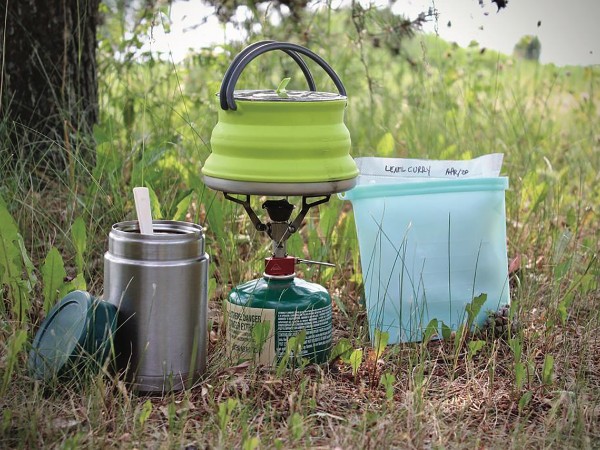
On trips where weight is less of an issue, I will bring an insulated food jar. I pre-heat my container, dump in my dry meal, and add my boiling water when I make my breakfast. I throw the sealed jar in my pack and have a hot and ready lunch come mid-day; no stove required. On hunts where every ounce matters, I use a re-useable food-safe silicone pouch. I take only one, and use it to house the vac bag, both when I rehydrate the food and while I eat. As the food is never in direct contact with the silicone pouch, clean-up is as easy as properly disposing of the vac bag.
There are two basic approaches to dehydrating meals. You can dehydrate the individual components of a meal and add them together once dry, or you can cook a full meal and dehydrate afterwards. I do a little of both. Choices like chilis, curries, risottos and the like all work well for one pot meals. Simply prepare your favorite recipe using the tips below and dehydrate. Pastas with hearty sauces, salads, Shepherd’s pie, Thai food, and mashed potatoes with fried mushrooms and onions are all ideas of component meals. Simply make and dehydrate the components of your entrée and add it to dried pre-cooked rice, powdered mashed potatoes, or dried pre-cooked pasta to round out the meal. Remember to experiment, as variety is the spice of life.
Not all ingredients rehydrate well, and still others require special preparation to aid in the process. Here are a few tips which should make finding success a little easier.
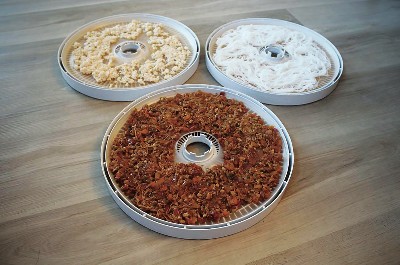
Above—Ingredients for homemade Pad Thai with canned chicken. Below—Dehydrated ingredients of the Pad Thai ready for packaging.
General Dehydrating Tips
Spread out foods thinly and evenly on sheets. It can pay to have a little space between individual pieces.
Slice items like vegetables thinly or grate. Thin pieces dehydrate and rehydrate better than large chunks.
Spread one-pot dishes out as thinly as possible and, once dry, smash them up into small bits to aid in rehydration and sealing.
Use the blender to break up or powder sauces that are not sticky once dried.
Avoid sugary sauces. They turn gummy when dried and do not rehydrate well.
Fat and Dairy Spoil First
Leave out the butter or oil from one-pot recipes and add it when rehydrating. If pan frying, choose a non-stick pan and fry without oil or fat.
Insert small, separately vac-sealed packets of oil with your individual meals to add when rehydrating.
Consider commercially prepared pre-cooked and sealed bacon or other fatty items with a high risk of spoilage.
Add powdered milk after dehydration rather than dehydrating milk rich recipes. (I have added stable cheeses like parmesan with okay results, but most cheeses are best added when rehydrating or in powdered form.)
Meats
Use lean ground meat instead of chunks. Mix ½ cup of quick oats into each pound of raw meat before cooking to help with rehydrating. Once cooked, rinse under clean running water to remove fats.
Canned meats can be used more safely in place of some fresh meats. Rinse first and break up into fine pieces.
Fruits and Vegetables and Starches
Items like apples and bananas turn brown when dried. Shake them in a little lemon juice to add a nice flavor and prevent oxidization.
Watery parts like the pulp of tomatoes are best removed before dehydrating.
Tough skins on vegetables are best removed before drying.
Thoroughly rinse starchy items like pastas or rice with cold, clean water after cooking to reduce clumping once dried.
Storage
Keep meals in the freezer to ensure your food will be fresher and safer than if stored on the shelf. (I pull my meals out of the freezer when I pack for my trip and have had no trouble with most meals after 10 or 14 days in my pack.)
Date your meals and label the contents. Note how much water you expect to need and if you need to add any oil, cheese, or butter.
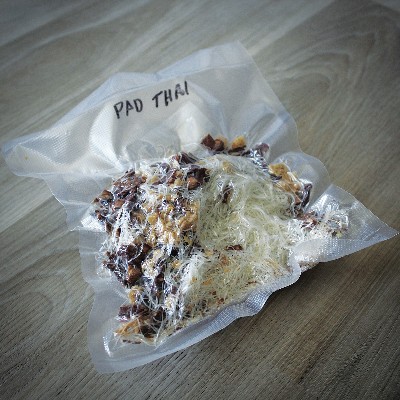
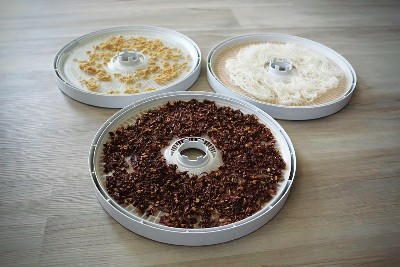
The author’s dehydrated Pad Thai meal. An inexpensive sealer, such as a Food Saver, works perfectly to seal out air, and keep foods longer.
Don’t forget to rotate through your meals, eating the oldest first. This way you will always have fresh and safe meals ready to go.
You can be a fussy foodie and aim for precision by weighing your meals before and after you dehydrate, calculating roughly the water you need to add by subtracting the dried weight from the pre-dehydrated weight and multiplying by two-thirds.
All that’s left is to add the boiling water and let stand at least 20 minutes. The water ratios and wait times may need to be adjusted somewhat for different recipes, but the food will never absorb quite as much water as it lost while dehydrating.
Although this brief primer barely scratches the surface, it should give you a solid footing on which to begin dehydrating your own food. I hope you find that making your own dried meals adds a little extra satisfaction to both your gloomy off-season days and your time in the field.
Bon Appetit!


Great article! I cant wait to try to dehydrate some food for this years hunting and camping. Question, what is the insulated jar and the green pot in the picture at the start of the article? Looks like a nice set up! Thanks
Hi Austin,
The “green pot” is a “Sea to Summit X-Pot Kettle” in 1.3L size. Its perfect for what I need, collapsible, durable, and light weight. The stove is a “MSR Pocket Rocket 2”. The food jar is nothing special. It’s the big-box-store “Stanley” from my work lunchbox. It’s handy but a little heavier, so I only carry it when ounces aren’t critical. I found the silicone pouches online.
Thanks for the kind comments. I hope making your own meals enhances your time outdoors.