

Introducing children to archery can be a fun and rewarding experience. You can also get them involved in target construction prior to actual shooting. I recently enjoyed an opportunity to get youngsters building targets and shooting arrows on the big island of Hawaii.
Compton Traditional Bowhunters generously sponsored shooting equipment for the kids. The Bear Archery fiberglass bows they supplied were excellent for introductory lessons. Wooden arrows crafted at The Nocking Point were a perfect match for the bows, and proved to be durable and functional in addition to offering visual appeal. The young ladies demonstrated a strong preference for the pink fletch.
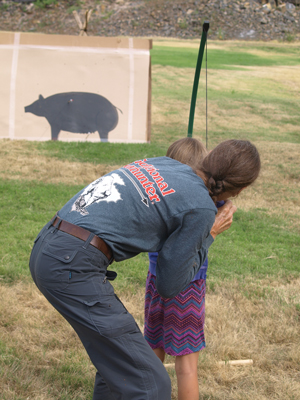
Help new archers aim by sighting over their shoulder. Note tripod extending above target, and safe clear background.
We constructed fun and affordable targets from cardboard. My favorites are large enough to act as a backstop in addition to having ample area to paint a target face. Several large sheets can be laminated together utilizing water-based wood glue such as Elmer’s or Titebond. A good source for cardboard is a building supply store. They often use a uniquely sturdy cardboard product for protecting or separating stacks of plywood or laminate sheets. They are the size of a sheet of plywood and make a great target face, as they are a bit smoother and stiffer than standard cardboard. Some are just very stiff compressed cardboard, while others actually have a very thin layer of wood fiber in the center. Best of all, they are free. Laminate three or four sheets of regular cardboard to the back of a stiff sheet, and you have a very sturdy target.
Find a flat work surface, such as the floor or a deck, and lay out the first sheet. One bottle of glue will do the whole job. Simply run a fat bead around the perimeter between six inches and a foot from the edge, and then apply an X of glue across the middle. It’s not rocket science, and children can easily accomplish this with supervision. Repeat with each layer of cardboard, stacking them and completing the stack with a firm finish sheet, if one is available. Pile a few heavy items across the top—books, bricks, boards, or rocks, what ever you find convenient—and allow the glue to dry overnight. You can then run a couple of wraps of tape around the target near the edge for reinforcement. When I have it handy I sometimes add a coat of Thompson’s Water Seal to increase longevity, but this is certainly not necessary.
Once the cardboard is prepared, the fun begins as you put your creative energy to work and draw a target face. Animals commonly hunted in your area are a good choice. Pigs are easy to draw and make a big, easy to hit target. Draw the outline using a bold Sharpie marker, and then get the kids involved painting and filling in the body. If you have unused leftover paint sitting around, this is a good time to use it up. Putting the paint in a shallow container and instructing the painters not to dip their brushes too deeply will help prevent a mess. I find that kids enjoy the pride of crafting a target almost as much as shooting arrows.
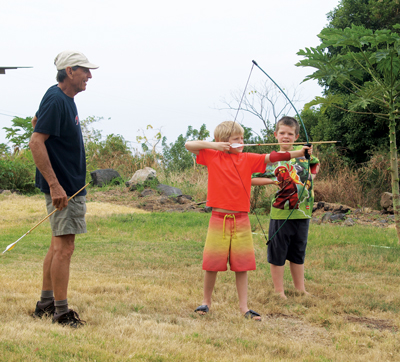
The author’s husband, Sterling, helping out with these two future hog hunters. Kadin had fantastic form.
Once the paint dries, a sturdy tripod to lean the target against is the only thing needed to put you in business. You can use almost any wood for the tripod. Coffee trees cut when pruning a coffee farm provided good legs for a tripod in Hawaii, where bamboo is also a good choice because it is sturdy but lightweight when dry. When making targets in Florida and Alabama, I frequently used river cane. Two by two lumber would work. Your choice of tripod frame material simply needs to be strong and long enough to properly support the target. Two legs slightly longer than the target is high—about five feet—are tied to one leg a foot or two longer, which projects back to provide support.
Simply lay the three sticks together, and then use a sturdy rope to lash securely around them a foot from the top. Pull the bottom of the long stick away from the other two, and then raise the top of the sticks where they are tied together. It will look like tripod for a teepee. Spread the bottom of the two shorter sticks and your tripod should stand up nicely. You want the short sticks near vertical with the longer one projecting behind, providing support to the back.
Alternately, a couple of metal rods driven into the ground will work. Rebar for reinforcing concrete works well. Since the ground there in Hawaii was primarily lava rock, the tripod seemed an easy alternative to attempting to penetrate the rocky terrain. The tripod also makes this target very mobile. Be absolutely certain to position the target in a safe place, where pass-through shots or misses will not damage anything or pose a safety risk.
One great thing about these targets, aside from their appealing large size, is that kids’ arrows will stick readily into the cardboard. Their arrows often bounce out from hard foam targets, which kids find annoying. These targets also stop arrows from stronger bows, at least until they get really shot out.

Lotus, on the left, took a keen interest in archery after helping paint the hog target.
Kids like to pull their own arrows. It is important to teach the youngsters to grab the arrows close to the target, near the point, when they pull them out. This prevents bending or stressing the shaft, which could occur when it is grabbed near the center or feathered end. Also, teach them to stand beside the arrow rather than behind it in case they pull hard and it suddenly releases, so no one gets bumped with the nock. For safety, you should not allow them to run while carrying the arrows back from the target.
Always take a minute to review the rules. They should know never to shoot until everyone is safely behind them and clear of the target. Start out shooting up close, so they are quickly able to hit the target. For new archers, have them point their finger at the target, then put a bow in their hand and tell them to pretend the arrow is their finger. They will be hitting the target in no time.
If stored out of the rain, this inexpensive target makes a great way to get kids involved in archery. You can start them on the road to making their own affordable archery gear, as well as teaching them the pride of craftsmanship.
After reading through Krista’s article, we decided to give this a try. Kerri and Amanda brought their children to T. J. and Robin’s house, along with paint and large sheets of cardboard. Simple designs were found online and drawn onto the cardboard. Jameson went freeform drawing his own target, and Teagan did not want a unicorn because she didn’t want to shoot at it, so she painted a deer. Jonathan’s is a dinosaur and little Evelyn was covered in paint to match her cute hair bows.
We should have followed Krista’s instructions better because single sheets of cardboard don’t stand up well, and don’t stop arrows from Jameson’s St. Joe River bow. The smaller kids did just fine, after a bit more instruction by T. J. It was a great activity to get the kids (and adults) out of the house, and we really enjoyed our afternoon of making targets and shooting bows.
-

- Kerri and Teagan planning their drawing.
-

- Amanda, Evelyn and Jonathan painting the dinosaur.
-

- Jameson designing his creation.
-
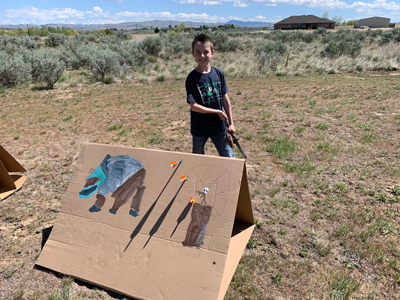
- Jameson (8) and his finished target.
-

- Teagan (6) with her beautiful deer.
-

- Jonathan (4) loves to shoot his bow.
-

- T.J. helping after a minor meltdown.
-

- They are getting the hang of it.
-

- All four beautiful targets.

Leave A Comment