
I once made a comment that finding good shooting advice on the internet was like digging a $20 bill out of a septic tank. It has value, but you’ll dig through a lot of “stuff” to find it. That being said, many years ago a traditional bowhunting Texan named Rusty Craine handed us all a huge bag of cash in the form of a relatively unknown aiming system he dubbed the “Fixed Crawl.”
Fixed crawl is simply a hybrid of gap shooting and something we call “string walking.” We’ve covered gap shooting in two previous installments (Aug/Sep 2018 and Dec/Jan 2019), so please feel free to review them if necessary. Since we’ve never covered string walking, we need to at least give it a cursory explanation.
String walking is an aiming method whereby the archer uses the same anchor and aim (point-on) no matter the distance to the target. Near or far, the archer always anchors the same and aims with their point directly on what they want to hit. To make this possible, they adjust for various distances by changing how far below the nock of the arrow they hold the bowstring. For a 40-yard shot, the archer’s index finger may be up against the arrow nock. But for 30-yards it may be ¼” below the nock. For 20-yards it may be ½” below. By sliding—or “crawling”—down the bowstring, the archer raises the back end of the arrow. This causes the arrow to shoot lower. The distance between the bottom of the arrow nock and the top of the index finger—the dead space along the bowstring—is referred to as “the crawl.”
As cumbersome as this may sound, once mastered it is an extremely accurate aiming method. When Frank Gandy won the 1967 NFAA Outdoor Nationals using string walking, he forever changed the face of barebow archery. Even though string walking is an excellent aiming method for target archery, it has some major issues with respect to bowhunting. Crawling one’s fingers up and down the bowstring changes arrow tune, which can be a major problem when shooting broadheads. In addition, the time it takes to look down at the bowstring and set the crawl can cause an opportunity at an animal to evaporate. These are problems we solve by using what’s called the “fixed crawl.”
Instead of using different crawls for different distances, with the fixed crawl we use one single, or “fixed,” crawl for every distance. No matter the distance to the target, the crawl remains the same. This immediately eliminates the problem of inconsistent tuning. By using something like a brass nock set to mark the crawl, we also eliminate the need to look down at the bowstring during the shot. We can feel the location of the crawl and set our string hand accordingly.
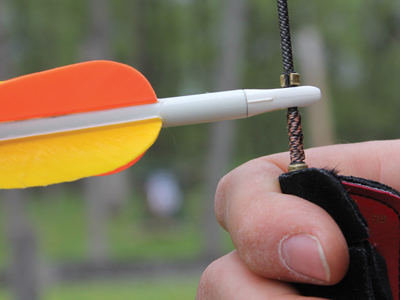
Before going any further, I need to mention the importance of having two nock sets—one above and one below your arrow—anytime you shoot with a crawl. Without a lower nock set, when you release the bowstring and the dead space between the arrow nock and your fingers is taken up, your arrow may be driven slightly down the serving. This can throw off arrow flight tremendously. If you are going to shoot with a crawl, no matter how small, a lower nock set is mandatory.
The great thing about this aiming system is that it allows us to pick whatever point-on distance we like by simply holding the bowstring in a different location. As a result, most bowhunters who use this system choose a point-on distance where they expect their shots to take place. For the sake of discussion, let’s assume you’ve decided on 20 yards.
First, you’ll need to find your crawl for that distance—how far below the nock you need to hold to be able to aim with the tip of your arrow directly on what you want to hit. This is a very simple process. All you’ll need is a backstop, a dot for aiming, and a brass nock set or something similar that can easily be moved up and down the center serving of your bowstring.
Pin your spot to the middle of the backstop, and step back 20 yards. Nock an arrow and crimp your brass nock set about an inch below the nock of your arrow. The brass nock set will mark the crawl we will use as a starting point. Now grasp the bowstring with the top of your finger tab or shooting glove contacting the bottom of the brass nock set that marks your crawl. Draw, anchor as you normally would, aim with the tip of the arrow directly on the aiming dot, and execute your shot. Shoot a group of three or more arrows, and notice where they impact relative to the aiming dot.
If your arrows group below the aiming dot you will need to shorten your crawl by raising your brass nock set. If your arrows impact above the aiming dot, you will need to increase your crawl by lowering your brass nock set. Keep adjusting your crawl one way or the other, up or down, until your arrows impact on or right around the aiming dot. Once that happens, and you’ve shot several groups of arrows to confirm it, you have found your correct crawl. Measure the distance between the bottom of your arrow nock and the bottom of your brass nock set and write down that crawl measurement.
Now that you’ve found your crawl the next thing you need to do is check your arrow flight. If your setup was tuned with your finger touching the arrow, you may find your arrow flight is less than ideal now that you’re shooting with a crawl. Go through your normal tuning procedure until your arrows are flying correctly with your crawl. Most times a small nock point adjustment is all that’s needed.
Now that you’ve set your fixed crawl and tuned for perfect arrow flight, here’s how this aiming system works. If your point-on distance is 20 yards and that’s the distance to the animal you want to shoot, without taking your eyes off the animal gently slide your fingers up the serving until you touch the bottom of your locator. Now grasp the bowstring at that location, anchor, aim with the tip of the arrow directly where you want to hit, and execute your shot.
What if the animal is closer than 20 yards? This is where the gap shooting part of this aiming system comes into play. Because the difference between your point-on distance and the distance to the animal is small, you will only have to hold a little bit below where you want to hit—use a very small gap. With a 20-yard point-on, my gap for a 10-yard shot is only about half the width of my arrow. Since the gap is so small you should be able to use it to a very high level of accuracy. If the shot is farther than your point-on, you will adjust your aim in the opposite direction, slightly higher.
The beauty of this aiming system is that for most bowhunting shots the tip of your arrow will either be very slightly below, on, or very slightly above the spot you want to hit. With conscious aiming systems, the closer you can get the tip of the arrow to that tuft of hair where you want to see your fletching disappear the more accurately you will shoot. In that regard, there is perhaps no simpler conscious aiming system to use than this one, even if the initial setup process is a bit cumbersome.
As great as this aiming system is, it does have its shortcomings. Just as some people experience a slightly louder bow when switching from split-finger to three-under, some find that their bows get louder still when shooting with a crawl. In addition, because you’re shooting with a crawl there will be a slight amount of downward pressure on the arrow upon release (this is why we always use a lower nock set). If you’re shooting off an elevated rest, this won’t matter. But if you’re shooting off the shelf, you will need to use a soft, somewhat plush rug rest to absorb the pressure.
Personally, I don’t mind putting a second set of string silencers on my bow or switching out my rug rest if it means I can hunt with an aiming system that will make most of my shots point-on and let me use a very tiny gap for the rest. I consider that a good trade. But that’s what works for me, and it may or may not work for you. As I’m fond of saying, there is no one perfect aiming system for everyone. So, if you’re looking for ways to improve your accuracy afield, give the fixed crawl a try. It may be just the change you need.


I started using the fixed crawl method a few years ago, and found something very interesting. You don’t have to use gap shooting along with it. Here is how to adjust. My fixed crawl point on distance is set for 20 yards. If the target is 25 yards, I simply put half of my index finger half way onto the fixed crawl mark and shoot point on. At 30 yards, the fixed crawl point is directly between my index and middle finger. At 30 yards the crawl mark is at half my middle finger , etc.. Experiment to find the finger placement yardages for your bow and no more gap shooting. Point on for all distances and the finger placement is easy to find. I have even found that using split finger will give me a point on distance of around 50 yards or so.