Most folks have heard the term “gap shooting,” but some confusion remains about its meaning. In a general sense it refers to using the tip of the arrow as an aiming reference by coming to full draw and visually placing it below what you want to hit. There are many ways to do this, some more complicated than others. After more than 30 years of shooting without sights, the following is what I consider the simplest, most effective version of gap shooting for bowhunting. I call it the Baseline Gap method.
In my last installment, we looked at gap shooting and how to avoid its most common pitfalls. Aiming with the tip of the arrow can be extremely easy and effective if approached correctly. Otherwise, it becomes an exercise in frustration. Please review that article at this time, although I’ll summarize it here as well.
Gap shooting revolves around what’s called the point-on distance. This is the distance at which you can hit a spot by aiming with the tip of your arrow directly on it. At distances closer than point-on, the tip of your arrow at full draw appears below what you’re trying to hit. The vertical space between what you’re trying to hit and the tip of your arrow at full draw is called the gap. This is what we will use as an aiming reference.
There are many ways archers can utilize the gap, but for the purposes of this system we will keep our primary vision on what we want to hit and relegate the tip of our arrow to our peripheral vision. As a bowhunter, it’s probably best to have our main focus on the animal itself. Our eyes can’t focus on two things at once, so the tip of the arrow must appear in our peripheral vision.
Since our peripheral vision deteriorates rapidly the farther we get from our point of focus, we want the tip of the arrow at full draw as close to our line of sight as possible. The smaller we can make our gaps, the easier they are to utilize for aiming. The simplest way to accomplish this is with a three-under hold on the bow string and as high an anchor point as possible.
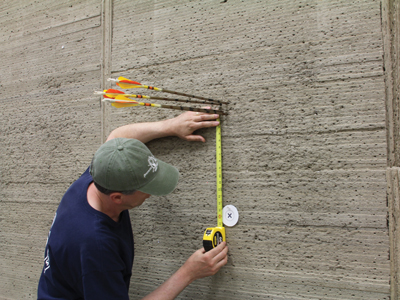
To find your gap at the target, measure the distance between your aiming point and where your arrows impact.
Conventional gap shooting requires you to memorize various gaps for different distances—one gap for ten yards, another for fifteen, twenty, twenty-five and so on. In hunting situations, it’s easy to accidentally pick the wrong gap in the heat of the moment. Baseline Gap solves this problem by reducing the entire aiming system to just two things you’ll need to know: your point-on distance and one single (or “baseline”) gap. This single baseline gap should be your go-to shot, a distance at which you are very comfortable. For the purposes of instruction, we’ll use twenty yards.
Let’s learn how this aiming system works by going through it step by step with one of my favorite hunting setups, my paternal grandfather’s 1966 Root GameMaster recurve. Pulling 56# at my 32” draw length and shooting full length Easton 2216s with 145-grain points, it gives me an arrow velocity right around 170 fps. If I want to use Baseline Gap aiming with this setup, the first thing I need to know is my point-on distance.
To do that, I’ll simply pin a small dot to the middle of a large backstop and shoot by aiming the tip of my arrow directly on the dot. If my arrow hits above the dot, I’ll back up and shoot again. If it hits below the dot, I’ll move closer. Once I’m hitting the dot by aiming with the tip of my arrow on it, I’ve found my point-on distance. With this setup, that’s exactly thirty-five yards. I now have the first piece of information I need to make this aiming system work.
The second thing I need to know is my baseline gap—how far below what I’m trying to hit the tip of my arrow should appear for a twenty-yard shot. To find that I’ll shoot by aiming with the tip of the arrow directly on the dot from twenty yards away. Because I’m shooting closer than my point-on distance, my arrows will hit above the dot. I’ll measure the distance between the center of the dot and my group, pull my arrows, and repeat this until I’m confident that if I execute a perfect shot from twenty yards away my arrow will land x-number of inches above the center of the dot. For me with this setup, that measurement is exactly sixteen inches.
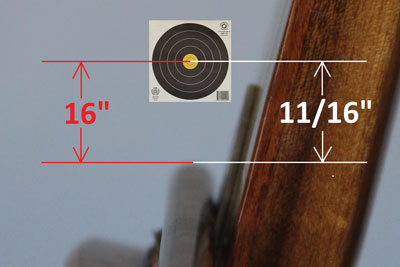
Gap at the target in red versus gap at the bow in white.
Now I’ve determined what’s called my “gap at the target”—the visual gap between the tip of my arrow at full draw and where my shot will impact as measured at the target itself. For Baseline Gap, we will use this measurement to find what’s called the “gap at the bow.” That is the size of the gap if we were to measure it not downrange at the target, but right where we’re shooting, at arm’s length, or “at the bow.” To find this I’ll pin a pair of dots to the backstop, one on top of the other, 16” apart (my gap at the target). I’ll then go back twenty yards and measure the distance between those two dots using a ruler held at arm’s length. For me, that measurement is 11/16”. Now I know my baseline gap—my gap at the bow for a twenty-yard shot—is 11/16”.
People who work with small measurements at arm’s length all day—carpenters, mechanics, machinists—can easily visualize their gap at the bow as a fraction of an inch. If that works for you, great, but you don’t have to visualize it that way. Some people imagine their gap at the bow as the size of a small paperclip, a coin, the width of their car key or anything else they can easily picture at arm’s length that is the proper dimension.
A lot of people, including me, visualize their gap at the bow in relation to the width of their arrow. If you think about it, the width of your arrow is a consistent measurement, it’s at arm’s length at full draw, and it’s already in your peripheral vision. You may as well use it as a measuring reference, too. Since my gap at the bow is 11/16” and I’m shooting 2216 Easton aluminum arrows (which by design are 22/64” wide) I know my gap at the bow is exactly twice as high as my arrow is wide.
So now I have the two pieces of information I need for Baseline Gap aiming: my point-on distance (thirty-five yards) and my baseline gap (twice as high as my arrow is wide for a twenty-yard shot). With these two pieces of information I can now shoot any distance I need for bowhunting. Here’s how it works.
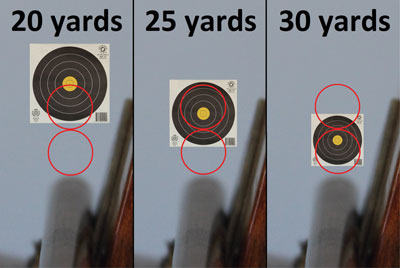
Learn your one gap and your point-on distance, and then adjust the gap accordingly.
If the animal I want to shoot is twenty yards away, I draw, anchor, and aim by setting my baseline gap—twice as high as my arrow is wide—and execute my shot. But what if the animal isn’t twenty yards away? What if it’s twenty-five? I go through the same shot routine, but with one minor change. I draw, anchor, and aim by setting my baseline gap—twice as high as my arrow is wide. But since twenty-five is 1/3 of the way from twenty to thirty-five (my point on distance), I raise the tip of my arrow to shrink my gap by 1/3 and then execute the shot. If the animal is thirty yards away, I’ll come up 2/3. If it’s thirty-five, I’m point-on.
But what if the animal isn’t farther than my baseline distance of twenty yards? What if it’s closer? Then instead of raising the tip of my arrow and shrinking my gap, I’ll do the exact opposite. I’ll lower the tip and expand my gap based on how much closer the shot is than my baseline distance of twenty yards. For a fifteen-yard shot I’ll expand my gap 1/3. For a ten-yard shot I’ll expand it 2/3.
That’s all there is to it. Simply find your point-on distance, learn one gap, and adjust the gap depending on the distance of your shot. This process may seem cumbersome at first, but since you’re only learning one gap, this quickly becomes second nature. I think it took me about a week in my backyard before I didn’t even have to think about the gap anymore. It became automatic, which makes it perfectly suited for bowhunting.
If the aiming system you’re using now works well and you’re completely satisfied, then you’re doing better than a lot of us. But if you’re looking to improve your accuracy, give Baseline Gap a try. You might be surprised at how much more accurate a bowhunter you may become.



Leave A Comment