A couple of years ago, I shot a whitetail doe right at dusk. The shot looked pretty good in the fading light, and the deer bounded down the side of the mountain through the timber. I could hear the deer’s frantic escape in the dry leaves, and it sounded like she made it at least to the power line easement bordering the property where trees gave way to high weeds and brambles. I did not hear the deer “crash”, and I didn’t really relish the thought of blood trailing a deer in the dark. The forecast was for overnight temperatures in the teens, so I decided to wait until morning to take up the trail. It was Friday night and I devised a plan to bring my nine-year-old grandson back with me, as he wouldn’t be in school on Saturday. It would be a good opportunity to teach him how to track and retrieve a deer.
We were back in the woods at dawn, and I encouraged the youngster as he sorted out the scuff marks in the leaves and droplets of blood. It didn’t take long to find the deer piled up in a thicket. I looked back up at the high ridge where my truck was parked. Even with the assistance of an energetic nine-year-old, dragging the doe back up the steep hill would be back-breaking. Luckily, I had brought my pack frame. My grandson would get a bonus lesson in quartering a deer.
We have all heard the saying, “The work begins when the hunt is over.”
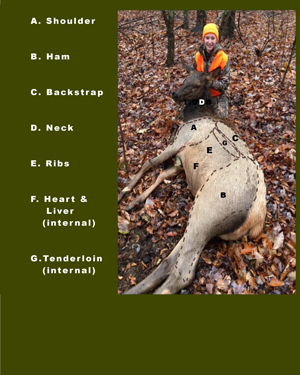
The author’s basic cuts when breaking an animal down into manageable pieces.
Here in the East, where the whitetail deer is the most sought-after big game animal, on most successful hunts, the primary method of game retrieval is simply dragging the deer. However, as hunters venture farther into the woods to avoid other hunters, and as hunters pursue growing Eastern populations of larger game like bear and elk, quite often dragging an animal is impractical.
As a Kentucky elk guide, I have witnessed the amazement on the faces of successful hunters when they approach their downed elk. When they actually lay their hands on these large beasts, the realization sets in. They usually stand back, shake their heads, and say something like, “Oh my gosh. Now what?”
As traditional bowhunters, we have a moral obligation to retrieve as much meat as possible from the animals we kill. Anything short of that disrespects the animal. Maximizing what meat we retrieve not only increases our stores of nature’s bounty, but reflects well on us as a hunting community as well.
The average elk will weigh around four times the weight of an average deer. Add to that difficult terrain and distance from the vehicle, and the logical solution is to quarter the animal and haul the meat out on a pack frame. This practice is common in the West but is still rare in the East. Even with deer-sized animals, pack frames can save a lot of back-breaking work. As a “mature” bowhunter nearing 71 years in age, I have also gotten a good deal wiser. Working smarter is a lot better than working harder.
This is probably a good time to mention all-terrain vehicles such as four by fours and side by sides. They are expensive, noisy, guzzle fuel, are a pain in the you know what to haul around, and they are illegal on much of the public land in Kentucky. Most of the deer and elk I have dealt with expired in places a four-wheeler couldn’t navigate anyway. Enough said about that.
To make the quartering process more efficient, I carry a kit containing all the tools I need, organized and placed into a game bag readily accessible in my hunting pack. Normally, when I have a deer down, I’ll go ahead and quarter the animal, put the meat into game bags, and then hoof it back to my truck for a pack frame. If I am guiding an elk hunter, I’ll send my hunter back to the truck for the pack frames (I carry at least two during elk hunts) while I quarter the elk. If the distance is over a mile to the truck, during the hunt, I carry a large internal frame pack containing my hunting and quartering gear, but with enough space for one elk quarter. Here’s the gear I carry:
- A pack frame to haul the meat.
- At least one tarp upon which to lay the quarters to keep them clean.
- Game bags of various sizes.
- Knives, a pruning saw, and a knife sharpener.
- Lots of bungee cords.
- A head lamp if the chore must be done in the dark.
- Energy bars and energy drinks. This is hard work!
- Rubber gloves, preferably elbow-length.
- A lightweight block and tackle that can handle at least five hundred pounds.
- Wet wipes to clean up hands, knives, etc.
- A telescoping hiking staff for packing heavy loads in rough terrain.
The quartering process on an elk is identical to quartering a deer. It is much easier if two people quarter a big animal. One can hold and apply pressure to the legs while the other cuts. However, simply using a piece of rope tied to a tree to hold the legs back out of the way will also work if you are alone.
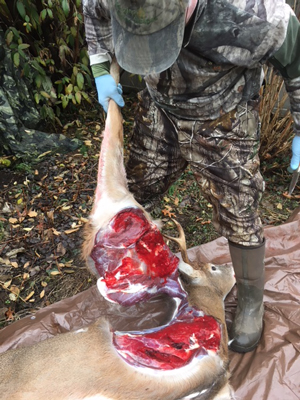
Removing a front shoulder.
I prefer to quarter an animal before I field dress or gut it. If an animal has bled internally, or if the arrow or bullet has penetrated the digestive system, field dressing an animal can be messy work with a risk of contaminating meat. It’s efficient to completely quarter the side of the animal facing up, then flip the animal over to quarter the other side. Remember, though, that flipping an elk, moose, or bison is easier said than done. That step may require more than one person. If you wish to save and tan the animal’s hide, before you skin the critter, drag its body onto a tarp to avoid getting the skinned animal dirty. If you wish to save the head for a taxidermist, make a cut encircling the chest of the animal, slice up the back of the front legs, and skin the animal up to the beast’s chin. Tuck a tarp under the animal’s head and neck to keep the neck and shoulders clean. Cut off the head at the base of the skull with the skin attached, for later work by a taxidermist. If the weather is cool and there’s no risk of meat spoilage, you can go ahead and skin or “cape” the head and remove the skull cap and antlers with a saw. That skull is very heavy, and this will decrease your pack load. On an elk, remember to remove the ivories, the two smooth, rounded teeth, before you discard the skull. They make nice jewelry.
Quartering an Animal
Remove the shoulder first. That step is easy, the “low-hanging fruit.” Even on large animals, it should just take a few minutes. Simply cut the skin and connective tissue between the leg and rib cage away as you lift the leg. You can also cut around the shoulder blade near the animal’s spine. Stay close to the shoulder blade to avoid damaging the back strap. Lay the shoulder on the tarp.
Secondly, remove the ham. It is important to be careful in the groin area to avoid puncturing the animal’s abdomen. Move the back leg back and forth and you’ll feel the spot where what moves adjoins what doesn’t. As you slice inward in that location, you’ll soon encounter the animal’s ball-and-socket joint where the leg is attached to the pelvis. With the point of your knife, cut away the cartilage around this joint. Then slice the tendon attaching the ball to the socket. Then it is just a matter of freeing the ham from the pelvis by cutting along the outside of the pelvic bone. Lift the ham away from the pelvis and lay it on your tarp. In states that require proof of sex, it is reasonably easy to leave the sex organ attached to the inside surface of the ham.
Next, remove the back strap. This is one of the best cuts of meat, so do your best to keep it clean. It’s easier to skin the animal’s back before attempting this step. Locate the spinous processes, (the bumps along the spine) and slice along each side of the spine from the hip to the neck. You can feel the knife bumping along the ribs if you are cutting deep enough. Then, cut and peel away this long column of meat. It is a bit like fileting a fish. Keep your knife close to the ribs to get it all in one large piece. Place the back strap on your tarp.
Remove the neck meat. The larger pieces are good roasts, and the smaller chunks make good burger. A whole deer’s neck, with the windpipe and esophagus removed, can make one big roast. Pile the neck meat on your tarp.
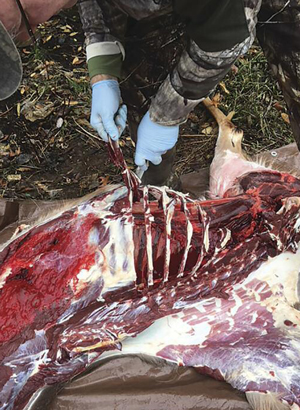
Slicing out the rib meat.
Remove the rib meat by slicing away pieces on the outside of the rib cage. Included in this process can be the brisket meat. Delay removing the meat between each rib until you have gutted the animal. If you have already field dressed the animal, go ahead and slice the long pieces of meat from between the ribs. This is good burger meat.
Then, flip the animal over and repeat the process.
Last, remove the heart, liver, and tenderloins. Eviscerate the animal by slicing from the pelvic area to the bottom of the rib cage. Keep your knife facing away from the animal. You can also use a “gut hook” to accomplish this task. Reach inside the animal with one hand holding your knife and the other hand pulling the animal’s innards, slicing all of the connective tissue holding the internal organs to the back of the critter. Drag everything out. Pick through the internal organs and retrieve the heart and liver. Lay them on the tarp. Reach inside the animal and slice away the two long columns of meat along the spine. These are the tenderloins. On a deer, they will be small, but on an elk, they are substantial and worth the trouble. If you do not like heart or liver, you can remove the tenderloins without gutting the animal by making a slice large enough for your hand just below the bottom rib, being careful not to cut the intestines. Push the intestines aside and slice the tenderloins away from the spine.
The hams and shoulders will still have the hooves attached. On a deer quarter, those hooves make good non-slip handles, but on an elk or moose, they are heavy and can increase your carry load significantly.
You can remove the lower leg by slicing the cartilage and tendons at the knee joint to free the lower leg and hoof. On a rutty bull or buck, you may wish to skin and remove the smelly tarsal gland. Make sure you clean your knife afterward. Even if you remove the lower leg, don’t cut through the big tendon, as that is the best place to insert the hook of a gambrel or the end of a rope if you wish to hang the quarter for processing or to cool. On an average deer, you can get all four quarters into one or two game bags. Put the scrap burger meat, the backstraps, tenderloins, heart and liver into another.
You can break an average whitetail deer down to about 60 pounds, a reasonable load for one person to carry. An elk is a different story altogether. I’m not a big, tough guy, so I really prefer to carry only one ham and maybe the back straps into an eighty-pound load. Two strong carriers can get an elk out in two trips. The one monkey-wrench in the works, however, is the elk’s head and cape. A whole elk or moose’s head and cape can weigh up to a hundred pounds, depending on the size of the antlers. If time and weather allow, and if the distance to your vehicle is significant, it’s better to cape the animal and remove the skull cap.
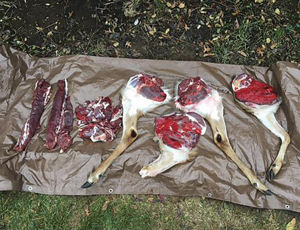
All the major meats from a deer, sans the internal organs of heart and liver.
Another strategy, if the distance and terrain are challenging, is to de-bone the quarters. This is quite easy. Simply cut the big bundles of meat, or muscle groups, away from the bone. On the hams, your best bet is to insert your knife at the top of the leg bone and cut around each side of the bone. On a recent cow elk hunt, I guided a young lady, who weighed all of about a hundred pounds. We were accompanied by her father. She shot a big cow at 9 a.m. It was cold, pouring rain, and there was a two mile, very steep hike back to the truck. We decided to bone the elk and the three of us were able to carry all of the meat, and the elk’s head and cape in one trip. It took some time to quarter and bone the meat, but there was no risk of spoilage in the cold rain.
If you do have to make two trips, it is better to hoist the second load high off the ground, in the shade, to let it cool and to keep it away from bears and coyotes. To assist in cooling the meat, make big slices in the hams to allow heat to escape. On several occasions, I have submerged the quarters, in game bags, in a stream to keep them cool overnight. I have never experienced any negative effects on the meat by doing this.
One final note: If you are carrying a bull elk’s head and cape, or even just the skull cap and cape, it is a heckuva lot easier to turn the head upside-down on the frame with the antlers pointing down and the tines pointing backward. If you place the antlers facing up, you’ll be constantly wrestling with the load when they hang up on every low-hanging branch and bush.
Knowing how to quarter a big game animal is just another skill that woodsmen should learn to master. The next time you harvest a deer, bear, elk, or moose, give it a try. Once you feel comfortable doing it, you’ll never drag one out again!
Bill Carman has been bowhunting Kentucky whitetails for over 50 years. He is an author, elk hunting guide, fly fishing guide, and he regularly conducts fly fishing seminars. He spends most of his time in the woods, in streams, at his computer, and teaching his grandchildren the ways of nature. He and his wife live in Lexington, KY. He can be contacted at www.kentuckywildoutdoors.com.



Leave A Comment