

This is a method of shooting that I developed about 10 years ago. It is a simple way to learn how to shoot a recurve or longbow. The best part is that you don’t worry about yardages. No more guessing: just look, pick a spot and release. It will work at longer yardages, but for now we’ll concentrate on three to 20 yards.
I will confess that I have not taught this method to anyone who shoots with three fingers under the nock, or anyone who sights using the gun barreling method. I suppose it would work the same way, but honestly I’m not sure. I like simple, so I teach all my students to shoot with a split finger release.
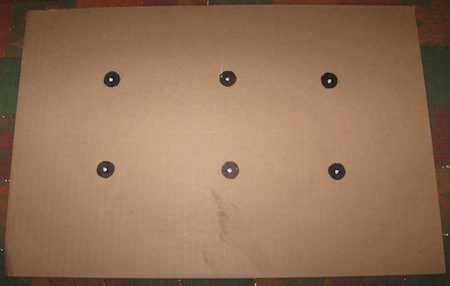
I will assume that you know how to shoot, and you’ve found a good solid anchor in the corner of the mouth. However, like a lot of shooters, you might have trouble with tight groups past 10 yards. Hopefully, this method will help correct that problem. Before we begin you will need: a blank piece of cardboard approximately 12 inches tall and 18 inches wide; a black magic marker; and some white typing correction fluid. Using the black magic marker, draw a 1/2″ diameter black dot three inches from the left side and three inches from the top. Staying three inches from the top, make another dot at six and nine inches from the left. Make another row of dots three inches below the first row. Now, use the white correction fluid to place a small dot on the center of each black dot. This white speck becomes your focal point.
 This shooting exercise has no time limit and no shortcuts. You are only required to pick a spot and concentrate–and be completely honest with yourself! If you cheat here, you only cheat yourself.
Place the target on a backstop and stand three yards away. Let’s get started! Yes, that’s right, three yards.
Look at the white dot in the center of the black dot; this is your focal point. The center of the white dot becomes a single hair on a deer, the eye of a rabbit, or whatever target you have in mind.
Let’s get ready to shoot at the white dot. Remember, if at any time during your draw you look at the black dot, your hand, the arrow, the housefly that just flew by…let down! You have lost your concentration! This shooting exercise does many things; learning to focus is the first and hardest part. We will shoot one arrow per dot–no shooting a group on any dot. There is just too much distraction for the brain in the beginning.
Using proper form, focus on the white dot, draw, settle, anchor and loose the first arrow. It’s not important where your arrow hits at this point, but it will probably hit about one to two inches below the black dot. If not, then shoot another arrow to see where that one hits. DON’T purposely make a huge “Kentucky windage” change; just look past your hand, focus on the white dot and shoot. This is not as easy as it may sound. If your equipment isn’t matched, this is where you will see it. Make any tuning changes now before you continue.
When shooting, I’d much prefer a good six-shot group rather than 30 “just ok” shots. If the arrows hit high, that’s ok too, as long as you are hitting in the same location on each dot. You, your bow, and your brain are learning to operate as one. Soon it’ll require no thinking at all. After a few shots your brain will make subconscious changes. By the end of the three-yard shooting session, you should be hitting the same area in relation to each black dot.
 Practice until all six arrows are hitting the same on all six dots. (Remember, shoot only one arrow per dot.) This method also helps to build confidence in your shooting ability and form. It might take a couple of days or a week before you master this level. Time isn’t the issue here; you are working on proper form and consistency. Hitting the same spot every time is priceless! It will become second nature for the arrow to just “go there.” This is what we want. The less you have to think about it, the better off you will be. It’s a bowhunter thing!
Congratulations on mastering this level. Now we are ready to move forward…or back in this case. You should make a new cardboard target before we continue.
For the second level, move back to 10 yards and repeat the exercise. Again, shoot only one arrow per dot. This is a learning process; you are teaching your brain the yardage and muscle memory to return to that exact location for the shot.
Here’s a hint: the sight picture will be the same as it was at three yards! Trust me on this! Now, just enjoy shooting the next few shots. If you have good shooting form, you should already be hitting close to the black dot.
Remember to focus on the center of the white dot. The center will always be your focal point. It doesn’t matter if it’s a beach ball or a BB, the center is always the center! It never changes. Look for the center of everything.
When you’re consistently hitting the spot at 10 yards, you’re ready for the next big change. It’s time to make a new target.
Move up to five yards. From this distance you will be hitting the black dot within four to six shots. Keep shooting until your brain makes the adjustment. Keep focusing on the center of the white dot. When you are comfortable with the six out of six shots (no cheating), then you’re ready for the final move. Again, make a new target.
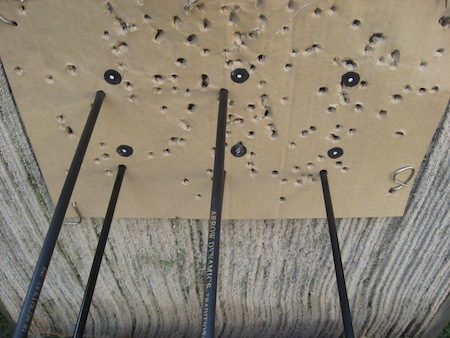
This is the big one: 20 yards. Now, when you focus on the center of the white dot, your shots will probably be three to four inches below the black dot; this is to be expected. Keep shooting at each dot. Your brain will automatically make the mental adjustments for where to hold.
At this stage, a three-inch group is good. Obviously, closer is better. Aim small, miss small! This will be the toughest level, so the shooting might take a bit longer to master. Then again, some folks spend less time here because they are getting conditioned to draw and focus on the center of the white dot. Shoot until you are satisfied.
This exercise has taught your brain where to hold from three to 20 yards. As you practice, you’ll notice the first shot will be easily within the kill zone of any North American big game animal. Congratulations, your brain is now on autopilot! You have one less thing to think about.
When you stand at three yards and shoot one arrow at the center of the white dot, you’ll be surprised to see your brain has made the adjustment for you, and you’re now shooting and hitting the black dot. Take a step or two away from the target, turn and shoot one arrow at the same dot you just hit. Take a couple more steps and shoot again, a few more steps and shoot again. You’ll notice the tight group of feathers as you shoot and walk back. You should find yourself picking out the white dot, or one of the nocks or a fletching speck of color. You’ll begin to concentrate on very small targets and not just shoot into the group. Your brain is making the minute adjustments needed to keep grouping the arrows as you get farther away. At 20 yards, your last arrow should be tight with the group.
Congratulations! You have allowed your brain to do all the calculations for you. Now all you have to do is keep that skill sharp by practicing. One set of arrows in the morning and one in the evening will do just that. After all, how many second or third shots do you think you’ll get at a deer during hunting season?
We just took the guesswork out of shooting; it’s now an automatic thing. As long as you pick a spot, your brain will make the adjustment and put an arrow right where you’re looking. Picking a spot is a thousand times more important now! If you are looking all over the animal, the arrows will go all over the animal. Ask anyone who looked at antlers and put an arrow dead center through the rack. Yes, it happens!
Keep practicing and have a great bow hunt this season.

Thank You,
The info. was just great. Shooting at the dot’s and the tooth
brush. Rest. And then the wool. What nice tip’s
What nice info. Fred C
Used to subscribe, have not shot in about 8 years, dug out recurve and long bow, got the bug again. Almost lost my foot, so archery will be my rehabe. And again through your magazine and writers i will get hints, history,and how to. Thanks for your efforts in keeping traditional archery alive.
That is quite good . believe it or not I’ve been doing something similar , with a wolf at my club. I put the wolfs head against a target and I aim for his mouth. I notice that my concentration was on his mouth and I did get a few of the arrow in his mouth and the rest were grouped very close. at 30 yards. I have shot this target for a week or two , I notice that I have become more consistent with out thinking about it .
I love this instructive article. Already cut out a stack of cardboard rectangles enough till the rapture. Now to put into practice. ….practice…practice…practice….
Agree with above comments. My mantra has become aim small HIT small. Take miss completely out of the equation. No negativity allowed. LOL