

Everyone who shoots a bow, whether it be a longbow, recurve or even a compound bow, breaks an arrow sooner or later. It can happen during practice or during a hunt, but it will happen at some point.
A few days ago I was shooting at doves. There were a plethora of them and many landed within my effective range for doves. Probably you are wondering what that effective range is. As close as I can get to them!
On that day these birds were not allowing anything, which included me, to get anywhere near them. To compound the problem of getting close to the doves, there were two hawks circling the area and every time one of the hawks came too close, the doves took off for parts unknown. Eventually the doves would return but they were so skittish that it was not fruitful to attempt to try to shoot them.
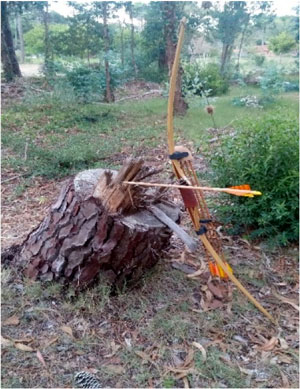
After three hours of trying to get close to the doves I decided to shoot at stumps. The stumps were not moving like the doves were. I chose a stump of an old conifer and took aim and shot my arrow. I estimated the distance to be about 45 yards. I hit slightly high but had it been the head of a nice “gobbler” he would have been in the freezer for Thanksgiving.
I shot more and chose other tree stumps to shoot at. One of those was a dead red oak stump. This may have been the wrong stump to shoot at. When the arrow hit it made a different sound upon impacting the stump. I decided to investigate and delayed shooting any more arrows. I retrieved my arrow and noticed right away that the nock was missing and the shaft itself was split. This was one of twelve new Carbon Express Heritage Traditional arrows and they were just a couple months old. I was disappointed and wondered if I could repair the arrow in some way. I had two more of the same arrow but they had split on the front end when I had hit a rock twice. Once with each arrow. How that rock jumped in front of both my arrows I will never know! The following two photos display the point end and the nock end of the two broken arrows.


I continued my practice and fortunately did not break any more of my arrows. But I kept trying to think of a way to repair the broken arrows so I could use them again.
Having owned both of the so-called “survival takedown” bows, one made by SAS and the other made by Primal Instincts, I recalled that one or both of the presentations about these bows mentioned that there were joints available to make takedown arrows. So, I bought some two-piece joints to make takedown arrows from my broken arrows. The joints are sold in packs of six and I purchased two packs for a total of twelve sets of joints. My intent was to make either twelve arrows with one joint or six arrows with two joints each. These joints are machined aluminum and come only in one size. They fit the inside diameter of the Carbon Express Heritage Traditional arrows very snugly.
I took another old carbon arrow, carefully cut the arrow in half and inserted the joints with the male end pointing away from the nock section and the open female end ready to receive the male section. I then screwed the arrow together into one piece. When joined together, the section between each piece of arrow measures 3/16th of an inch. This joint will be exposed once the pieces of arrow are screwed together. To maintain the length of my arrow, 3/16th of an inch had to be removed from the total length of the shaft. This was exactly the length of the damaged portion on the nock end of the arrow. I cut that off of the shaft and that gave me the correct length of arrow.


I reassembled the arrow, but it did not flex evenly in the center where I had put the joint. The total length of the joint when screwed together meant I had almost 2 inches of aluminum inside my arrow. Even though the arrow was a bit stiff in the center I decided to shoot it anyway.
The first shot was from one of the survival bows at fifteen feet from the target. The arrow seemed to fly fine from that distance. I moved back one yard and shot again. This time the arrow appeared to porpoise a bit during its flight to the target. I retrieved the arrow and shot it again and it seemed to porpoise again. I changed to my recurve bow and the same thing happened when I shot the arrow. This was not good and a bit disappointing.
Nevertheless I made a decision to modify the next arrow with two joints to see if that changed the dynamics of the arrow in flight. I returned home to make an arrow from the newly broken arrows of the previous day, but also with the hope that two joints in the arrow would make it fly better.
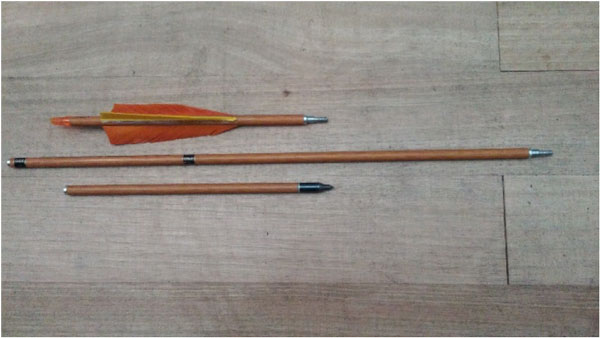
I made the top section with the arrow nock and the bottom section with the arrow point both 7 inches long. This was only the length of the two sections of shaft, and did not include the point insert or the nock. The eventual length of the arrow would include the nock and point insert, plus the length of each joint. Two joints at 3/16 of an inch added close to ½ of an inch, and I wanted my arrow to be a finished length of 30.5 inches. This measurement of ½ of an inch would be removed from the center section, which was the longest section of the three pieces. Removing the ½ inch from the center section proved to be a good decision on my part. Test firing the arrow would show that leaving the longer portion of the arrow as the center of the three sections, and not making each section equal in length, the arrow would “bend” around the bow better and fly truer to the target.
I took the arrow to the archery range, and with great anticipation I nocked the arrow, took aim and shot. The arrow flew straight and true with no fish tailing or porpoising! I retrieved the arrow and shot it again with the same results. I jumped for joy at having found a way to fix and reuse a broken arrow!
Since I had four more broken arrows waiting for me at home, I decided to make three more takedown arrows using the same measurements. I returned the next day to the archery range and test shot my three new takedown arrows with the same results as the previous day. They all flew straight and true. I shot out to a distance of twenty-five yards with spectacular results. I was using 145 grain field tips, and when I changed to my broadhead (which is also 145 grains) the arrows flew straight and true.
A review of my process is as follows: I did not use any formulas to calculate the length of each section of arrow. I actually had three pieces of broken arrow that were slightly longer than 7 inches. My choice of 7 inches was purely providential. My bow is a Dale Dye “Good Medicine” take down recurve of 55 lbs. at 30.5 inches, and the arrows I normally shoot also measure 30.5 inches. When cutting the sections of arrow shaft, I was careful to keep the ends square and flat so that the joints abutted evenly to the sections of shaft. Prior to shooting the shafts, I spin tested them on a flat surface in my house using the marble countertop in my wife’s kitchen. (Thank you so much dear for the use of your counter top on a regular basis.)
During the flight testing I also used heavier field points weighing 175 grains and 225 grains. The heavier the points, the lower the arrow would impact, so I had to adjust my aim according to the weight of the point I was using.
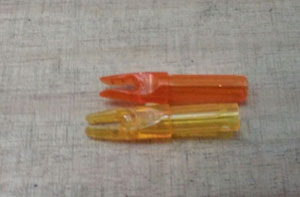 I fletched the arrows with 4 inch, home-dyed, yellow and orange shield cut feathers. I also experimented with different length nocks, one Carbon Express and the other Bohning.
The Carbon Express nock is orange, and whether you buy six or twelve arrows they come with twelve nocks. I purchased the twelve Bohning nocks separately and they are a more yellow-orange color. The portion of the Bohning nock that is outside the shaft is ¾ of an inch long whereas the outside portion of the Carbon Express nock is 5/8th of an inch long. When I was originally tuning my arrows, before I broke them, I found that using the slightly longer Bohning nock made the arrows fly better during the initial tuning process. (But that is a story for another time.)
If you have the inclination to try something different and unique, and you have some broken carbon shafts, then make yourself some takedown arrows to shoot from your takedown bow. You will be pleasantly surprised with the results!
Editor’s note: Please use caution while cutting carbon shafts. Do this in a well ventilated area and wear a face mask to avoid breathing any carbon dust.


Great article. I’ve been wondering about take-down arrows ever since I bought my 55# Primal Instincts bow several years ago. I’ve been wanting to keep a few in my jeep fulltime with that bow so I always have something handy, even if I’m miles from my recurve. It never occurred to me to make my own from my broken arrows, which I have been saving but haven’t yet come up with a good use for or effectively repair. Great idea.
Since the Primal Instincts bow breaks down to only 22″ (I believe), I don’t need my arrows to break down any shorter than that. I wonder if a single joint, placed off center, say 22 inches from the nock, would allow for the same center flexing you achieved with two joints, save some weight and cost, and keep the arrow more front heavy. I suppose I’ll have to order some joints and find out. Thanks for the idea!