
The brush rest, in my opinion, is the most durable and aesthetically pleasing method I have seen for shooting a traditional bow with an elevated rest. I used to shoot my recurve off the shelf, but after experimenting with the brush rest and settling on a style/method of attaching it to my bow, I found I could get perfect flight with vanes or feathers. If you hunt in the rain, vanes are an obvious advantage, not to mention their superior durability.
Brush rests, done the way that I now do them, are next to impossible to wear out. I have shot thousands of vane-fletched arrows over a single rest and have not yet managed to wear it out. The rest also helps keep an arrow in place during times of inadvertently torquing the string while drawing or a little shaking brought on by an awkward shooting stance or the excitement of having an animal in front of you.
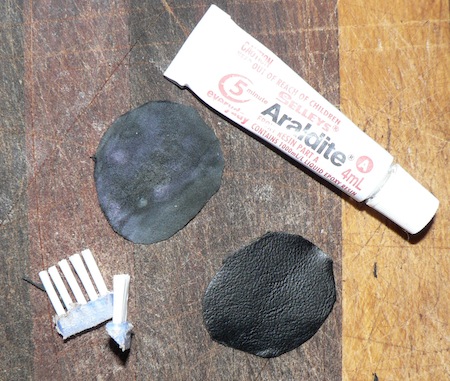
Figure 1
Building a brush rest on your bow is reasonably straightforward and hopefully, with the following explanation, I can help you achieve this. You will need some thin leather, some contact adhesive (I use Kwick Grip), some five-minute epoxy and a medium-bristled toothbrush. I have found that there is no point in getting an expensive brush as the economy toothbrush is definitely more durable for this purpose. See Fig 1.
First, clean the area of the sight window and shelf on the bow. I use acetone, but methylated spirits (denatured alcohol) is more gentle. You need to be careful of the quality finish on your bow. Not all finishes will handle acetone treatment.
Cover the entire area of the sight window with glue and allow it to dry. Shave an approximate 20mm (1 inch) piece of leather (cut more oval shaped) very thin, and smear contact adhesive on the back of it. Place it onto the bow in a position where the base of the brush will be glued to the leather. See Fig. 2.
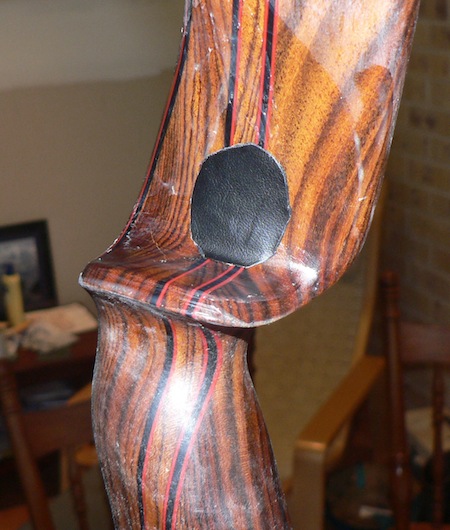
Figure 2
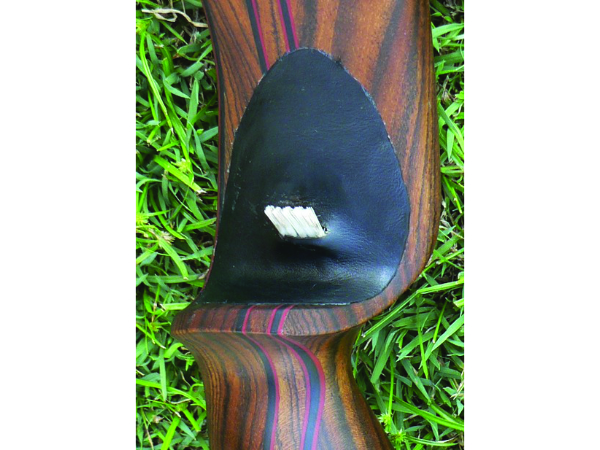
Carefully cut through the toothbrush to free a line of four to five bunches of bristles. As a guide, if you shoot reasonably heavy arrows, use five bunches of bristles; for lighter arrows, four would be plenty. Grind the plastic base of the bristles to an angle that will set the bristles out from your sight window at the desired angle, approximately 40 to 45 degrees, as shown in Fig. 1.
Using five-minute epoxy, glue the plastic base to the thin leather patch on the bow (Fig. 2) at the desired angle and distance above the shelf. Gauge the placement above the shelf by the height of the vanes. For example, the vanes I prefer have about a 12mm high profile, so I set the brush to give me just a touch of clearance, say 13 to 14mm (approximately 1/2″). Use a bow square with an arrow taped to it to set the correct line and to hold the bristles out at the correct angle. Allow the glue to set. See Fig. 3.

Figure 3
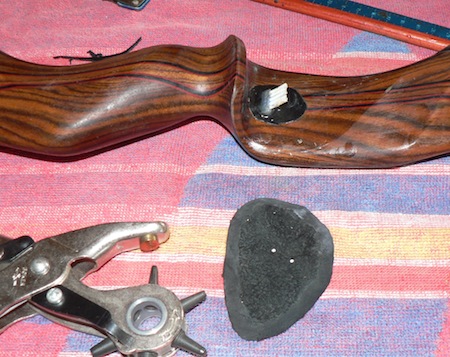
Figure 4
Once the glue is set, trim the second piece of leather to the shape you want, and shave down the edges nice and thin. While holding the leather in place, mark where you need the bristles to come through the leather. I use a leather punch and make a small hole at each end of the proposed line, then cut between them. See Fig. 4. The leather needs to be as thin as you can reasonably get it; you don’t want to push the sight window any further away from center shot than necessary.
Cover the back of the leather generously with contact adhesive. Slip the bristles through the cut and work the leather into place while the glue is wet. The wet glue allows you to move and work the leather into place properly before it sets.
You now have a nice-looking, practical, durable, elevated rest on your bow. Clean up and setting the nock point remains. Once again, I use acetone to clean up surplus glue on my bows since the finish handles it without a problem, but you may need to be more cautious with the finish on your bow.

That is so cool!! I have a longbow with no arrow rest that I am going to give that a try on. I am not getting much consistency off of my hand. Thank you for sharing.
Genius!! Thank you so much for showing this DIY!! I hate all those flimsy plastic flippers and hate the metal aluminum arrow rest that takes away the beauty of my wooden bow. This is the PERFECT solution!! I’m gonna try it with black bristles to match my riser. Thanks again Mark!!
Capitol idea.
Very clever idea. Thank you for sharing your idea with us.
Sorry, if you are an archer you are a traditional archer, too, and you should be able to shoot well off the shelf. I put this in the same category as mechanical-bow and crossbow shooting.
This guy (Mark Kimber ) is a Bowyer from Australia who makes some of the most beautiful and practical bows with decades of successful hunting and experience under his belt.
A master Boyer who shares his knowledge unselfishly and is always looking to improve every aspect of his craft, with a long list of customers wanting his bows.
How do I know ? I am fortunate to have a recurve and a long bow made for me by him and I can not recommend him highly enough. His custom bows are sold world wide.
Thanks for the tip Mark, I suppose one day I will have to renew mine (but after several years of repeated use with no sign of wear ) I am sure I can now do it when the time comes.
Don that is an interesting comment, reminds me of a conversation I had with a work mate (non hunter) where I was relaying the reason why I hunt with traditional gear and mentioned that I like to hunt like they did before so much technology got involved. He asked a simple question that was this ” do you use binoculars ? ” yes I replied, “well that blows your theory out of the park doesn.t it ” he said I had to agree . enough said ! So just how “traditional ” is traditional ??
It’s as traditonal as you wish to make it archery is a Time Machine and you can step off at any stop. You can actually free yourself from the bonds of this world and disaappear into the woods for life if your good enough’!