
Forum Replies Created
-
AuthorPosts
-
in reply to: Fletching color #55441
White so I can find the dam things!!! Figure the feathers are small enough to not attract attention. The shaft is stained, don’t want straight lines to stand out in the woods.
in reply to: BUILDING THE BOW #54310Lots of views, but only 4 response… Is anyone reading this? Should I continue? Am I boring you?
in reply to: Kangaroo leather and neat sewing tool #54308Harbor Freight has the same for half the price. Been using them since I was a teen.
in reply to: IT WORKED!!!!! #53097YUP!!! After all that work…
On the other hand, I was so involved that I found myself rushing home to work on the bow, try out the next good idea (just because it didn’t work doesn’t mean it not a good idea), now that I have a bow that works, its like life no longer has meaning…
in reply to: BUILDING THE BOW #52010RECURVE JIG
When you buy the piece of oak (I used 4’, you can make yours as long as you like) try to get a piece with straight grain, and look for knots. Bend it like it will be bent when finished (if it breaks, you don’t want that one). I suspect that some of the bows that broke were defective wood, that I didn’t notice. Really don’t have the skill to select well. Good Luck.
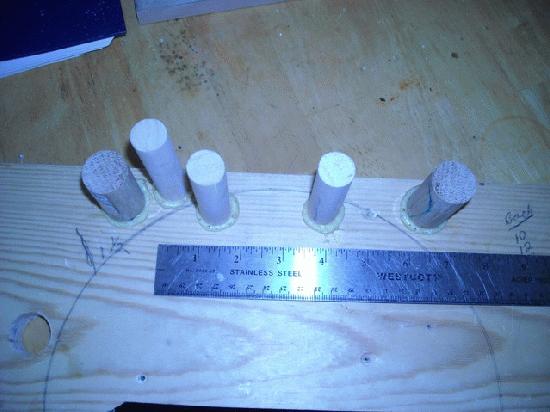
Read on the internet to cut the jig out of a 2 x 6 with a band saw. Not about to buy a band saw so I tried with the coping saw, and reciprocating saw. Neither was square, so the recurve went off at an angle. If you stare at the pic of broken bows long enough you can see the result, I don’t advise it. I also tried to use a 5 gal bucket to make the recurve, but found the bucket is NOT straight up, thus, again, the recurve was off.
This works: Find a scrap 1x 6, 2 feet long. Drill holes and insert dowels as pictured. The exact spacing is up to you, but you can place them pretty well from the picture, and I don’t think the exact curve is critical. Keep in mind that the more recurve, the more likely it is to go astray. The dowels (aka old broom handle) must be glued in and THEY MUST BE SQUARE. The curve you see on the board was the bottom of a 5 gal bucket. I started out trying to make a big sexy recurve, like DD. Didn’t work, The more the recurve, the more likely it is to turn out to the side. Best to try for B/C.
I toyed with the idea of tapering the thickness of the limbs but decided that making them consistent, symmetrical, etc. would be almost impossible, and would require a lot of work. We are going to do that with the fiberglass.
I did taper the width. The taper starts at the top (& bottom) of the riser and the ends are ¾” wide. That means you are tapering each side by 3/8” this has to be really, really accurate. You can do it with a plane, but I found the circular saw more accurate. Obviously you will have to sand out any waves. If it isn’t accurate, throw it out, (you have only lost $2.50) if you continue the recurve will be off. Oh, you only bought one piece of Oak? You actually thought it took me all of those tries, and you were going to get it right the first time!! FOOL!!! You may think that it would be a good idea to taper them more, like down to ½”. I thought so too. Go ahead, but keep in mind that the thinner you make the ends the more they are likely to twist out at some odd angle, after the bow is finished. I said after the bow is finished. The recurve may look fine until you have fiber glassed it put a string on and actually bend the bow.
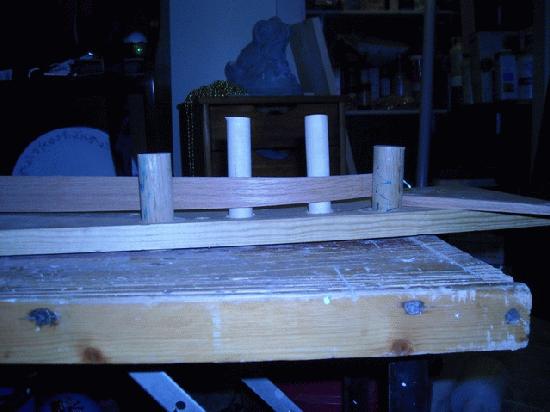
I had planned in my mind to hang a pipe from the ceiling with the end catching the steam from the spout of the tea pot… Got the visual? Instead I put 2 quarts of water in the turkey roaster, put the limb on it and covered with aluminum foil. You can do what you want, but I suggest you steam the limb for one hour. The hour starts when steam starts escaping from the aluminum foil. Not really sure what will happen if you steam it for less. You can’t steam it for too long, but if you fall asleep, and the turkey roaster runs out of water throw it away and start over. After the hour, take it out and IMMEDIATELY put it on the recurve jig. It has to stay on the jig for 24 hours. Any less and you will loose the recurve when you string the bow… after you fiberglass it. Notice that I used the piece I cut off to taper the limb to space the end up from the base of the jig (on the right). Read that again, and look at the picture. If you don’t do that, the recurve will be off. Yes, that is a frog in the background. BTW steam is HOT!!!
After the 24 hours, you can steam, and recurve the other end. If you make a mistake, and recurve the wrong way (a big S instead of a big C) throw it away, it cannot be corrected (gory details omitted). Steaming/setting the recurve is a one shot deal, you make a mistake, throw it away. Isn’t it your turn to make coffee?
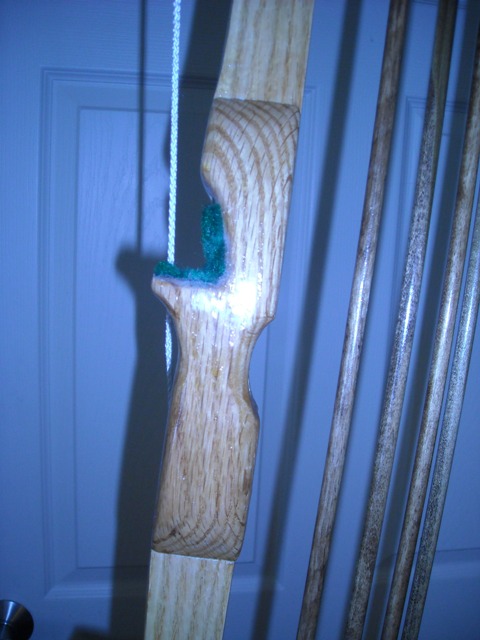
THE RISER
As I said earlier, I made mine out of scrap oak. Here is a pic, it is 8” long and the widest part is 1¾ “ wide. Nice door, huh. You can make it any way suits your fancy, just make it comfortable for YOUR hand, and keep in mind that the closer the arrow rest is to the center the easier it is for the arrow to go around it. This gives you something to do while waiting for the limbs to dry. I hope you have some kind of work bench that you can clamp it to (or a vise) while doing all of this sawing, shaping and sanding.
After the recurv is dry, you can put the riser on the bow. Mix up 1 Tbs. of resin, brush it on… WAIT!!!! When ever you are going to use resin you have to sand both surfaces with 6o grit sand paper and wipe down with a rag SOAKED with acetone (to get your greasy finger prints off). If you skip either of these steps it will come apart after it is finished. Notice I said “after it is finished” with all of the mistakes, you don’t know until the bow is finished, and you actually bend it. Then the the top recurv points, North, while the bottom recurv points South. Or it delaminates, or the wood breaks. NOW!! Make sure you have everything you need before you open the resin. Gloves, brush, gloves, fans on, stir stick, rags, floor protected, blah, blah. Run thru the steps in your mind to make sure you have everything, and know what you are going to do. Brush the resin on both the bow, and the riser, and clamp to your workbench (lightly, don’t squeeze all of the resin out) with the riser down. No workbench? Find someone dumb enough to hold it in her lap. Before the resin dries, you have to drill, counter sink, and put the 3 screws in. No, you don’t have to use resin, use your gorilla glue, pine pitch, or wheat paste if you want to, just keep in mind that I used resin, and if you don’t you may have your own gory details.
Fly fishing/tying since I was 12. Was fishing full time and working part time 9 years ago. Then my constant companion arrived. Now that she is older, she is learning to cast a fly, and perhaps…
I’ve had 4 or 5 careers, learned the first in college, taught myself the others.
We go to church Sundays, and I read a lot, Tolstoy is my favorite author.
Oh, and I take naps when she lets me.
in reply to: Posting Pictures in the Forums #50932GRRRRRRRRRRRRRRRRRR
I loaded a bunch of photos to the bucket, and forgot to tell it the 640×480, how do I make them all 640×480????
Keep in mind that I am old enough to be your father (tech capable, NOT tech inclined), and GRUMPY. Why is it soooooo easy to add photos everywhere else and soooo hard to add tham here????
in reply to: BUILDING THE BOW #50918ROFL
Beauty is only skin deep, ugly (at least in this case) goes all the way to the core. She has ugly details I don’t want to know about.
CHAPTER 2 – MATERIALS
You are going to need….
Time.
Fiberglass cloth (not the fiberglass mat, that is too messy)
Fiberglass resin (this has a 1 year shelf life, if you go to buy it, and there is dust on it, keep looking… gory details omitted).
Acetone (a CAN of acetone. Finger nail polish remover has stuff like lanolin, and aloe… gory details omitted)
Red oak I used ¼ x 1 ½ x 4. And added a riser to it. You can buy a thicker piece of oak, and make a one piece (no not talking about bathing suits), but you need a table saw and that is at work, besides if the riser is separate, you can reuse it in the next attempt. I made risers out of scrap 1” stock, usually oak, but it doesn’t really matter.
3 Screws ¾” x 8. These are to hold the bow to the riser. You can glue the riser to the bow, and SOMETIMES it works without the screws.
SAW I used a circular saw to cut the limbs and coping saw to cut out the riser.
Sandpaper. Most of the sanding was with 60 grit, some 80 grit, and some 100.
Wood Rasp to shape the riser.
Bastard File. For fine shaping and smoothing. About the same as 80 grit sandpaper.
Car to drive to HD, for another piece of oak, fiberglass, resin, etc.
If your constant companion is an adult, it may be a good idea to do this outside, or plan on sleeping outside. Otherwise do it in the bathroom, with the vent fan on, and a fan in the window.
Gloves. I like the blue kind, helps if they fit.
Broom, dustpan, and vacuum. Actually, I think I used these more than any other tool.
Mixing containers. Soup cans, big bottle caps, etc. We are going to be mixing resin in 2 tbs. batches. I found plastic shot glasses (tacky) at the dollar store at $1 per bag.. Spent $2, thought it would be a lifetime supply. I was wrong. Plastic shot glass??? You might be a redneck if…
Rags and something to protect the floor. Paper towels don’t work all that well, I get cheap wash clothes at 18 for $4 at WM. Using the drop cloth is a pain, but getting the resin off the tile floor is worse (gory details omitted).
1” chip brushes. I use these at work so it wasn’t a problem. Suggest you buy in quantity… like dozens.
C clamps to hold things down while cutting/shaping/sanding.
WOW!! Didn’t know I used all of that stuff. Seemed so simple when I started out…
Later, I have to go make a parachute for Barbie.
in reply to: Angry cow vid AND Ben's hilarious deer story! #50435When I read the first paragraph, I thought it was a good idea. But like most of my good ideas, it resulted in a lot of gory details. At least now we know that good idea doesn’t work.
in reply to: Built some arrows today #49904FYI: Most superglue is NOT waterproof. Zap-A-Gap IS waterproof, and LOCTITE makes waterproof superglue. Zap-A-Gap and some of the LOCTITE are gels.
in reply to: what quivers do you prefer? #49897Tks DWC
in reply to: Please introduce yourselves, I'll start #33937Hi,
Im know as the short, ugly old man with a white mustash… Wears a dirty old hat…
aka Grumpy Grampa
I made bows, arrows as a child in upstate NY, but that ended when I was 14 when I got my hunting (gun) license. The last few years I have toyed with the idea of getting a bow, but I have a few problems with what is available. Im short, 5’1″, and have short arms for one of my size. Thus my draw length is only 22″. As I loked at the compound bows I was confused and confounded by the 28 draw length. Kids bows with my draw length are only 20#. Recurves arn’t much better as they are too long, and again expect a 28″ draw length.
Since I am raising my 9 yo grandaughter, I was looking forward to the holidays at home (aside from sliding trips) and bored. I found something in the cloud about making a bow out of red oak, and fiberglass. OK, I had the time, some left over fiberglass fabric/resin and found a piecs of red oak for only $2.50 at home depot (1/4 x 1 1/2 x 4). Figured it probably wouldnt work but it wouldn’t cost much might be fun, and I had time, and the help of a 9 year old.
The first bow was done in a few days, and it actually worked, I took it out on the porch with a cheap target arrow, and the first shot actually hit the tree in the back yard (dam near needed a new diaper). Apparently my muscles remembered all of that shooting when I was a kid. Unfortunatly, the bow was too weak for me, and too strong for Arwen (grandaughter).
Now it is march and I have a pile of broken bows on the back porch (I refuse to count them), and bows that work for both me and Arwen. Oh, we also have 16 arrows that I made. If anybody wants I cnn tell you all about it, but not sure this is the place.
-
AuthorPosts