
Forum Replies Created
-
AuthorPosts
-
I’ve only had one bow that slapped my arm and it was a skinny little Osage selfbow that I made. The reason was the grip. The bow was made from a sliver off of a bigger stave and I thought it would make a nice kids bow. It wound up being 42#@28″ and the limbs were only a hair over 1″ wide at the fades and the grip was that diameter. I had to really concentrate on the way I held it when I shot. It served me well for about four years and finally had a small crysal appear just above the grip area on the back of the bow. I saw it after I came out of the woods and unstrung it. I was real happy I did not draw back on a deer that morning. I might have had a big knot or worse on my head.
in reply to: Questions About Arrows #136109Wood arrows are all I have shot for many years. To me it seems unnatural to shoot anything else from a trad bow.
You may already be aware of this but there are several factors to look at before buying shafts. You say your bow is 32#.
What is your actual draw length? That will be the starting point for determining spine weight.
Next is the weight of the point. 125gr is the standard weight. If you put a heavier point on the arrow it will reduce the spine. If you put a lighter weight point on it will strengthen the spine.
Here is what my setup is. My bow that I am shooting is 45#@28″. I have a draw length around 26″. Since I am not drawing the full 28″ I will not be reaching 45# so I need a shaft with a lighter weight spine. I shoot 125gr points so I picked a spine weight of 36-42#’s for my arrows. They work fine for my shooting and I am currently making two dozen 5/16″ Hickory shafts for hunting coyotes.
One thing that really goofed up the equation was when I made some shafts for some guys in California who shot the Japanese form of Kyudo. They wanted the shafts to be 48″ long. Wood shafts are spined at 28″ and the longer you get over the 32″ mark the weaker the spine gets. Their bows were 30# or less so we guessed at a spine of about 35-38#’s with a 100gr point. They said they shot fine. The thing with Kyudo is you get points for your shooting style. Hitting the target doesn’t really matter.
in reply to: Tips from the old timer #46664Main purpose of the vaseline is to keep moisture off the blade and prevent rusting. The tape will draw moisture from the air.
Dennis
in reply to: 8th Annual Oklahoma Selfbow Jamboree #25465Even with all the rain I never heard anybody complain. I think the rain also dampened the turnout this year too. We were expecting anywhere between 800 to 1000 people this year. I’ll be posting a bunch of pictures in the near future.
Wish I could have met up with you.
Dennis
in reply to: 8th Annual Oklahoma Selfbow Jamboree #31436Here’s the regs from the Ok. Wildlife Dept. for Turkey hunting.
http://www.eregulations.com/oklahoma/hunting/turkey/
Dennis
in reply to: Dying natural turkey feathers #7718in reply to: Who names their bows? #7919I made a longbow for my cousin and asked other family members for a name suggestion. His niece came up with the name for it. Her response was, “Since Bob is going to be skewering meat with it you should name it ‘Shishka’.”
So it is.:wink:
Dennis
in reply to: Bald Eagles 5-22-2011 #13406Got this Egret this morning too. Not a great picture but worth showing. If you look close you can see water drops in the air just behind his feet.
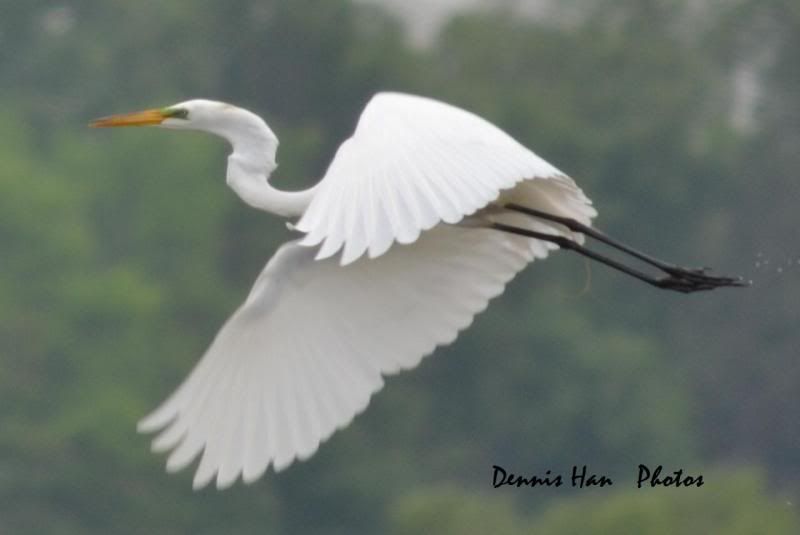
Dennis
in reply to: More Bald Eagles—5-8-11 #54412According to my bird book it is a Little Blue Heron. We have lots of Great Blue Herons and Green Herons but I don’t see too many of the Little Blue’s around here. He was nice enough to pose for a picture about 30 yards from the truck.
Dennis
in reply to: Longbow For a Cousin #31005Here are some pictures of Bob’s first shots with his new bow.


This was taken at Three Trails Archery. We went to a traditional only 3D shoot on Sunday. None of us shot worth a crap but we had a blast. At least Bob had an excuse….he was shooting a new bow he wasn’t familiar with.
I caught the arrow in flight in this picture just before it hit the deer.

Dennis
in reply to: Bald Eagles #28314I see eagles around here quite often, usually around the nearby river and a few times around farm ponds. This sighting made me a little envious.
I got a call from my daughter one afternoon and she said she thought she was looking at an eagle and wanted to ask to be sure. She was sitting in her car at the end of my driveway. The eagle was sitting right across the road and she and her sister took these pictures from my front yard.


Headed toward the river.

Dennis
in reply to: Longbow For a Cousin #28308Hi Steve, I enjoyed your story in the TBM magazine.
I just ‘eyeball’ the curve and shape it with a rasp and a file. There is about 1/8″ drop to the curve front and back. I use a 4-way rasp at first because it has a smooth edge and I won’t dig into the back for removing the bulk and then switch to a fairly coarse file to square up the back corner. After that I use a square cornered piece of Walnut and sandpaper to finish.
On Hickory it takes about 45 minutes to do.
in reply to: Let's build a selfbow #25462Good build-along Clay. Looks like it will be a good shooter.
Michael. I don’t know what kind of trees you have up there but I have seen some good bows made from Hackberry, Black Locust, & Hickory.
Dennis
in reply to: Bald Eagles #20951Homer. The ‘geeks’ with guns is what concerns me with where the nest is. It is located right on the edge of a river. On our (company) side it is employee only access but the other side is private ownership and the sons of the owner have been known to shoot at anything and everything. The river is also used in that same area by lots of people who set limb lines and trot lines and run them at all times during the night.
We are thinking that the Ks. DWP may put up a restricted area around it. I kind of hope they do.
Dennis
-
AuthorPosts