
Forum Replies Created
-
AuthorPosts
-
in reply to: sharpening tuffheads with kme sharpener #51945
Skinner,
The KME did not work like magic for me either on first crack, and I think I am pretty skilled with my hands.
Ron spent forever with me, (whatever it took), to understand the process, don’t hesitate to contact him…he is that dedicated to his product.
So a couple thoughts that may help you. I can’t emphasize enough not to put muscle into it….let the stone do the work, when you push down you actually flex the BH down and defeats the purpose of the jig maintaining a perfect angle of cut…this was my biggest mistake. Also, don’t think of the magic marker as a suggestion….consider it a mandatory visual tool. Last do not mix sharpening techniques. Some of those Youtube videos show a final flat pass…the KME actually cuts a micro bevel on the back edge of final pass. I asked Ron about this and he stated to not expect to slice a piece of paper in half in mid air like those youtube video’s show. Your cut angle is 25 degrees, not the much thinner edge on those Japanese steak knives. Know there is no doubt when that BH is razor sharp….the hair cuts clean to skin…no problem. Truth is, I still don’t have the system down perfect, as I shave hair much better with the coarser brown stone and then lose my edge with the final 2 stones.
When you cut by hand did you use a file? I did the same when I first failed with the KME, thinking I dropped money on a gimmick, and was surprised at how fast the file cut by comparison to the stones. I was convinced the stones were too soft, but after much discussion Ron finally convinced me the stones were hard enough to cut the BH metal…you just have to work the correct surface. Anyway just offering another voice that the KME works, and you are not the only one who did not magically shave hairs on their initial attempts. Hang in there, a good blood trail makes the effort worth it.
in reply to: tuning tuffheads with dixon alignment tool #23930Skinner, thanks for the pic. I had a bad assumption from your first post, even though I looked at the Dixon, I just now noticed it has fixed bearing points. I have the Firenock APS and all bearings can be moved anywhere along the tool length(loosen thumb screw and slide), and also qty. of bearings added or removed as much as you want, hence my comment about a 3rd bearing under the spinning hand to prevent flex that causes false readings. Now I see your dilemma from your initial post. Even though your outsert is riding on front bearing per pic provided, because it is machined and therefore assumptive to parallel with the shaft, I still would have suggested spinning with all on using your Dixon. Never would I suggest using a 3rd bearing per your pic….light pressure to spin is the better option.
If it works, don’t fix it.
in reply to: tuning tuffheads with dixon alignment tool #23822Skinner,
Glad to hear all worked out. I miffed on my first try at BH and adapter assembly with the tuff-head. I was really surprised at the slop,coming from a “buy off the shelf ready to shoot mentality” before. I know the theory…performing the theory is another issue.
Would you be willing to share your opinion of fine detail using the Dixon tool for assembly? I got mine to work on second effort, and want a better system to achieve perfect results in the future. Joe makes it clear on his web site that the BH tip is not perfectly centered, and therefore with my bearing spinner jig/tool, BH and adapter alignment was a big challenge. Spin test was easy by comparison, but adapter alignment is similar in enjoyment as going to the Dentist at present. Do you see a specific benefit to the Dixon tool vs. a standard bearing type spinner? I bought the tuff-head last year(Newbie to “Ashby clan – Totonka arrows”):lol: Personal assembly was certainly more challenging than buying “off the shelf” goods, but I am a better archer for having to take the time to understand all parts of the system, now knowing the system trumps any individual part.
Also, with you being the better than average shooter that your pics indicate you are, and knowing you have taken the time to tune….I would also love to hear your opinions about shooting the tuff-head tipped arrow in wind(not that I am looking to hunt in a wind storm:shock:. For some reason I now have acquired a lively bow arm that makes forming an opinion on flight characteristics less than scientific.:wink: All hits the mark OK, but I sware my arrow looks like it is going every which way in flight and do not know if this is because I went with bright fletching and more is visible, or if actually wobbling in the air. In other words because I am new to BH and adapter assembly, I am learning to trust my results. Before it was the factory with the responsibility. Paper tune and French tune says fine, and so does accuracy to 20 yards…after that I fall apart. How do you compare the Tuff head in flight to what you shot before? What I know for certain was the extra weight causing benefit at point of shot: bow dead in hand and soooo quiet?
Sounds like you have your answer to thread topic, so I hope you do not mind adding to your question asked?
in reply to: tuning tuffheads with dixon alignment tool #22486Glad video link was helpful, but I cannot take credit, I am not the maker.
in reply to: tuning tuffheads with dixon alignment tool #22137In my personal testing, even with a small 3 degree helical, while test shooting at 5 feet, my arrows showed up to 270 degrees rotation already.
See archers paradox. http://www.youtube.com/watch?feature=player_detailpage&v=96KGWC0PB6s
Alignment is an important part of the equation to good arrow flight.
in reply to: tuning tuffheads with dixon alignment tool #22129Have you reviewed this youtube link? http://www.youtube.com/watch?feature=player_detailpage&v=YR0pgc18EEI
Detail to your circumstance is lacking(pics make all very clear) but in general you want everything on the front, to be installed before testing. Both tester bearings ride on arrow shaft. Keep in mind all can be aligned, but still theoretically possible that if you had greater mass off center,(tied outsert for example) to the center line of arrow shaft, the arrow still would not spin true. Similar to a tire with a load of ice causing it to want to wobble.
Use caution not to flex arrow when spinning. some models offer a 3rd bearing which can be used under where your hand will spin. 3rd bearing is a bad idea unless your arrow is perfectly straight.
Looking at the groups you posted showing stacked arrows, I would think you have tuning mastered already.:D Great shooting.
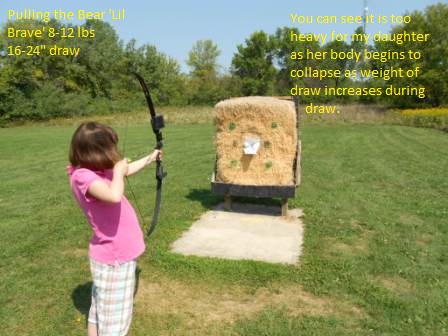
in reply to: Light bows for the "little ones". #25765Ben, Thanks for sharing your .02 I fully expected no response. The easiest answer for most dealing with special needs children is just to scrap the idea if easy answer is not found. I am blessed that my daughter thinks I am the greatest, and wants to do what I do. So I ‘need’ to come up with a workable solution….and have fun in the process. Just shooting targets after all.
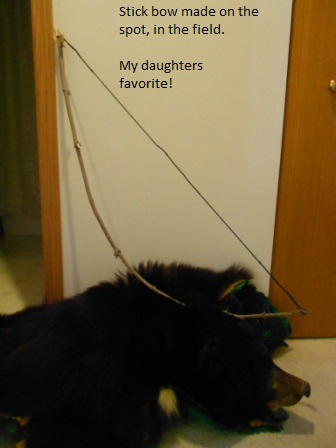
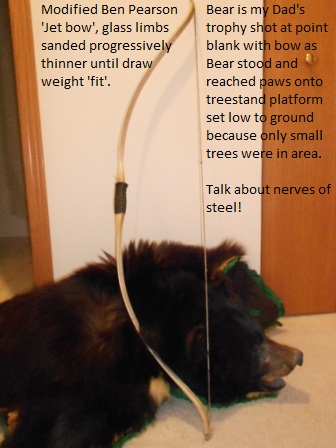
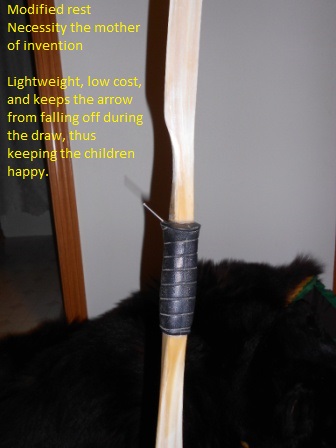
Many a 7 year old can easily pull the 8-12 pound “lil brave’ pictured, without a glitch…the need for an EXTREME low draw weight – at longer draw, is the heart of my dilemma. I like your ideas to address less drag(lean string, smooth rest,….), never thought of that. A whisker biscuit rest(similar to what you describe) came with the lil brave, but is a bad choice unless a a cut away riser is used, which then makes the physical bow weight too heavy(more wood mass needed). A longbow style, seems the best option, and I will probably tweak the nail idea in the pic to make more visibly pleasing(paint?), but it does function perfectly.
With the extreme low draw weight I am thinking all wood will be so thin, it will never have spring and memory to work again. Perhaps my carpentry experience is not relevant to being a bowyer, and I should just stop thinking it won’t work with wood, and give it a try. So far, I know I need a longer bow or else the weight stacks too quickly from limbs needing to flex more. I never shot anything but a recurve, so the longbow concept will take some research…can it be too long if navigating a woods is never a concern? Photo’s of native’s bows look as long as the person.
Is that a hand made bow in your signature pic? I am never ceased to be amazed at the creativity of the members on this forum. Thanks for the ideas.
in reply to: Light bows for the "little ones". #22512Hope this works, and that pics were worth the effort. Don’t know if I gained anything archery wise, but I will be a computer genius by the time I finish this effort.:lol:
As mentioned earlier, I would love ideas of how to come up with longer draw lenghts at very light draw weights for future issues that may arise.
Thanks.
 in reply to: Light bows for the "little ones". #22378
Sorry about no pics. I am trying to send to compressed folder, as even 1 single pic was 210kb and this put over limit allowed.
If I can figure it out I will add.
in reply to: THE WEAK LINK #57724For me, whatever it takes to know that I left no stone unturned before releasing an arrow into an animal … if I can’t afford the most lethal arrow out there, I can’t afford to go hunting. Keep us posted.
Couldn’t say it better! The purpose to all this “madness”!
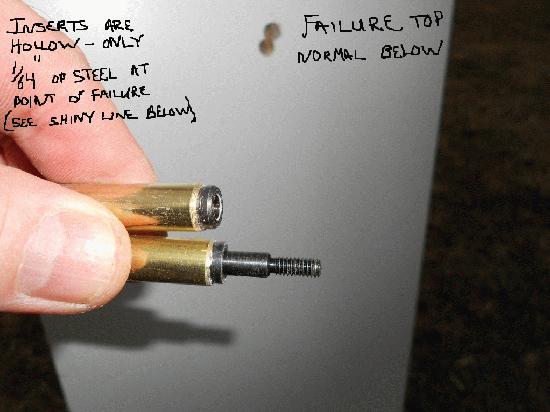
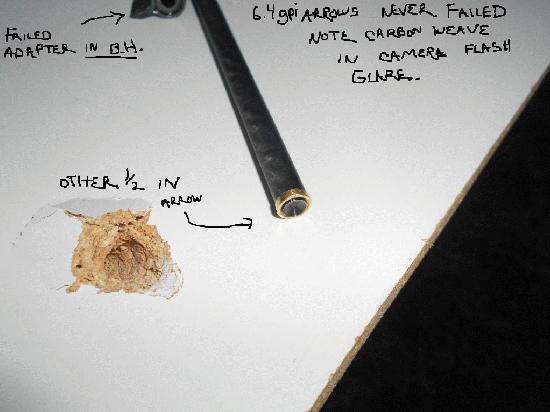
in reply to: THE WEAK LINK #57394More confirmation to same problem. 698 Gr., 32.8% FOC, 6.4 GPI Carbon Tech Cheetah 3D arrows into 3/4″ particle board. I varied shot distance and angle of impact. Arrows and BH(300 gr. Tuff-Head and 75 gr adapter)no fail. Field point and BH adapters failed in 2 of 4 arrows.
I did not buy adapters from Joe, as other sight showed an adapter with the nice shoulder discussed. Well I ordered and opened mail and lo and behold received something other than advertised. Called with inquiry and told adapters vary with the season…all suppliers gave same speech.
I would be better with a lighter BH and a solid adapter. Will try filling the void with epoxy to increase bond area and also try the titanium as recommended.
Pics attached to help clarify…forgive the scribble…hard to write with a mouse.
 in reply to: Tuffhead 225 gr. Penetration #44472
Congratulations, you look happy! Also admire the effort taken to present your trophy in the beautiful manner you have: good for you, good for the trophy, and good for the sport.
in reply to: Wet Feathers #17759Just posting what I found in a previous thread in Tradbow about AA fletching.
Note the effects this design has with water resistence!!!!
A long look at fletching and EFOC
Forums: Friends of FOC:
Created on: 09/17/09 11:51 AM Views: 2701 Replies: 209
EDIT: Oct 21, 2009.
No real need to go to the other site now. Dr. Ashby has kindly added to this thread below and it’s a much easier read.
(You must copy and paste the ENTIRE link in an address bar)
http://tradgang.com/noncgi/ultimatebb.php?ubb=get_topic;f=1;t=057257;p=1
Dr. Ed Ashby
Joined: 05/26/2009
Location: Texas
Dr. Ed Ashby has not Created a Profile
Posts: 660
RE: A long look at fletching and EFOC
Posted Wednesday, October 21, 2009 at 12:47 PM
Steve,
This is an area of EFOC and Ultra-EFOC arrow design that needs to get more attention from hunters. There are some big benefits, and I’ve migrated to using the tiny A&A fletch on my serious hunting arrows. Of course there’s the decreased drag in flight, with better trajectory and more retained arrow force downrange, along with less deflection in crosswind conditions, but that’s not what I find to be the biggest advantages. The biggest advantages are: (1) a clearly present reduction in noise in flight; (2) the tiny fletching is far less visible to game; and (3) there is a major wet-weather benefit. NOTE: Your shaft setup needs to be well tunded BEFORE you start working on minimum fletching required to stabalize your broadhead. Even at EFOC, small fletching won’t work well when the shaft’s dtnamic spine is not correct.
Wesley did some test shooting for me (I can’t shoot well enough at forty yards to hit those tiny target dots!). From his compound, we took 190 gr. Grizzly BH’s on a 26%-27% FOC setup with the A&A fletching. Shot them dry then soaked the fletching in a bucket of water for a full 30 minutes and, without even shaking the water off the fletching, shot again. At 40 yards there was absolutely no change in point of impact. I think a lot has to do with the stiffness of the low-cut fletching (which you can only get away with using if your arrow has very high FOC). Even after 30 minutes of soaking there’s no visible matting down of the fletching. Those shots were with untreated feathers – no form of add-on waterproffing whatsoever.
For any unfamiliar, here are a few photos of the A&A fletch. Their appearance does take a bit of getting use to. The red ring is the turbulator.
#1: With EFOC 0.5″ tall, 2.5″ four-fletch A&A works for my very poor quality finger release. Once I get a good Ultra-EFOC setup I may be able to go smaller.
#2: 0.5″ tall, 2″ three-flect A&A worked with mechanical release from Wesley’s compound. This is the fletching we water-soaked and tested.
#3: Compare the fletching surface area between the 2″ A&A and the 3″ parabolic cut fletching. When thoroughly water soaked the A&A still stabalized the broadhead’s flight; the 3″ parabolic didn’t.
#4: Looks starnge; works great!
Ed
in reply to: 25 Degree angle of cut? #8134I just had a phone conversation with Dr. Ed Ashby to address “Why 25 degree angle of cut”. He has a health issue which prohibits him from using his arm, and with his permission, I am thus forwarding a summation of our conversation for the benefit of all.
To start, whether the BH was 25 or 35 degrees, assuming a similarly sharp angle, it is suspected to have no discernable difference in regards to PENETRATION. No scientific study was done to verify this hypothesis: a study of this type is suspected to require 1,000 shots under a controlled study to reach any meaningful conclusions.
Next, 25 1/2 degrees was confirmed to be Dr. Ashby’s preferred angle of cut. I will address why Dr. Ashby came to this conclusion, and how 25 1/2 is preferred to an angle such as 35 degrees for example.
WHY – The thinner the cutting edge, the greater the mechanical advantage a BH gains with regard to severing the blood vessels: less pressure is required to sever the blood vessel with a thinner edge. Unless pneumo thorax occurs(my insert), an archer/arrow kills with hemorrhaging. [A cell when cut, wants to coagulate through a series of reactions by blood plasma enzymes and proteins…prothrombin…thrombin….fibrinogen….fibrin which attaches to the tissue tags at the edge of a cut, causing coagulation].
HOW – Simply, through much independent trial and error, any thinner of an angle of cut than 25 1/2 degrees was causing an edge roll to the BH because it lacked durability and thus defeated the purpose of WHY. It is emphasized that a minimum Rockwell hardness of 52 is required to shoot an angle as small as 25 1/2 degrees. Assuming a softer metal is chosen, this requires a greater angle to BH, so integrity is not compromised(Dr. Ashby did not recommend a softer metal- 52-57 is recommended hardness range for the compromise between durability and brittleness).
In confirmation to Dr. Ashby’s conclusions 1).Larry Hanify, an engineer with Abowyer Broadhead Co. came to the same conclusion from his studies. 2). Bacon skinners all use 25 degrees single bevel for the perfect balance between sharpness and durability. 3). Tire cutters all use 25 degrees also.
One last note about methodology of obtaining the angle of cut. Dr. Ashby said it is critical to both penetration and hemorrhaging for the edge to be refined. A file is not good enough, even a smooth edge file. File burrs cause extra tissue tags to form, and these increase coagulation.
It is his educated opinion a file and a subsequent refinement using a window edge,coffee cup or similar is not refined enough. They may cut paper and rubber bands well, but on live cells, nothing bleeds as well as a refined edge. Dr. Ashby is quoted as preferring to prepare for the worst case scernerio, to put all odds in his favor, and I am in complete agreement with this philosophy.
Thank you Dr. Ashby for sharing this knowledge to better the Bowhunting community. Saying a prayer for a speedy and complete recovery to your health issues.
Good hunting to you all.
in reply to: Wet Feathers #60664Am I the only one feeling sarcasm coming on about the obvious answer to this question. A goose of course:D And turkey feathers from a turkey.
Amazing how often we are brainwashed into thinking we can only find a product in a store. I suggest if you want to give this idea a go, and you are not a goose hunter, to connect with the hunting community and I am certain a goose hunter will give you all the feathers you want.
I always thought hair spray was a good option to keep water off of feathers.(writing this I assume a silicone spray would work in a similar manner). Never tried a goose feather but if it works, then there must be a natural oil in them to repel water. Fletch helps to steer an arrow. By default wet fletching does affect flight. Trial and error is the only way to determine at what point this affect is enough to cause a hunter to make adjustment to a shootable vs. not situation.
-
AuthorPosts