
Start with a reference photo and a ruler. Lay out and trim your foam to the approximate size of your completed target. Attach pieces with glue, expandable foam or tape.
Over several decades of traditional bowhunting, I developed a strong desire to know as much as possible about my quarry. When my husband and I moved from the Lower-Forty to Alaska, topography, terrain, and species forced a change in hunting technique. Time in a tree stand and close brushy thickets gave way to hours glassing with binoculars and surveying broad, gravel stream beds and rolling alpine tundra. My first Alaska black bear hunt with Homer Ocean Charters, a couple decades past, reinforced the need for familiarization. During that hunt we spotted numerous bears. I passed up several shot opportunities on small animals. Two bruins were harvested during the charter. One was small like those I had passed up and another, which my husband shot, was what I expected a black bear to look like.
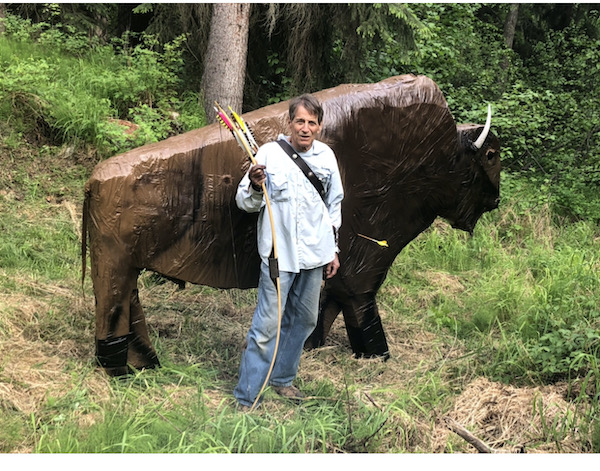
When we checked in his bear tag and skull at Alaska Fish and Game in Fairbanks, it was so large the biologist got excited saying it was the largest bear they had tagged that year. Bottom line, my expectations had been unreasonable due to a lack of familiarity. I thought the average size was larger than it was. From that experience I surmised it is smart to get a life-size target and practice with it. With Alaska quarry in mind, I would eventually expand our archery range to include caribou, bison, and moose. While large life-size targets are expensive, shipping to Alaska is also costly. The obvious solution: construct the targets yourself.

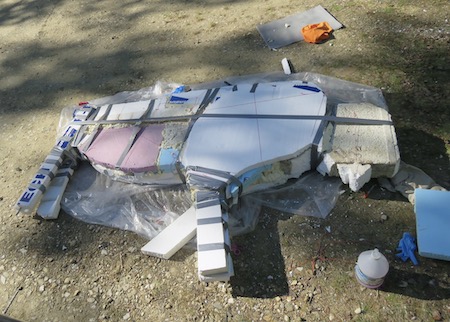
If you began with sheets of foam you simply draw your target shape and cut it out to arrive at this step. Using scrap pieces has the advantage of easily adding strength and durability to the kill zone. Note the pipe secured with duct tape and extending from each leg. I have used a wooden block for a weight while the glue dries.
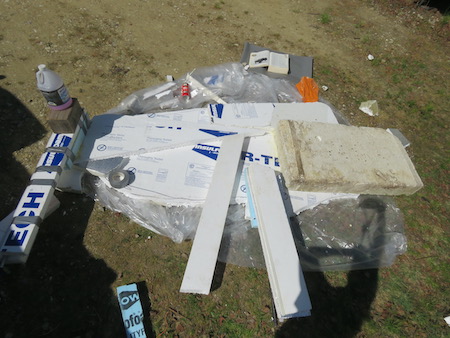
I applied a construction plan I had utilized on smaller targets. First, locate a photograph of the animal and determine dimensions. So, six feet tall, seven feet long, and upwards of 1,500 pounds. Second, secure construction materials. If cost is not a consideration you can pick up ridged foam insulation boards the size of a sheet of plywood at a building material outlet. Made from a variety of materials, it will vary in density, thickness, color, and weight. All of these options will work fine. If making a purchase, I would have selected two sheets three-inches thick, one a lightweight polystyrene the other a heavier dense polyurethane. Instead, I checked a local construction disposal dumpster and quickly amassed a variety of foam sheets. You can shoot a few field points into various materials and study the results. Is it dense enough to stop arrows, does it stay together, can arrows be pulled out with relative ease? Another consideration is total weight of completed target.
Other necessary supplies include two gallons of water-based glue such as Elmer’s wood glue, a large roll of duct tape, five old bed sheets, four cans of expandable foam, a gallon of exterior house paint and rubber gloves. Acetone can be used to clean the expandable foam applicator if desired for repeated use. Tools may include a measuring tape, sharpie marker, an old serrated kitchen knife, scissors, a jig saw, and bucket for mixing glue. Start by laying out a sheet of foam as large as your desired target, this may require taping two pieces together. Looking at a picture for reference, draw the animal shape on the foam. Once you are satisfied, cut out the shape, if your foam is difficult to cut, a jig saw is a wonderful tool. Next, glue or tape additional pieces to make it thick and sturdy, especially in the kill zone area. You can use expandable foam to fill voids and attach pieces.
Once enough layers have been added and you are satisfied with the shape, you are ready to stand it up and apply the outer covering. It should be sturdy enough to stand at this point, add more tape
if necessary.
Decide how you will make the target stand upright. I use a couple of pipes and some rebar that will slide into the pipes. Attach the pipes in a manner that keeps them away from the kill zone. Perhaps in the front of the front leg and angling towards the head, and a long one up the back leg and well into the body. Use duct tape to help make them secure. Once you have a satisfactory shape and the target will stand, you are ready to begin covering it with fabric. Tear old sheets into strips by cutting a slit in the top and then ripping lengthwise. If there are lots of stray loose treads, pull them off and discard, as it will make wrapping easier. Mix wood glue with water, adding less than 40-percent water, think soupy but not too thick. Saturate the strips in the diluted glue and begin wrapping the target. Smooth the fabric as best you can so it lays like a piece of tape. Continue adding overlapping layers, then take a break and allow it to dry.
Examine your work. You can still add foam, expandable foam, or trim things to your satisfaction. As you begin adding more layers of glue fabric, think about ending with the strips downward so water will run off, also think about strength and tie it all together. For example, lay a strip over the back that reaches down the leg, and then wrap a strip around the leg covering the other strip, and repeat. More is better to a point, but eventually it could become quite heavy. Once everything is thoroughly dry and all of the foam is covered, go around the hoofs with black duct tape.
Now for paint. I generally use any exterior product, often construction salvage. I generally roll the entire target, laid either on an old tarp or sheet of plastic, allowing it to dry before I turn it over to paint the second side. Alternately you can do it standing and paint entire thing. It is quite messy and old clothes are a must. Refer to your photograph for detail which I often apply with spray paint. Enjoy your effort for years to come. It’s a good idea to provide an annual maintenance. Expandable foam for shot-out areas and a paint touch up to extend target life, I have some a decade old and still in good condition. Even if you never plan to hunt really big game, it is incredibly cool to have a large, fun target to shoot with friends. It is especially good for teaching kids to shoot, and I practice more often when it is fun.
-
- First layer of covering in place. Long strips of sheet were dipped in the diluted glue mixture and wrapped smoothly around the core. Different colors of sheet show how they overlap from many directions.
-
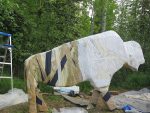
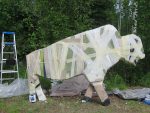
- Once numerous layers of glue impregnated fabric have been applied, allow it to dry, and if you are sat- isfied with the shape, it is time to apply paint. Depending on weather conditions, you might take a break between application of fabric layers to allow your target to dry thoroughly prior to applying exteri- or paint. This photo shows the front half of target painted with a base paint.
-
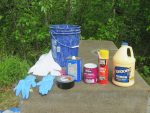
- These are some of the recommended supplies.
Author Bio: Krista thoroughly enjoys making archery equipment and accessories. Her first article in TBM was “How to Make a Bow Tip Protector” published in 1992. She and her husband live in Alaska where they own a plane and enjoy remote traditional bowhunts.


Leave A Comment