

For the purpose of this exercise we are assuming whitetail deer, as the most abundant and popular big game species hunted in North America today. This exercise could easily be used for the tracking of other big game, as well.
Before The Shot
It would be assumed that your equipment is properly tuned. You have practiced and recognize your personal range of competency in making an effective shot.
Deer are prey animals, meaning they have a sixth sense, kind of like the bogey man effect, like how you feel in a dark basement alone. They are animals constantly on the alert for pending danger. As a bowhunter you need to take certain precautions in order to have an opportunity to take that shot.
First, pay attention to the wind and keep yourself as scent free as possible. Separately, store hunting clothes, rubber soled boots that are relatively scent-free, scent elimination spray; and above all pay attention to the wind. Be mindful that humans/hunters let out a scent cone that spreads in the direction of the wind, so that once an animals gets within close yardages, particularly 20 yards or less, the higher the chances of being detected. This is why being as scent free and clean as possible is so important. Also consider “thermals” in the area you hunt, deer pay close attention to this. Because, as the day warms up, wind thermals rise up and down from morning to afternoon. These thermals carry your scent.
One of the reasons treestands are so effective is that typically you are above the “normal” line of sight, and scent tends to carry up and away from the ground and your stand. Deer have learned to look up, so camouflaged face and hands or gloves and face mask are a plus. This is not an essay about treestand hunting — but two things need to be stated here for safety sake: 1) there is no need for a treestand to be any more than 12′ — 15′ feet up in a tree; and 2) ALWAYS, ALWAYS wear a full body harness and be tethered to your tree while in your treestand.
Making The Shot
When a deer presents an opportunity to come into range for a shot, do not move until the animal’s view is blocked from catching your movement. This would typically be when the animal’s line of sight is behind a rock, tree or brush, or when the animal has its nose to the ground either scenting or feeding and it’s direction of sight is focused on the ground. Preferably, when the deer passes your position is considered the optimum time to draw and take the shot. It is also the “quartering away” shot that is most ideal. You are now behind the animal’s general line of sight, your arrow placement will be a little farther back, but your “depth of kill zone” is greater. Meaning your arrow and broadhead has greater potential for passing through a much larger area of the vital organs. This is not to say a broadside shot isn’t also a very good shot, as it will allow for greater potential of complete body penetration.
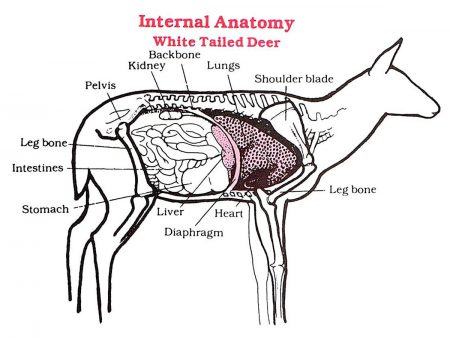
When taking the shot remember to focus on the SPOT—that little tuft of hair behind the shoulder, a crease, a certain hair color. If you focus you will pick out a spot. Typically on a whitetail deer this is likely to be a spot somewhere between 4 to 6 inches behind the crease of the shoulder. Do not look at the whole animal — Focus On The Spot. I remember reading an article many years ago by Jack O’Connor, a famous gun writer, who said, “Think of the deer as a running back carrying a football, the football is just behind his shoulder. Your job is to focus on the football and shoot it.” Notice I said famous gun writer… shooting at the whole animal is a problem for many including firearms hunters. I am a strong advocate of focusing on the lung area of a deer regarding shot placement. It is a large area allowing for a forgiving shot. Secondly and furthermore a deer can’t run very far if he can’t breathe! Heart shot deer have been known to go distances of 200 yards on their final heartbeat. Good penetration into the lungs and a deer will not go nearly as far. As I mentioned, a lung shot is more “forgiving”, it has a wider area. A heart shot placement on a deer is a very small window of opportunity, and depending on where the deer’s front leg is positioned, a significant percentage of the deer heart area is protected or blocked by bone! If you hit that scapula bone in front of the heart, you will hear a telltale “CLACK”! Most likely most of your arrow will protrude from the animal, they will likely pull the arrow out if it does not fall out. With this shot, you will get good muscle blood trail from the deer, but be assured that deer will live for another day, and in a couple of weeks be no worse off for the incident, only smarter. This is why I advocate the lung shot.
Always keep in mind, regardless of the shot, we as hunters and bowhunters have a moral obligation and responsibility to recover all game shot, or track the animal to a point where we are convinced we either missed or the shot was so minor the animal will be fine. Many sates have “Deer Search” and organizations that allow tracking dogs to find your deer if you run out of trailing sign or cannot find your deer, and you are convinced of a mortally placed shot.
At the Time of the Shot
Take mental note of WHERE the arrow hit and penetration into the animal. Concentrate on where the fletching went through. This will give you a good idea of actual shot placement. Be Quiet! Do Not Move — If you holler and whoop it up… the animal will only run harder and farther.
 Listen — most times the deer will run out of sight! Listen for telltale signs… crashing in leaves, splashing in water, etc. Wait — be patient! Wait at least 25 to 30 minutes before beginning to pick up the blood trail for your deer. Allow them to bed down. Seriously hit deer will not go far, but if you trail them right away, you will be pushing them and they will get up and run farther. Allow them to bed down and die / expire. For larger game animals, and particularly potentially dangerous game like bear, wait 45 minutes before you start trailing. Take mental note of where the deer was standing when you shot it. And take a compass or GPS reading in the direction you last saw the animal. This is key, because you may have to come back and backtrack and start over your trailing. At the spot the animal was hit, look beyond that point for your arrow if you believe you had gotten full penetration. If you find the arrow, the color of hair, blood and body fluid will all be telltale signs about possibly where and how well the animal was hit.
One word on stomach shot deer. If you find yellowish-greenish fluid on your recovered arrow or on the ground/trail, your animal has been stomach shot. He is mortally hit, but it will take more time for the animal to die/expire. You must wait 4 to 6 hours to give the animal time to bed down and expire before trailing. Stomach shot deer and other animals have a tendency to escape toward water, for reasons really unknown (but man does the same thing in the same situation). If you were to trail him right away — good luck! You will be trailing him clear into the next county. Another characteristic of a stomach shot deer is that when hit they will tend to hunch up their backs like a cat, and they may not run, they may actually appear to hunch up and “tip-toe” away from the scene. Wait first, even if it means overnight. Once starting on the blood trail, mark your trail with orange survey tape, in every spot where you find blood. This will develop into a pattern and direction of travel. Preserve your trail, be careful not to step in it! Look for blood on the ground, on rocks, tree trunks and bushes. This will give you an indication of where the deer is hit. Blood on both sides of the trail obviously confirms full penetration. Also look for body hair, the type and color of hair will tell you about where the animal was hit. Always be looking ahead when on a blood trail. Deer will go to bed down, but they will (if not dead) be looking back on their back trail. Essentially, what you are doing is stalking your deer. In reality, you may be doing just that if the animal is watching their back trail. If you lose the trail, don’t give up. Deer in flight have a tendency to go some distance without much blood sign. Look for tracks, scuff marks in the leaves, etc. If you lose the trail, go back to the last spot where you found sign and begin a series of “L” grid searches. Walk ten paces, turn to the left, walk ten more paces completing the”L”, walk 20 paces and turn left, walk another 20 paces to complete the second L. Continue in this pattern until you either pick up the trail again, find your animal, or go get help! This is one reason why it was so important to take a compass or gps reading when you first started out, as well as mark all spots where you found blood and other sign on the trail. Once you have found your deer… you have arrived! You are a skilled hunter and tracker! Congratulations!
TRAILING FACTS
Types of Blood Sign:
1. Blood that is frothy with bubbles usually indicates a lung hit.
2. Very dark blood may indicate a vein, liver or kidney hit.
3. Blood with mixed vegetable matter or greenish in color indicates a stomach hit.
4. Blood with frothy bubbles may indicate a neck hit where the arrow has cut neck arteries and the wind pipe.
5. Blood spattered on the ground may indicate a fast moving animal or one where major blood vessels have been cut. Spattered blood produces fingers which are a telltale sign of the direction of travel.
6. No blood sign doesn’t always mean a miss. The animal may be bleeding internally.
Types of Whitetail Deer Hair:
1. Back hair is long and dark, many times black tipped and coarse.
2. Neck hair is like short back hair except underneath the front of the neck which is short and light in color.
3. Brisket hair is very dark and twisted near the junction of the neck and the body.
4. Side hair is short brown with dark tips.
5. Bottom of the ribcage is a mixture of white, dark brown hairs, straight, long and thick. 6. Belly hair is usually long, white, very fine and sometimes twisted.
Other Tips:
1. A small spray bottle of hydrogen peroxide may go a long way in helping to find the blood trail, as peroxide will ooze just like on a cut, when sprayed on blood.
2. On windy days you may have to be extra careful and be mindful to turn over leaves in looking for blood and other sign.
3. Often crows, ravens and jays will congregate where an animal is down.
4. Mortally hit animals tend to run downhill rather than up.
5. Be sure to check streams and swamps if necessary.
6. Oftentimes animals will circle back and back track their trail.
7. Do not be afraid to get help, but limit the trailing to three people maximum.
HAPPY TRAILS!!!! AND GOOD HUNTING!!!!
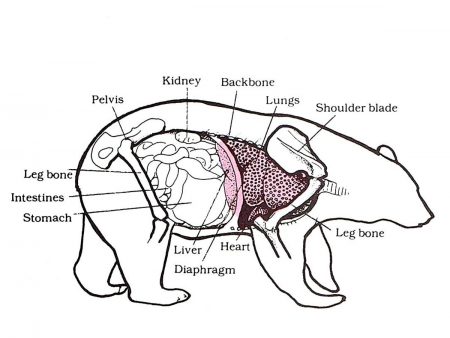
Editor’s Note: Deer and bear anatomy images from Big Game Recovery Guide by Wayne Trimm.

Leave A Comment