
Forum Replies Created
-
AuthorPosts
-
in reply to: 2 Blade double bevel and 3 blade vs single bevel #15595
One other aspect of the eternal 2,3, or 4 blade debate that is rarely mentioned is penetration issues when bone of any size is hit. Here’s somthing to ponder- When a 2 blade head hits a bone (heavy or light) the BH has to break that bone in just one direction in order to pass through that bone and reach the vital organs. A 4 blade head will need to break the same bone in 2 directions to accomplish the same thing, and a 3 blade head will need to break the same bone in three sepeate directions to get through it. It takes far more energy to break a bone 3 times than it does to break it once and that means the arrow tipped with a 3 blade head looses far more of it’s limited energy to accomplish the same amount of penetration that a 2 blade will. Once again, the 2 blade head will have a much greater chance of achieving a full pass through than the 3 blade will.
Secondly, while it can be done with a perfect shot getting a complete pass through with a three blade without setting of the mental alarm bells in the animal and triggering an intense flight response from the animal with a three blade head is rare. Even with a perfect shot the animal is gonna head for the hills and a longer, more difficult tracking job is often the result.
Ron
in reply to: HOW SHARP IS SHARP ENOUGH? #15503David Petersen wrote: It’s so strange that some of our most informed and vital members, like Daniel, Doc Ashby, Kingwouldbe and Sharpster for examples, are either here every day in full force, or else disappear entirely for months at a time. Ed is plagued with serious medical problems, while Daniel (I hear) is massively busy in his profession, as is Sharpster/Ron Swartz. Still, it sure would be nice if these and other experts in their fields could check in with us monthly or so, as does Fletcher. I miss ’em. :?:(
My apologies Dave, Robin and to all. Yup, guilty as charged.
Now to see if I can add anything even remotely useful…
“How sharp does a broadhead need to be to kill”? That’s easy- not sharp at all. Any animal can be killed with a target point if it punctures both lungs (bi-lateral pneumothrax). The reason a broadheads level of sharpness is so critical is not so much to up the odds of a kill (although it certainly does). The level of sharpness plays a huge part in upping the odds of our actually recovering that animal. (and that’s the real goal, right)?
There are many benefits and no downside to getting the absolute sharpest edge we can on our heads. As the level of sharpness goes up, the level of drag/resistance on the head from slicing soft tissue goes down, result… increased penetration. Translation- A crazy sharp BH requires and uses far less energy to penetrate hide, hair and soft tissue than a semi-sharp head of the same design/weight does. So a shaft with a super sharp BH will have used up considerably less of its limited energy when the BH reaches the off side of the animal and will have a much greater likelihood of continuing through and attaining a full pass-through than a shaft with a pretty sharp head will, even when bone is encountered.
The biggest benefit of a surgically sharp broadhead is in its ability to dramatically up the odds of a successful recovery of the animal. This is accomplished in two ways. Foremost is the impact on the bloodtrail. All else being equal, the best bloodtrail will always be produced by the sharpest broadhead. Not the biggest BH or the one with the most blades but the sharpest BH. Few things in bowhunting are set in stone but in my mind at least, this comes close.
Another often overlooked and very under-discussed benefit of blazing sharp broadheads (particularly 2 blade) is the amount of flight response triggered in the animal at the shot. In other words, the animals reaction to being shot. If we can zip an arrow right through an animal in a flash, (without hitting heavy bone) often they’ll jump and look around like “what the heck was that” and not even realize that they’re injured. This is exactly what we want because an animal that doesn’t know it’s been shot frequently doesn’t run. They just casually walk away with blood pouring out both sides and fall over in sight. I used to think the best bloodtrail was the one a blind man could follow but I’ve changed my mind, the best bloodtrail is without question, the shortest bloodtrail.
When heavy bone is hit, that animal instantly knows that something very bad just happened and he’s headed for the next county at hyperspeed. Even with a perfect double lung hit it can take 90 seconds or more for the animal to succumb, and we all know how much ground they can cover in that short time. In this case the level of sharpness becomes even more critical because we’re not hounds, and we can’t scent track. The only hope we have of recovering the animal is to follow the bloodtrail, and the sharper the head, the more blood there will be on the ground.
I’ll be the first to admit that a super sharp BHD will never make up for poor shot placement. The complete recipe for consistant game recovery is: 1) Shot Placement
2) Penetration, and 3) BHD sharpness… and we need all three ingredients.Ron
in reply to: Mechanical Advantage question #22232In order to preserve the original topic, I’ll add this one point…Single bevel broadheads rotate due to the huge difference in surface area between the beveled side and the unbeveled side. In other words the bevel needs to be wide, and the wider the better.
To achieve the greatest rotational benefit of a single bevel grind, the blade blank must be sufficiently thick to result in a big, wide 25 degree bevel, ideally for the entire length of the blade. Grinding a 25 degree bevel on a 0.20 thick blade won’t produce a very wide bevel and the resulting difference in surface area of the two bevels will be minor, so the rotational benefit gained by single beveling a blade this thin would be minimal.
Ed Zachary said he didn’t want to bring up a theoretical minimum blade thickness so I’ll stick my neck out… I’ve single beveled blades as thin as 0.37 (the older Tusker Concords). The resulting bevel contrast was adequate but the structural integrity of the head wasn’t great at 3:1. I had to shorten the broadhead by adding a big tanto tip in order to stiffen the heads up. I’d say 0.50 is pretty much minimum, and I’ve yet to see a blade that was too thick.
Dave, The only new grizzlies I’ve seen are the 3 sample heads that Shawn sent me last year and since I think they’re from one of the very first runs, I haven’t touched them so I can’t say how much easier the new ones are to sharpen. I’ll be getting some in the next month or so and report back. Let us know your thoughts after you sharpen a couple.
Bert, yea I’ve got a touch of gray…. a very light touch mind you, but a touch none the less. I remember when I was a kid my Dad had a small inexpensive file that I swear would have cut through a diamond. It’s long lost now and I’ve never seen another like it. I love very aggressive files and extremely coarse stones for quickly establishing a bevel and burr. Believe it or not, I don’t particularly enjoy sharpening. I view it as a necessary evil and I want to get it done quickly. I have to regularly preach that files, and x-coarse sharpening stones are our friends. So many people want to jump right to fine grit stones too soon, and all that does is prolong the task and/or polish dull edges! Get the blade very sharp with your file or coarsest stone, then refine and polish the edge with the finer grits.
Ron
in reply to: Mechanical Advantage question #20563Now to address the original question, the words “machanical advantage” are used to describe two very important yet distinctly different aspects of BH design. The term is used to describe the shape of the broadhead itself as Dave mentioned- Longer, narrower heads (3:1 designs) have a greater MA than shorter, wider (Delta style) heads do. The greater MA 3:1 heads require less energy to attain the same level of penetration as a wider head.
When we use the term MA in reference to the bevel geometry of the cutting edge it refers to the ability of the bevel and cutting edge in combination to efficiently slice tissue. Therefore the lower the bevel angle, the greater the MA of the cutting edge BUT, in bevel geometry there is more to it than that. We want the greatest MA we can achieve WITHOUT sacrificing the durability of the cutting edge. If we were to sharpen a double bevel BH at an extremely low angle like 10 degrees per side the MA would be excellent in theory but, the blade’s edge retention would suffer dramatically and it would dull pretty much instantly. So we willingly sacrifice a bit of MA by using higher sharpening angles in order to preserve cutting edge durability and to ensure that the blade has the ability to slice cleanly throughout the penetration cycle.
This is another case where a single bevel captures the best of both worlds. If a single bevel BHD has a 25 degree bevel on one side of the blade, and a flat, zero degree bevel on the other side, the total included bevel is 25 degrees.
A double bevel ground 12.5 degrees on each side will also have a total included bevel of 25 degrees. Both bevel types would have exactly the same MA but, the single bevel will be far more durable and will likely still shave hair off your arm after a full penetration pass through, whereas the double bevel would very likely have dulled long before even reaching the vitals of the animal.
Ron
in reply to: Mechanical Advantage question #20516There are certain BHD manufacturers out there who are completely hostile towards Ed Ashby’s work/findings. That’s all I’m gonna say about it.
Ron
in reply to: Eclipse Broadheads #56676The Eclipse are great heads. I prefer the double bevel version to the single, and although they have been around for a long time, I have to commend Blake for the improvements he’s made since taking over. The factory bevels are now much better than they were in the past and the teflon coating is another big plus. Can’t go wronge with Eclipse heads.
Ron
in reply to: Guys and Gals, I Need a Few Prayers #53805Prayers for you and your family,
Ron
in reply to: Ashby on arrow weight — just posted #51205I couldn’t agree more Dave. Wise words as usual. I just like to remind folks about that structural integrity thing every chance I get. It’s a drum I beat on a daily basis. In fact it’s just about as near and dear to my heart as shot placement, and the level of broadhead sharpness. The depth of Ed’s work is so vast that some very critical aspects don’t get nearly as much attention as thay should. I try to point out the less talked about but equally important stuff when the oppertunity presents itself.
Ron
in reply to: Merry Christmas #51176Merry Christmas to all. Here’s to good health and perfect arrow flight for the new year!
Ron
in reply to: Merry Christmas, Ed! #51169I second that. Merry Christmas Ed. Thank you so much for your selfless devotion to helping ALL bowhunters. I seriously doubt that you know just how many people appreciate your work and are anxiously awaiting your next series of updates. I know that your having a tough time now and our prayers are with you but, hopefully the worst has passed. Merry Christmas and a speedy recovery to you my friend.
Ron
in reply to: Ashby on arrow weight — just posted #50532StandingBear wrote: Patrick, the arrow was a carbon shaft and it broke 1 inch behind the insert where you screw the broadhead in the shaft. SB
Now that sounds familiar… There’s a perfect example of the primary advantage of using internal footings, particularly with carbons. A 4″ tapered internal footing would have added greatly to the structural integrity of the shaft/BH setup. The internal footing also would have provided the added benifit of even greater FOC.
Ed’s research points out much more than the 2 blade vs. 3 vs. 4 issue or the single bevel vs. double, or high FOC vs. low. While these are the primary topics of discussion, one of the most important (and most overlooked) topics of the Ashby reports is the critical importance of the structural integrity of the broadhead, shaft, and the connection of the two.
I’m sure there will be questions about internal footings. Hopefully Ed will chime in here with some advanced footing info.
Ron
in reply to: Custom Knife Handle: A Work In Progress #49499SB, you are indeed an artist my friend.
Patrick, SB is one of the premier knife makers in all of North America. He’s far too humble and mild mannered to admit it though. You’d be hard pressed to find anyone more qualified to restore your beautiful knife. Just thought you should know.
Ron
in reply to: Custom Knife Handle: A Work In Progress #49343Oh come on SB… The ‘ol batteries need chargin thing??? I think you just love keepin us all on the edge of our seats!
On with it Man!
Ron
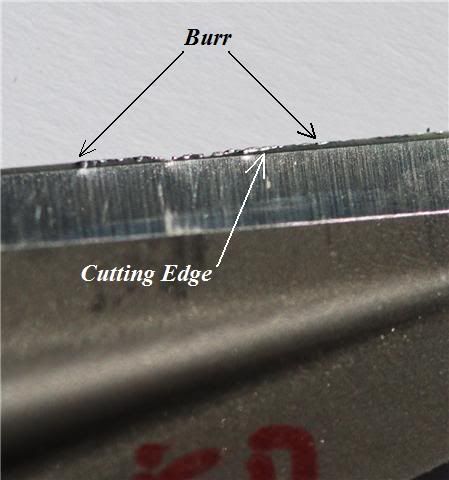
in reply to: Ashby on sharpening — posted! #46990Thanks for adding the pictures Ed. Hope you don’t mind but I stole one of them…(fair and square of course).
Patrick, about the burr… Remember the old joke- Q: “Why did the chicken cross the road? … A: “To get to the other side”.
When sharpening, we need to raise a burr for the same reason… to get to the other side of the blade. All sharpened edges have two bevels. In the case of a single bevel there are still two bevels, just that one of them is ground at 25 degrees and the other at or near zero degrees. The burr is the physical evidence that tells us that we’ve removed enough material from one bevel to have “reached the other side” of the blade and in so doing, created a true intersection of the bevels… a cutting edge.
Sharpening is really grinding on a micro level. We start with a coarse stone or file and stay with it until we have removed enough material to bring the two bevels to a true intersection. The burr is a coarse feeling ribbon of steel which develops on the edge of a blade when the two bevels intersect. The burr will develop on the side of the blade opposite from the stone or file. In other words, the side you not working with the stone. If you look at the pic I stole from Ed, you can clearly see that the true cutting edge is straight and uniform but, there’s a very thin, irregular ribbon of steel still attached to it. That’s the burr. Light burrs can be moved around with light pressure because they’re very thin like foil. It looks like this one may have been stropped or folded out in front of the edge for the photo because typically it would be on the underside of the blade. When sharpening a single bevel blade, one of the reasons we flatten the back of the blade first is to remove any burr that may be there from the factory. That way we’ll be able to tell when we have raised our own burr. Just lightly drag your fingertips straight out from under the unbeveled side of the blade. Before the burr is raised, the blade will feel perfectly smooth all the way to the cutting edge. When you’ve ground the blade enough to raise a burr, you’ll feel it. Just a light, coarse bump right at the cutting edge on the unbeveled side of the blade.
 [/img]
That’s the burr… once you have that, you’ve got it licked. All that’s left is to polish the bevel(s) and refine the cutting edge with finer grit stones, then remove the burr and that’s it. Done. One important note though… If we proceed to finer grit stones before the burr is developed, we’ll end up with beautiful, mirror polished bevels but the blade will be still be dull as a stump. Gotta raise that burr right in the beginning. Hope this helps,
Ron
in reply to: Ashby on sharpening — posted! #45201Single bevel sharpening
Sharpening single bevel blades is actually easier than sharpening double bevels once we understand the “how” and “why” of the process. When sharpening double bevel blades it’s important to give equal treatment to both sides of the blade in order to keep the cutting edge centered on the blade. This is not the case with single bevels. When sharpening single bevels almost all of the work is done on the bevel side.
Step one is to true-up and flatten the unbeveled side of the blade. We don’t want any bumps, burrs or low spots, just a nice flat surface from tip to heal of the blade. Abowyer, Tusker and ABS heads are very flat right from the pack so, just a quick pass or two with a medium grit stone held flat on the unbeveled side of the blade will true them up fairly effortlessly. Grizzlies are a bit rougher out of the pack but, a couple of passes with a file will take them down pretty quick too. Grizzlies also need to have the tips filed flat as well. The bulge at the tip of a Grizzly broadhead is actually excess braze that has bled out during the lamination process. File flat across the tip of a Grizzly and you’ll see brass beneath the paint. Just file it flat till the brass is completely gone and you see only steel.
Step two is to work the bevel side of the blade with a coarse stone or file until a very small but pronounced burr is developed on the unbeveled side of the blade. Make certain that the burr runs continuously along the edge from tip to heal. Although it will be small, you should be able to both see and feel the burr. It is critical that we raise the burr at the beginning stages of sharpening because this is where the cutting edge is actually formed. The most common mistake people make when attempting to sharpen anything is: Progressing though the grits too quickly. If we don’t reach the point where the burr is developed with the coarsest stone or file, then progressing through finer grits will only polish the bevel, but it won’t get the blade any sharper.
We have all been taught that when sharpening, it’s important to move the blade into the stone as though we were trying to shave a thin slice off of the stone with the blade. This is generally true but, it’s less critical when sharpening single bevels except as a last step. So in the beginning, work the blade forwards and backwards on the stone, either parallel or perpendicular to the cutting edge, whichever you prefer. Because at this point, we’re only attempting to remove steel to shape the cutting edge, keeping the stone in contact with the blade on both the forward and back strokes will save time and effort, and will develop a good burr quickly. If you’re using an angle guide of any kind, you’ll typically work perpendicular to the cutting edge. If you’re free-hand sharpening, it’s generally easier to maintain a consistent angle if you work the blade lengthwise.
Step three- Once we have raised a burr with our coarsest stone or file, we can then progress through successively finer grit stones to refine the edge we developed with the coarse stone. Do this the same way- keep the blade and stone in contact with each other on both the forward and back strokes. At this point we’re simply polishing the bevel and refining the cutting edge so we can progress through successively finer grits fairly quickly. As we do this, the burr will continue to get bigger and heavier, which is exactly what we want.
Step four- final “tuning”. Now that we have developed a good burr and have refined and polished the bevel and cutting edge with the finer stones, the last step is to do the absolute minimum necessary to the unbeveled side of the blade in order to remove the burr. This will expose the blazing sharp edge which is concealed beneath the burr.
This is the most critical step. It’s fairly easy if you’re using an angle guide but if you’re free-handing, take your time and be very deliberate at this point. Flip the broadhead over and using the finest stone you have, make 3-5 passes into the edge of the blade to shear off the burr. Check the sharpness after this. The blade should feel pretty sharp. Then make a couple more passes into the edge of the unbeveled side… Now it should be getting very sharp… Then start doing single passes and check the sharpness of the blade after each pass. Before long, it will be extremely sharp. At this point if we make another pass or two, we can sometimes loose the sharpness because we’ve gone too far and now have begun to create a burr on the beveled side of the blade. If this happens, it’s an easy fix: just make a few individual, alternating passes on each side of the blade just like you would a double bevel. It should only take 3 or 4 alternating passes to get right back to “hair plowing” sharp. Again, this last step of removing the burr should be done with your finest stone.
Finish up by stropping the head on leather or my personal favorite, corrugated cardboard. Just a good sized flap off a plain brown cardboard box. I do 6-8 passes per side then follow with a series of alternating passes flipping the broadhead each pass.
Sorry about not having pics to go with this post. I’ll get a real tutorial with pics or better yet, video posted soon. Till then maybe Ed or Standing Bear might have some? Let me know if this wasn’t as clear as I hoped it would be or if anyone has any questions. Thanks,
Ron
-
AuthorPosts
 [/img]