Forum Replies Created
-
AuthorPosts
-
in reply to: OJAM VI Video #35342
Thanks for the ompliments everyone. In two weeks, we’re doing it all again———OJAM VII————.
Dennis
in reply to: A different kind of repellent #28377I haven’t heard of it either. For ticks and chiggers I use Permanone on my clothes and I haven’t found anything more effective than that. For skeeters I use a Thermacell.
Dennis
in reply to: may I come in? #28375Howdy Homer. Feel free to jump in and add your two cents worth in the forums.
Dennis
in reply to: Starting Some New Ones #27480I managed to get in a few work sessions the last couple of days so I will update the progress.
I started dressing down the riser overlay and blending it in and then did the laminations on the belly.


Now I have started the fun part:shock: working on the tips.
I first mark out the general shape of them.


Then I do a little sanding with a small (1″) drum sander in the drill press to get it close to the lines.

And then use a small rasp and sandpaper to work it on down.

I work on the string groove to finish it out and sand everything down with 120 grit paper. Here is the final fit with the string loop in place. I will take time to even everything out during the final sanding.


That Mesquite over Hickory is going to look real sharp with the finish on it.Now comes the really fun part. Making the other tip match this one.:shock::shock:
Initial test has the weight right around 55#. After the final finish it should set in around 50#
Dennis
in reply to: Tips fpr a Beginning Bowyer #26783Sorry. I can’t help on that one.
in reply to: Tips fpr a Beginning Bowyer #26140If you are close to Oklahoma plan on attending OJAM VII. This is where you will find lots of answers to your questions and get a lot of hands on experience.
Dennis
Here is a video I made of the fifth annual gathering. It will give you an idea of the event.
in reply to: Sealing Some Surewood shafts #22576Glad to help guys.
I had a lot of the same questions when I got started with this stuff long ago, before the thought of home computers existed. My way of doing things is just one of many and I hope to give someone a few tips and pass along information if I can.
I’ve been trying to get everything ready for OJAM next month. We had a work day there getting the area ready or the campers and having a club meeting to see what else is needed. I just got home and am more behind than I was before.:lol:
Dennis
in reply to: Recurve – new or used? #22569Excellent advice Killdeer. Nothing more needs added to it. Glad to see a post from you.
Dennis
in reply to: Sealing Some Surewood shafts #20555Fletchtite will not stick to Minwax Polycrylic. You will have to use Duco. The first set I made using Polycrylic I used Fletchtite and had three feathers floating around in front of me on the very first shot.
If you decide to use polycrylic wax the shafts with some furniture paste wax before you shoot foam targets. The poly will really stick and make them hard to pull if you don’t.
Another note to watch for. If you use water based analine dyes on your shafts the poly will make the color run. I made some crimson shafts and dipped them a few days later and had a tube full of pink sealer.:oops: It is best to wipe on the poly in this instance.
Dennis
in reply to: Starting Some New Ones #19655OK, now my arms itch like crazy. I sanded the nock and riser overlays off flush and started cutting nock grooves. This is not THE method of doing this but it is the way I do it.
I measure down 3/4″ from the end of the limb and mark across the nock overlay. From this mark I measure down another 3/4″ and make a mark on the belly. Next I mark a line from back to belly on the side of the limb. This is where I cut the string groove. Is that clear as mud? Maybe the pictures will clear this up.
I start the string groove by making a shallow cut on the line with a hacksaw.

I then deepen this cut with a rod saw.

From there I get my 5″ rat tail file and deepen the groove until a string loop sits down in the groove flush with the bow limb.


Now I take a 4-in-1 rasp and bevel the back side of the string groove. This allows the string to move when the bow is drawn and won’t chafe the string.

Belly side view of string in grooves showing the bevel.

That is as far as I will go on the tips for now. This will let me get a string on the bow and start the tillering process. Initial tillering looked real good so I shouldn’t need to do much after I get a string made.
More to come…………….
Dennis
in reply to: Sealing Some Surewood shafts #19646Tucson, I use Minwax Polycrylic to seal my shafts. You don’t really need a dip tube to apply sealer. You can dip a rag in it and wipe it on in two or three coats, wiping it with steel wool between coats.
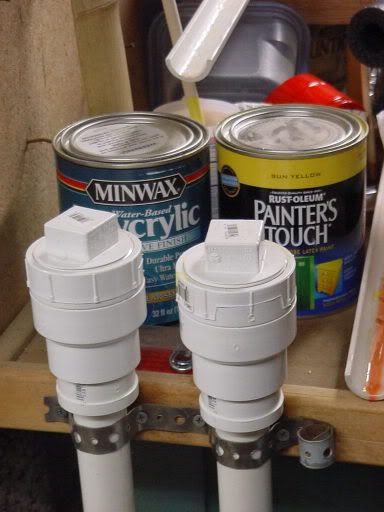
I made my own dip tubes out of 1″ pvc. I glued a cap on one end and on the other I glued on a 1″ to 2″ threaded reducer. After I’m done I just screw on a cap. Keep in mind that some solvent based finished will eat up the pvc tube. If you decide to make some out of pvc, get the reducers with male threads. You won’t have to worry about getting paint in the treads as much.
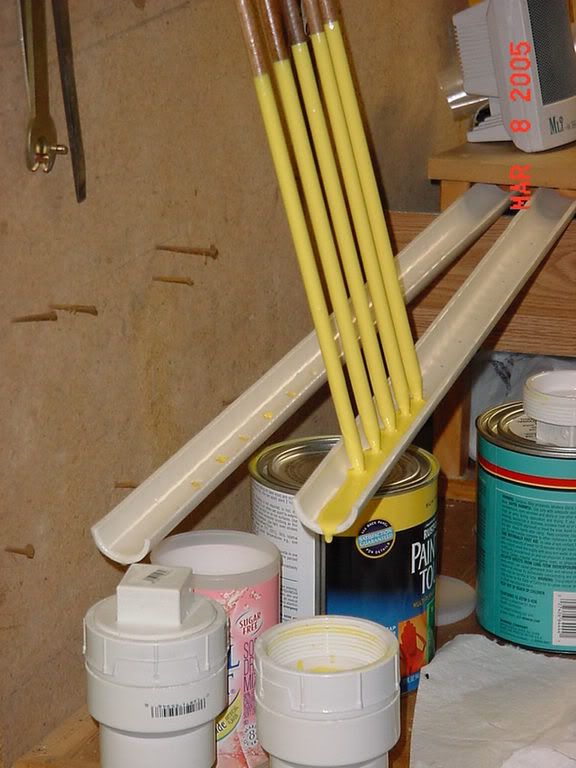
I usually just let them drip dry but I have some thin strips of rubber that I punched a hole in and just hold it on the top of the tube with my fingers and let it squeegee the poly back into the tube,
Long one for full length shafts. Short one for cresting paint.


Cresting paint. The pvc gutter drips back into the tube.

Dennis
in reply to: Starting Some New Ones #17477Did a little more yesterday evening and tonight. I worked late both days and didn’t get to do too much. I did get the limbs and riser window cut out and the edges sanded down yesterday evening. I always save back a couple of dull bandsaw blades for this step. When I get done cutting out a bow the blade is trash.
Putting the ‘hurts’ to a blade.

Tonight I am gluing on the riser and tip overlays. Here is the Walnut riser overlay.

And the tip overlays. I used Hickory with a piece of Mesquite on top.

It is now back in the hotbox at a little cooler setting than the last time. Maybe tomorrow I can get the overlays trimmed up and cut some nock grooves.
More later………………
in reply to: Starting Some New Ones #15140I got all the glue boogers sanded off and got everything squared up again. A 36 grit sanding belt makes it a little easier to do this. I took the bow back into the basement and peeled the tape to see what it looks like and to check for any flaws before continuing on.
Leopardwood is purty.

I found one small air bubble on the back just below the center of the riser. I am not concerned with this because there will be no flexing at this point and it will be covered with a Walnut overlay. I then re-taped the limbs and marked the centerline. I use a laser level for this step. I have the laser with a magnetic base attached to a heating duct above my work area (it has been hanging there for about four years now). Simplest way I have found yet. These are old photos that it.


After marking the center I just measure and mark the cut lines on the limbs. I decided to go with a 66″ length (64″ N-N) on this one.

Riser is marked for the shelf.

If I have time after work tomorrow I will do some bandsaw work. To be continued……………………
Dennis
in reply to: Built my first quiver! #15043You did a good job on that one. Nice looking quiver.
Dennis
in reply to: Starting Some New Ones #14711M. Miller
I had always wanted to learn to make a bow and had read lots of articles and books on the subject but I wanted to see it first hand. I did that by attending the first Oklahoma Selfbow Jamboree in 2005. Now it is an event that I won’t miss. After I got home my first bow was a Bamboo backed Osage D/R that I shot for about three years and had to retire it because the bottom limb was starting to fret. It is still my favorite bow. That got the addiction started.
I started out with glass bows by making a bow from a Bingham’s kit. The instruction tape was very good on the steps you take in the process. After that I started making my own forms and riser styles.
Good luck on your endeavors and if you get a chance to attend an event like OJAM or MOJAM do it. Ask lots of questions because everyone is glad to help you get started.
Dennis
-
AuthorPosts

