
Home › Forums › Bows and Equipment › PVC Kids Quiver Build-Along
-
AuthorPosts
-
-
When I first started making PVC Kids bows, I could give a young archer a bow and the arrows, shooting glove, and arm guard necessary for fun shooting. As the bairn ran off with his or her new gear to start their lifelong archery adventure, I couldn’t help but feel a little guilty for not giving them a quiver to hold their arrows.
They never held it against me, as they didn’t know better. But I did. A few kids would get a store bought quiver if I had one around, but that just didn’t feel right either. Store bought kids quivers don’t fit or work very well, and they tend to be a bit spendy to boot.

It took me a while to figure out this PVC quiver, but I think it’s a dandy. It fits kids well, it works great, its indestructible (mostly), it matches the bow perfectly, and its cost is mostly reckoned in your time spent making it.

It’s easier to make than the PVC bow, and it can be painted with the same rattle-can used to paint the bow. A perfect match.

The first quivers I gave away were to my nephew’s a few Christmases ago. They had been shooting their bows for 6 months or so at that point, and were already more expert than I will ever be.
It was a joy to see them sling the quivers over their shoulders, and struggle to grab that first arrow. After about 5 minutes, they could retrieve an arrow by the nock and settle it on the string without a thought. Within an hour they were running around the yard shooting the target as they went. It was amazing.
I watched my oldest nephew, 13 at the time, take a 20 yard dash across the yard slinging arrows the entire time. As he leapt across the well house he released his last arrow into the target. He shot a total of 6 arrows in this display, at a target no less than 30 yards away. All the arrows were in it.
The quivers turned these boys into little Howard Hills.

I will get started on this build-along directly.
-
Wonderful
Truly great to see these younguns enjoying archery, having fun and embracing the freedom and the discipline of the sport.
Well done Stephen !
Scout
-
The materials needed to make a PVC quiver include a piece of 4″ PVC drain pipe, jute twine, some thread, some duct tape, and some 1″ nylon strap. I bought a lifetime supply of 1″ nylon strap from Amazon for about 10 dollars.
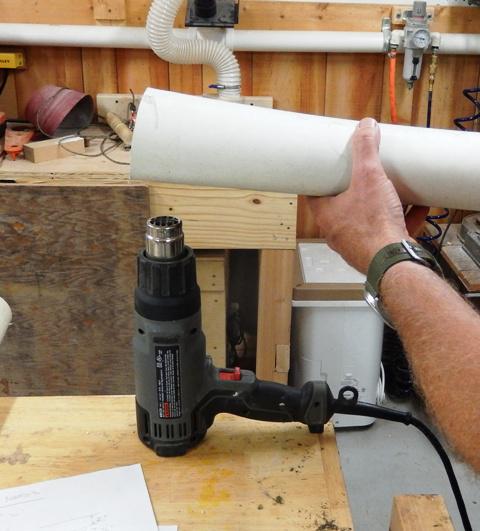
The tooling needed to make the quiver include a heat gun, hand saw, a bench vice (or just some clamps and wood blocks), and the kitchen oven.
Step 1- The first thing to do is to cut a 20″ piece of pipe. I started out using a piece of pipe closer to 24″ because that was the longest piece I could put in our oven. After making a bunch of these quivers, I found that a piece 20″ long was plenty.
Step 2- Form the quiver. I put a cookie sheet in the oven and heat the oven to 210 deg. Once the oven is at that temperature, I put the tube in and set the timer for 8 minutes. When the timer goes off, I look to see if the pipe has slumped into an oval shape. The longer you leave the tube in the oven, the more it will slump.

Note- All ovens are not created equal. I found that just a small change in temperature means the difference between the PVC not getting soft on the one hand, and getting discolored from overheating on the other. You may want to experiment with some scraps to determine what temperature you should set your oven to. The perfect temperature will allow the PVC to get really soft, yet stay in the oven for a long time without getting discolored.
Once the tube has slumped to a nice oval shape (a bit flat on the side that rests on the cookie sheet) I take it from the oven and place it on the floor. I immediately put the flattening board through the quiver and hold the two ends down to really flatten the back. I hold this position for about a minute or so, till the PVC hardens up.

Once this step is done, look the tube over. Was the flattening board straight down the back when you pressed it down? Is the tube as flat as you wanted? Does it look good? If the answers to these questions make you happy, then we can proceed with the next steps. If not, pop it back in the oven, soften it up, and re-flatten the back.
The next step is the only really tricky step in making a quiver. I’ve had to repeat this step a few times to get it right. In fact, while trying to figure out how to make this quiver, I started out with a 24″ piece and before I finally got it right, I had about 6″ left.
In fact, I have found that my results vary depending on which side of the quiver goes against which side of my bench vice. So experiment around till you find what works best.
Step 3- Form the bottom seam. Before forming the bottom seam, you need to decide which end will be the bottom. To do this, I usually just determine which side looks best. Which has the most pleasing oval shape? least uneven edge? etc.
Once you have picked what will be the bottom, heat the last 3″ of the quiver till it is soft using the heat gun. Rotate the quiver around so that all areas reach the same temperature.
Once the bottom is soft, clamp it in your bench vice, or between two pieces of wood and a clamp. The point is to get the edges to come together and make a flat seam. Let it cool down for at least 5 minutes before taking the quiver out of the clamp.

When I first got this to work, I was surprised, and pleased, with how the bottom sort of flared out and had a “leathery” look. It was an unexpected bonus. Hopefully you will see the same thing as you form the bottom seam.
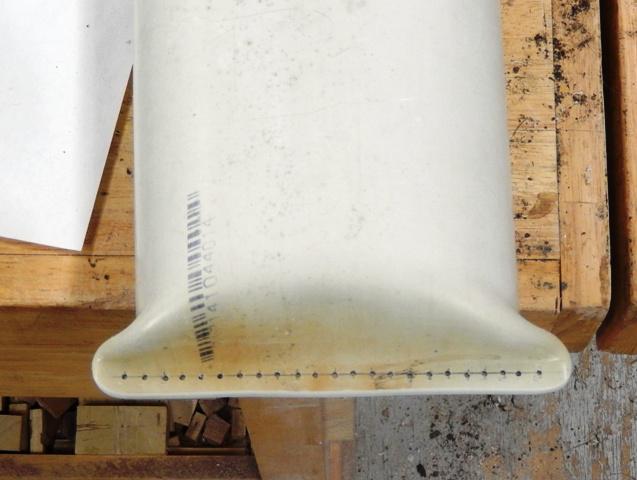
Step 4- Clean up the bottom seam. When you take the quiver out of the vice or clamp, you should see a nice flat seam with a jagged edge. To make this right, draw a line across it (leaving about 1/2″ flat seam) and cut the jagged part off using a hand or band saw.

Things are starting to take shape! You could, I suppose, stop working on the bottom at this point. It will serve its purpose. No arrows will fall through. But with just a little more work, we can give the quiver a finer look.
Step 5- Finish the bottom seam. In order to make this quiver look like something special, we need to round out the edges and drill holes for the saddle stitch we will sew once the quiver has been painted.
Before I start rounding and sanding though, I will usually draw a line down the center of the flat area and then mark hole locations along the line 1/4 inch apart.

Then, using a 5/64 drill bit and my dremel, I will drill these holes. I use files and sandpaper to do the rounding. Round the corners over to match each other, and round the long bottom edge to feel smooth to your finger.
-
There is just one step left before we get into painting the quiver. When I made this quiver, I neglected to complete the next step before painting and had to finish it after painting. It worked out OK, just the same.
Step 6- Cut the shoulder strap slots. The shoulder strap is affixed to the quiver in such a way that it can be adjusted as your young archer grows. The slots should be cut to match the strapping you procure. The strapping should just pass through the slot without much room to spare. The dimensions between slots I give work with my strapping, you should experiment on some scrap to make sure you dimension the slot spacing to work with your strapping.
Two slots should be cut at the top of the quiver. The first about 2 inches from the top, and the second about 3/4″ below the first. This is where the adjustability comes from as the strap can be lengthened or shortened through these two slots. Test your strapping in some scrap to make sure that it won’t slide under pressure once fed through the slots. You may have to adjust the spacing between the top slots. If your strapping slips, putting the slots closer together can solve that problem.

The third slot should be cut about 3″ from the bottom of the quiver. As I mentioned, I forgot to cut this slot before painting, and you can see that it looks white inside as a result.

Step 7- Paint the quiver. First I go over the entire quiver with some 150 grit sandpaper to clean up and de-gloss the surface. You can paint the quiver at this point, but I have found that coating the quiver with PVC purple primer really makes the paint adhere well. Purple primer is nasty stuff, so you will have to decide for yourself if the results are worth the cost of working with the primer.

On the plus side, I have found that only one coat of paint is required to get a good finish if PVC primer is applied before painting. I will apply the paint, wait 5 minutes or so, and then take the quiver out in the sun to touch up the spots I invariably miss.
In the picture you will notice a string loop tied in the holes at the bottom of the quiver. I hung the quiver by this string to paint it.
I like to let the quiver set for a day or so to allow the paint time to harden up. In truth, it will get harder for several weeks after painting. A day or two is enough to allow us to continue working on it.
I don’t bother trying to paint the inside of the quiver.
Now it’s time to start adding those finishing touches that can really make the difference. Kids notice things, whether we notice that they notice, or not. The details that tie the bow and the quiver together in appearance, help to tie them together in the mind of the child.
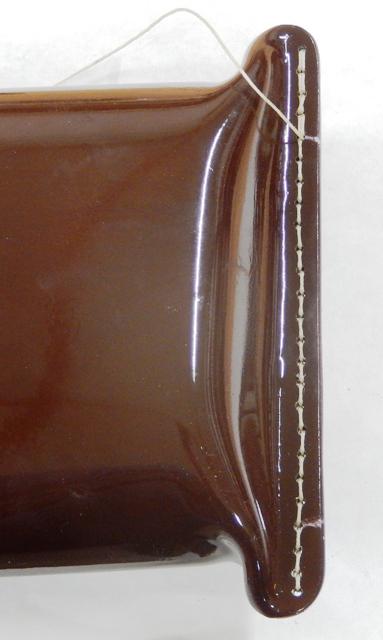
Step 8- Lace the bottom. I like to lace the bottom together using a saddle stitch. Here is a video tutorial on this easy stitch : https://www.youtube.com/watch?v=VLa3ehDCUi0
Here is my needle and thread and needle nose pliers for stubborn stitches where I need help to get the needle pulled through.

I like to use artificial sinew, but anything will work. Once the entire bottom has been stitched, I like to back stitch 4 or 5 stitches to secure the thread. I will heat up a flathead screwdriver with my propane torch to melt the ends of the sinew to keep it from unlacing.

-
The next task we need to complete in order to finish the quiver is to dress up the top end. To do this we need some duct tape, and the ball of twine we used to wrap the handle of the bow. I like to wrap the twine from the top edge down to the first slot used to receive the back strap.
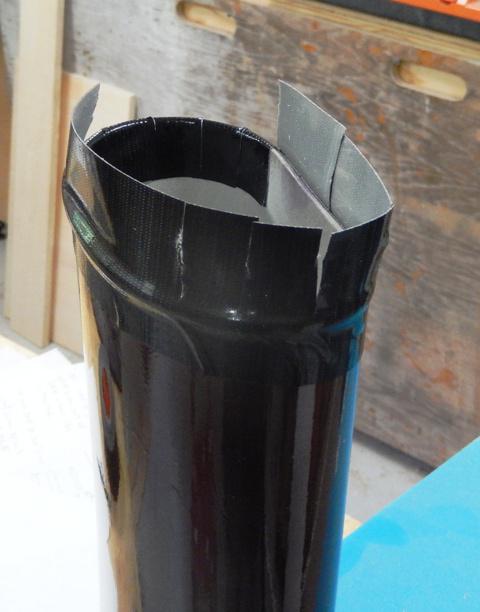
Step 9- Build the lip around the edge of quiver mouth. I like to make a lip around the top of the quiver. It serves as a stop for the twine wrap, and gives the mouth of the quiver a nice rounded edge. Cut a piece of duct tape about 13 inches long and lay it flat (sticky side down) on a cutting board. Then, using a sharp blade and a straight edge, cut strips about 1/8 inch wide.

Carefully apply these strips to the edge of the mouth, and build it up about 3 pieces of tape thick. I usually start in the middle of the back and lay pieces, end to end, around the mouth until I have built it up 3 pieces thick.

Step 10- Wrap duct tape around mouth of quiver. Cut a piece of tape that will wrap all the way around the mouth of the quiver and overlap at least 1/2 inch. Wrap the tape so that about 1/3 of the tape is on the quiver, and the other 2/3 of the tape is hanging in the air. Then, using a sharp scissors or blade, slice the tape down to within 1/8 inch of the edge. I make several tabs along the sharp curvature of the sides, and maybe just 1 long tab along the mild curvature of the back and front. This helps to reduce wrinkling. Then carefully fold these tabs down tightly until the adhere to the inside surface of the quiver.
In the following picture, you will notice that I have folded down the tabs along one side of the quiver, while the other tabs are yet to be folded down. You will also notice the lip that has formed.
Note- In the next step, we will wrap the jute twine around the top of the quiver. Before doing this, I like to make a loop of twine about 6 inches long. I use this to pull the tag end of the twine underneath the wrap, once it is finished.
Step 11- Wrap the top of the quiver. I like to tape the first end of the string down to the quiver, along with the twine loop mentioned in the note above using the same piece of tape. Once these are taped down, I begin to wrap the twine around the quiver, getting it up tight to the lip, and making sure each successive wrap is tight and up against the last wrap. Continue wrapping until the wrap extends down to the first strap slot.
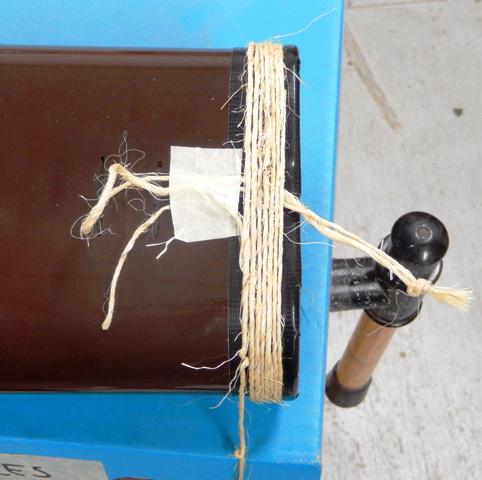
Cut the twine with about 6 inches extra and pass the tag end through the loop. Pull the loop through until the tag end emerges from the top of the wrap.
Cut the tag ends as close to the wrap as possible, and tuck them under a bit.
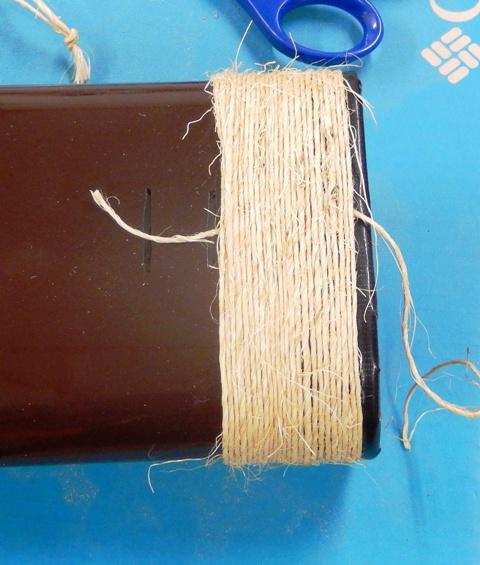
Step 12- There is usually quite a bit of loose fiber frizz on the twine. To eliminate it, I carefully burn it off with my propane torch. Be careful not to heat the quiver up as you do this. To minimize heat, apply the flame tangentially to the wrap. After burning off the frizz, briskly rub the twine to raise more fiber. Repeat the burn off.

Step 13- Seal the twine. I like to coat the twine with wood glue or the like to seal it, make it stick together, and harden it up. When you apply the glue it will look goopy. But don’t worry, it will soak in and dry clear. Apply the glue liberally and wipe off any that looks like it will run or drip.


We have now arrived at the final steps!
Step 14- Prepare the strap. Cut a piece of 1″ wide nylon webbing about 36 inches long. I like to touch the ends of the webbing to my propane torch flame to seal the thread and keep it from fraying. Then fold one end over on itself twice, starting with about 1/4 inch. This will form the stop to keep the strap from pulling out of the quiver. Stitch this fold so that it will not unwind using the same needles and thread used to make the saddle stitch on the bottom of the quiver.

Note- Depending on how thick your forearms are, you may need to enlist the help of your young archer for the last step.
Step 15- Take the straight end of the strap in your hand and reach down into the bottom of the quiver. Push the strapping through the bottom hole. Bring it around (be sure the strap is not twisted) and pass it over the top of the quiver and push it out the top slot. Then push the strap back into the quiver though the middle slot.

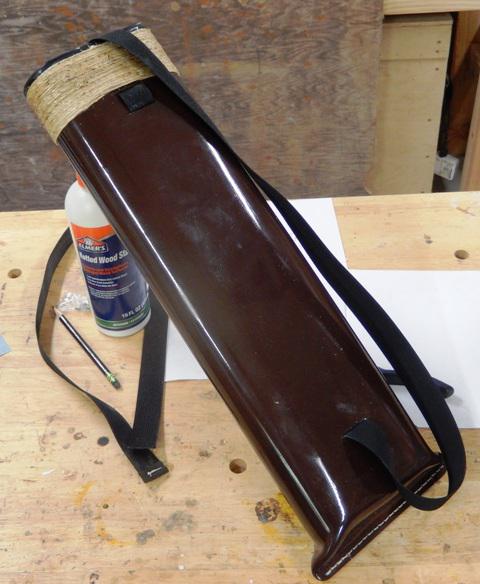
You are finished!
Well… As you have seen in the pictures at the beginning of this thread, many of the quivers have names and artwork etched into them. If I know to whom the quiver will be given ahead of time, I will often add their name and their totem. I have found that most every kid has an animal (real or mystical) that they are drawn to. I like to affix said creature to the quiver so that they can enjoy grand adventures together!
To do this, I draw the artwork (by hand, or by computer) onto a standard piece of paper. I then tape said paper to the back of the quiver and etch the artwork into it using a dremel model 290 engraving tool.
It is a very easy process. If you want to try it, I suggest you paint a piece of scrap PVC and practice on it. It will take you about a minute to figure out what to do.
And that’s it!
Here are the bows and quivers I made while taking the pictures for this build-along. The 24″ arrows, gloves, and arm guards are from the youth section of the 3Rivers catalog. I find that these items are very reasonably priced compared to the adult versions. I expect it is 3Rivers way of paying forward.

-
Since the PVC Bow Build-along and this thread may get separated from each other over time…
Here is a link to the PVC Bow Build-along sister thread to this build-along:
If you have any questions, feel free to ask…
-
AWESOME!!! Thanks, Steve.
-
Stephen
Yes Awesome! Art from plastic, and functional Archery Tackle – Very impressive! well done! I am sure the younguns love it.
Scout
-
Thanks Ralph!
I sure hope there are some wee tykes that will be casting arrows with their new bows and quivers soon… If y’all make a bow and give it to a young archer, take a picture and hang it here.
-
-
AuthorPosts

- You must be logged in to reply to this topic.