
Home › Forums › Campfire Forum › Helle knife kit
-
AuthorPosts
-
-
I just received my Helle knife making kit, that I bought because many of y’all have such good things to say about their quality. I bought the kit (rather than a finished knife) trying to save a few bucks, but there’s a small problem…..the instructions aren’t quite as detailed as I was hoping they’d be! I have no clue as to how to put together the sheath or how the “helle” the brass end fits or fastens or whatever. If any of you have made one before or just have some general advice, PLEASE HELP me out! I need ALL. the help I can get!!!:shock:
-
You need to call who you bought the kit from. Any kit should come with detailed assembnly instructions. I have built a couple of knives from Helle blades, but I just bought the blades, very cheap, and made my own handles, one from antler, the other Osage. One point I’m not sure if folks are aware of is that Helle makes two basic types of blade: solid carbon steel, and 3-layer stainless. I have both and while the carbon blades are excellent for carbon blades, it’s the sandwiched stainless that earns all the kudos for staying sharp forever. You can always return the kit, save you pennies and buy a finished knife. Best luck …
-
Fatty– I guess we should get Campfire Philosopher Doc Dave Sigurslid to do a cleaner translation for you, as he speaks Norsky. 😀 I would call Dryad, ask for explicit instructions, and politely suggest they start including such, with drawings or photos as necessary, in their kits. It will benefit their business as well as their customers.
Steve — The only reason I got the carbon steel in one of my three Helle blades is that I wanted a small drop-point blade for an arm guard combo, and the style I wanted is available only in carbon. I too always preferred carbon in skinning knives because it’s so easy to sharpen, even on a piece of sandstone if necessary. I just got into the habit of stopping often to touch up the edge, but would occassionally have to use a broadhead file while doing an elk. I swore by the old Shrade Sharpfinger and still have two of them. Then Helle came along with its laminated stainless and all changed. The two outer layers are hard but slightly softer than the very hard center, which forms the final edge. While a full blade thickness of steel that hard would be near impossible to hand sharpen and prone to chipping, this arrangement allows it to work. Having done many elk with mine by now I’m in the habit of having to break out the diamond stone only once, at most, for a few strokes, and otherwise just touch it up as needed (not often) with a carbon cross-stick. By taking such a scalpal edge and holding it so long, it really cuts down on field dressing time. Plus my favorite model, “Fire,” has a large handle compared to blade size and a heavy blade to provide max torque power when needed, as when cutting and prying apart bone joints. I liked mine so much that I gave it away to hunting buddy Alex Bugnon and paid $1,000 for a second one … it came as a bonus, nicely engraved, with my life membership to BHA. I think the original was right around $100. I don’t care at all for the black snap-strap scabbards they used to come with, bad design and thin leather, and replaced mine with a full scabbar of heavy leather. Scabbard quality should match knife quality, IMHO. I haven’t checked to see if Dryad still uses these quivers. Chad Sivertsen had the franchise when I bought all of mine. In any event there are scores of superb knive designs out there, many of which are prettier to look at than the Helle’s. But no other blade I’ve experienced or even heard of has the practicality of the 3-piece stainless Helle sandwich. Their carbons are real good too, for carbons.
-
I agree completely on the quality of Helle’s stainless steel blades. They are incredible. My favorite is the Polar model, which I dress up with antler and osage handles and home made leather sheaths. In moose camp several years ago I ended up skinning not one, but two bull moose with a Polar blade, which is not even remotely the right tool for that job (too small). The nice thing is that it held it’s edge so well I don’t recall having to touch it up during either animal.
-
If you have a Norwegian version, send it to me with the English and I’ll see whether something has been garbled. (I translate the Scandinavian languages for a living. I’ll take a free look for you.)
On the general subject of all things Helle, there’s an excellent forum dedicated to “Scandinavian” knives at Scandinavian Forum. I use quote marks because Finnish knives are well-represented there as well, but Finland is not part of Scandinavia. The people on that forum are extremely knowledgeable and helpful. Many of them are knifemakers and know way more about this stuff than any human should.
-
I took a look at the dryad helle knife site – A lot of interesting reasonably priced models. There were a couple of Triple laminated Carbon blades also –hmmm. Might have to try one out, after the significant praise being remarked upon here.
Scout
-
Eidsvolling- Thank you very much for the offer. I don’t really think it’s the translation that’s the problem as there’s only 1 illustration about suggested dimensions of the finished handle, I’m thinking that they’re just too vague for a beginner like myself. I will check out the link though. Again, thanks!
Dave- How did you go about fixing your handles to the blades in your previous projects? This one came with a brass button thing that doesn’t have any threads or anything (nor does the blade) and the holes aren’t big enough for the butt of the blade to fit in. So I dunno if I’m supposed to grind the blade part to fit or what? How did you do yours?
-
Fatty (or do you prefer Tony?) — I pre-cut the handle pieces, both wood and antler, to roughly the size I wanted them, make sure the flat sides were absolutely true, sanded the handle tangs to rough them up a bit, cleaned all contact sides with acetone, and used a two-tube expoxy I had around for bowmaking — can’t recall the name but I think it had “13” in it, and it’s too cold (0 this morning) to go out to the shed and find it right now. Glue and clamp, nice long drying period, then a belt sander upside down to do the final rough shape, a bit of filing, finish sanding, then finished with clear epoxy. Not counting the drying time, I doubt I have 30 minutes in either knife. I’ve also made antler handles by grinding down the tang to a point, pre-drilling a hole through the center of the piece of antler, filling the hole with epoxy and driving the tang into the handle. If the tang is long, this makes a sturdy knife; if it’s short, I don’t recommend it. With your kit parts, my method then would be to forget the rivet and use epoxy to attach the handles. Or return it and buy a finished knife. 8) In general I’m not a fan of kits–knives, bows, leather stuff, nothing.
-
I make mine the same way Dave does, with one possible exception. I also grind the sides of the tang to the same width as the blade. That way everything slides together with no gap near the blade. An 1/8″ long drill bit works great for drilling out your handle stock. Drill two holes cnext to each other and work the bit around to create a long, oval shaped hole for the tang. Devcon 2-ton epoxy works great.
A word of caution: Helle blades are extremely sharp right out of the package. Before you start working with one, cover the blade with cardboard and wrap it with duct tape. You don’t want to hold a sharp blade when you’re working on the handle (been there, done that, bloodied the t-shirt).
-
I got a Harding model (factory finished) about three years ago. It has the triple laminated blade. I could not believe how it holds an edge. Nothing I have ever used comes close. I have always carried two knives so I wouldn’t have to stop to sharpen. Now I still carry two but do not have to sharpen the one I start with if it is the Helle. I don’t just bone out the elk I shoot. I cut it into the individual muscles so I can leave everything I’m not going to eat. It makes a lot of difference on the amount of weight you have to carry. It does take longer though. But is faster when I get home. I can completely cut an elk into individual muscles with one knife and not sharpen it if it is the Helle. I am now in the process of getting another one so that I have two. I may never pick up the other knives again. Gary
-
I’d send it back and see if Chad Siverten will make you one. His work is nothing short of fine art.
-
Fatty,
Just found this thread. I will try to find some instructions I have with pictures and details in English. give me a day or two.
Once you’ve done one the fog will lift and clarity will shortly arrive. I too was a bit baffled with the first one but once I succeeded with a basic handle I received a vision of more complex and attractive handle designs. Hang in there.
When I bought my first Helle I too was amazed at the edge holding ability.
Joe, thanks for the compliment.
Best to all,
Chad
-
Chad sent me the images and instructions and I will post them here. If you have questions though, you should probably contact Chad. I’m just the messenger. 😆


-
Robin, Thanks for posting that, it was long and thought you should look at it first.
This info was created by a customer of mine when I had the Helle distributorship. Darn, I can’t remember his name but will try to find it and give him credit. He also built fine bows and was kind and generous with his information.
Be careful Helle blades are scary sharp. These are good instructions and should tell you everything you need to know to put a handle on a knife. They can be one piece of wood or as elaborate as your imagination wants to make it. I use a variety of exotic and local woods with antler or horn. Note that some fruit trees have interesting and colorful wood. I trimmed some plum trees last year and the heartwood is milk chocolate color with nice grain. I have a bow roughed out from it too.
Also note that you do not have to do it exactly like the info here. These instructions can be modified to fit your tool or material supply, for instance not everyone has a drill press or scraps of exotic wood laying around.
I see Jason is sticking with his story of two bull moose without sharpening his Polar. I believe it now but would have been very skeptical if I was not familiar with Helle blades.
Fattony77, sorry I addressed you as Fatty. I will blame Elkheart for that, we both forgot our reading glasses that day.
Have fun,
Chad
-
Excellent tutorial, Chad. I especially liked the wood choices and how you used the Pony clamps to keep the pieces from slipping while the glue set up.
-
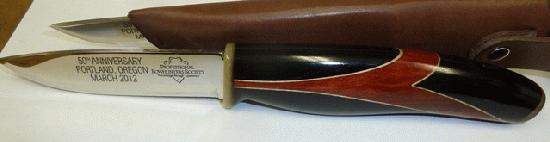
For those of you who missed it, here is one of the knives that Chad donated to the PBS auction held last weekend in Portland, Oregon. Thanks, Chad for supporting the club even though you couldn’t be there. I hate it when life gets in the way of having fun! 😀
-
Jason brings up a good point with the clamps. When I first tried handles with multiple curved pieces it was a bit of an adventure.
I clamped the pieces dry and it all looked good. But when I spread the epoxy and clamped the pieces they squirted out of the clamps in every direction. 😯 Funny now but not at the time. I frantically tried to find more clamps and wedges before the epoxy set up.
Make sure you have more clamps than you think you need. Twice as many should work. Clamps work best at 90 degrees to the piece they are holding. Also have some wood wedges with various angles to assist with that. If you do clamp at odd angles and the clamps want to slip a small piece of non-skid pad will help.
-
Chad- Thank you (and Robin) for the tutorial! I think it answers most of my questions, and I should be able to figure out the rest. As for calling me “Fatty”, don’t worry, I’m not easily offended. I’m not sensitive about my weight or I’d have chosen a different screen name. 8) And, believe me, in my line of work (I’m a correctional security officer) I’ve been called much worse just for doing my job. Thanks again & hopefully I’ll figure out a way to post a pic once I’ve finally finished the project.
-
-
AuthorPosts
- You must be logged in to reply to this topic.