
Home › Forums › Bows and Equipment › BUILDING THE BOW
-
AuthorPosts
-
-
I have thought about getting involved with archery for a couple years. My pre teen years were spent making bows and arrows, but I never actually hit a living thing with them (although my brother hit me a couple times). I lost interest in archery when I was able to hunt with firearms, and that was replaced with the usual drugs, sex, rock n roll, kids, work, and fly fishing (NOT in that order). Thus I hadn’t shot an arrow in 50 years. I’m small, 5’1”, and short arms for one my size. Thus a draw of only 22”. As I looked about casually at bows I found that the compound bows were complicated, and all seemed to have a 28” draw, kids bows were a pull weight of less than 30#. Recurve bows were too long, and again expected a draw around 28”.
I’m kinda used to this as I am still buying my clothes in the kids department (“Where are the big kids sizes.” “How old is the boy?” “63”). I looked around on the internet for information about making bows and found that you could make a recurve with red oak, and fiberglass. Neat. Found red oak (¼ x 1 ½ x 4) at HD ($2.50), and I had fiberglass and resin left over from God-only-knows-what. And I had time. I’m raising my 9 year old granddaughter (aka my constant companion, aka the ball-and-chain, aka sweetheart, aka the boss, aka motor-mouth, aka Little-Miss-Sunshine… her given name is Arwen) I was faced with the holidays/school vacation with nothing to do, and a blizzard on the way.
Before the holidays were over I had a composite recurve bow. I took it out on the back porch, and aimed a arrow at the tree in the back yard and actually hit it!! Dam near needed a clean diaper. Obviously, my muscles remembered what to do after all of the 50 years. The second arrow ricocheted off the tree and went into the parking lot next door (had to get dressed and retrieve it before I got caught). The bow wasn’t strong enough for me and my constant companion could only draw it 6”, so there was work to do, but I was on a roll (that bow later broke, but did a lot of target practice). Now it is March (last day of winter, school was canceled due to snow), we both have bows that work, and I have a big pile of broken bows on the back porch that I refuse to count.
The forum mother said you would be interested in knowing how I made the bows, so here I am. I’ll do my best to tell the tale without unnecessary gory details, and still warn you about all of the good ideas I tried that didn’t work. The first thing you have to do is start driving all of the back roads on the way to/from work looking for dead turkeys and geese. I asked all of my friends to do the same, and ended up with a really flat pidgin on my back porch. Still haven’t figured if it is from a idiot, or wise-azz (if it is from the ugly widow down the street, I’m worried).
?
-
ROFL
Beauty is only skin deep, ugly (at least in this case) goes all the way to the core. She has ugly details I don’t want to know about.
CHAPTER 2 – MATERIALS
You are going to need….
Time.
Fiberglass cloth (not the fiberglass mat, that is too messy)
Fiberglass resin (this has a 1 year shelf life, if you go to buy it, and there is dust on it, keep looking… gory details omitted).
Acetone (a CAN of acetone. Finger nail polish remover has stuff like lanolin, and aloe… gory details omitted)
Red oak I used ¼ x 1 ½ x 4. And added a riser to it. You can buy a thicker piece of oak, and make a one piece (no not talking about bathing suits), but you need a table saw and that is at work, besides if the riser is separate, you can reuse it in the next attempt. I made risers out of scrap 1” stock, usually oak, but it doesn’t really matter.
3 Screws ¾” x 8. These are to hold the bow to the riser. You can glue the riser to the bow, and SOMETIMES it works without the screws.
SAW I used a circular saw to cut the limbs and coping saw to cut out the riser.
Sandpaper. Most of the sanding was with 60 grit, some 80 grit, and some 100.
Wood Rasp to shape the riser.
Bastard File. For fine shaping and smoothing. About the same as 80 grit sandpaper.
Car to drive to HD, for another piece of oak, fiberglass, resin, etc.
If your constant companion is an adult, it may be a good idea to do this outside, or plan on sleeping outside. Otherwise do it in the bathroom, with the vent fan on, and a fan in the window.
Gloves. I like the blue kind, helps if they fit.
Broom, dustpan, and vacuum. Actually, I think I used these more than any other tool.
Mixing containers. Soup cans, big bottle caps, etc. We are going to be mixing resin in 2 tbs. batches. I found plastic shot glasses (tacky) at the dollar store at $1 per bag.. Spent $2, thought it would be a lifetime supply. I was wrong. Plastic shot glass??? You might be a redneck if…
Rags and something to protect the floor. Paper towels don’t work all that well, I get cheap wash clothes at 18 for $4 at WM. Using the drop cloth is a pain, but getting the resin off the tile floor is worse (gory details omitted).
1” chip brushes. I use these at work so it wasn’t a problem. Suggest you buy in quantity… like dozens.
C clamps to hold things down while cutting/shaping/sanding.
WOW!! Didn’t know I used all of that stuff. Seemed so simple when I started out…
Later, I have to go make a parachute for Barbie.
-
RECURVE JIG
When you buy the piece of oak (I used 4’, you can make yours as long as you like) try to get a piece with straight grain, and look for knots. Bend it like it will be bent when finished (if it breaks, you don’t want that one). I suspect that some of the bows that broke were defective wood, that I didn’t notice. Really don’t have the skill to select well. Good Luck.
Read on the internet to cut the jig out of a 2 x 6 with a band saw. Not about to buy a band saw so I tried with the coping saw, and reciprocating saw. Neither was square, so the recurve went off at an angle. If you stare at the pic of broken bows long enough you can see the result, I don’t advise it. I also tried to use a 5 gal bucket to make the recurve, but found the bucket is NOT straight up, thus, again, the recurve was off.
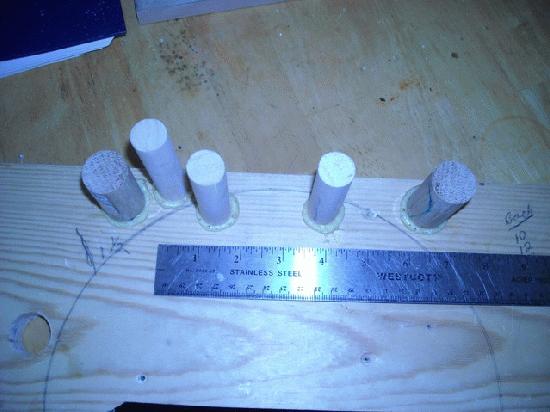
This works: Find a scrap 1x 6, 2 feet long. Drill holes and insert dowels as pictured. The exact spacing is up to you, but you can place them pretty well from the picture, and I don’t think the exact curve is critical. Keep in mind that the more recurve, the more likely it is to go astray. The dowels (aka old broom handle) must be glued in and THEY MUST BE SQUARE. The curve you see on the board was the bottom of a 5 gal bucket. I started out trying to make a big sexy recurve, like DD. Didn’t work, The more the recurve, the more likely it is to turn out to the side. Best to try for B/C.
I toyed with the idea of tapering the thickness of the limbs but decided that making them consistent, symmetrical, etc. would be almost impossible, and would require a lot of work. We are going to do that with the fiberglass.
I did taper the width. The taper starts at the top (& bottom) of the riser and the ends are ¾” wide. That means you are tapering each side by 3/8” this has to be really, really accurate. You can do it with a plane, but I found the circular saw more accurate. Obviously you will have to sand out any waves. If it isn’t accurate, throw it out, (you have only lost $2.50) if you continue the recurve will be off. Oh, you only bought one piece of Oak? You actually thought it took me all of those tries, and you were going to get it right the first time!! FOOL!!! You may think that it would be a good idea to taper them more, like down to ½”. I thought so too. Go ahead, but keep in mind that the thinner you make the ends the more they are likely to twist out at some odd angle, after the bow is finished. I said after the bow is finished. The recurve may look fine until you have fiber glassed it put a string on and actually bend the bow.
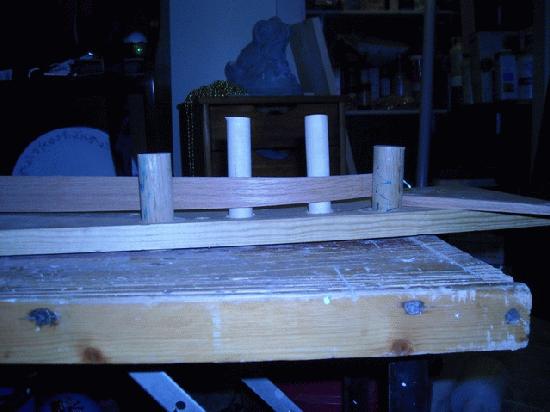
I had planned in my mind to hang a pipe from the ceiling with the end catching the steam from the spout of the tea pot… Got the visual? Instead I put 2 quarts of water in the turkey roaster, put the limb on it and covered with aluminum foil. You can do what you want, but I suggest you steam the limb for one hour. The hour starts when steam starts escaping from the aluminum foil. Not really sure what will happen if you steam it for less. You can’t steam it for too long, but if you fall asleep, and the turkey roaster runs out of water throw it away and start over. After the hour, take it out and IMMEDIATELY put it on the recurve jig. It has to stay on the jig for 24 hours. Any less and you will loose the recurve when you string the bow… after you fiberglass it. Notice that I used the piece I cut off to taper the limb to space the end up from the base of the jig (on the right). Read that again, and look at the picture. If you don’t do that, the recurve will be off. Yes, that is a frog in the background. BTW steam is HOT!!!
After the 24 hours, you can steam, and recurve the other end. If you make a mistake, and recurve the wrong way (a big S instead of a big C) throw it away, it cannot be corrected (gory details omitted). Steaming/setting the recurve is a one shot deal, you make a mistake, throw it away. Isn’t it your turn to make coffee?
THE RISER
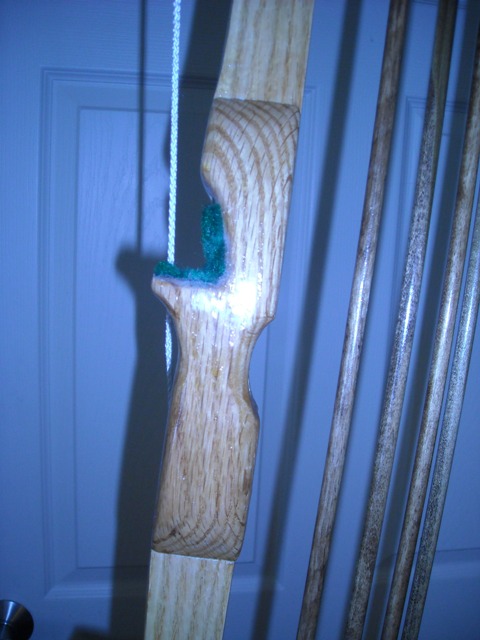
As I said earlier, I made mine out of scrap oak. Here is a pic, it is 8” long and the widest part is 1¾ “ wide. Nice door, huh. You can make it any way suits your fancy, just make it comfortable for YOUR hand, and keep in mind that the closer the arrow rest is to the center the easier it is for the arrow to go around it. This gives you something to do while waiting for the limbs to dry. I hope you have some kind of work bench that you can clamp it to (or a vise) while doing all of this sawing, shaping and sanding.
After the recurv is dry, you can put the riser on the bow. Mix up 1 Tbs. of resin, brush it on… WAIT!!!! When ever you are going to use resin you have to sand both surfaces with 6o grit sand paper and wipe down with a rag SOAKED with acetone (to get your greasy finger prints off). If you skip either of these steps it will come apart after it is finished. Notice I said “after it is finished” with all of the mistakes, you don’t know until the bow is finished, and you actually bend it. Then the the top recurv points, North, while the bottom recurv points South. Or it delaminates, or the wood breaks. NOW!! Make sure you have everything you need before you open the resin. Gloves, brush, gloves, fans on, stir stick, rags, floor protected, blah, blah. Run thru the steps in your mind to make sure you have everything, and know what you are going to do. Brush the resin on both the bow, and the riser, and clamp to your workbench (lightly, don’t squeeze all of the resin out) with the riser down. No workbench? Find someone dumb enough to hold it in her lap. Before the resin dries, you have to drill, counter sink, and put the 3 screws in. No, you don’t have to use resin, use your gorilla glue, pine pitch, or wheat paste if you want to, just keep in mind that I used resin, and if you don’t you may have your own gory details.
-
I’m following. Looking good bud.
-
grumpy wrote: Am I boring you?
No way, keep it comin’, Gramps! I like your trial-and-error style, and your easy-going way of writing has me cracking up. And, good on you for taking care of your family (Arwen is a beautiful name). I’m looking forward to the post on this thread where you bag a turkey with this bow.
-
Even if no one was reading mate, it’d still be worth putting up. It’s great when you have a question here, do a keyword search and voila, someone has already answered it. Part of what makes this place a great resource in my little opinion 😉
-
WOW!!!!! Wish I was this popular on the dating sites. Working on the fiberglass chapter, lots of details you have to do just right, don’t want to steer you wrong. And the pictures. Good thing I figured out how to post the pics w/o using the picbucket. Suggest youse guys (y’all in Dixie), uninstall that and all other “free” software. It all comes with overhead, cookies, marketing, viruses, and (OMG) program bugs that crash your system. Yeah, I know the people in the picbucket wouldn’t do that. You wouldn’t think Mom’s religious emails would crash everybody’s computer, but they did. Getr what you pay for.
-
Archer: What is a R/D bow?
Ben: Arwen is NOT something I volunteered for. More like my values wouldn’t let me not. Long wait for the turkey, but I have a friend with lots of acres full of deer and turkeys.
Aus: I found the keyword search and got overloaded with gory details. Went to the FOC thing, and WOW!!! I was a systems programmer in the 70s 80s and got along with smaller manuals. BTW how did stone age man read the FOC?
-
This is a diversion from the thread but I found the most accessible introduction to Ashby’s stuff these videos from a seminar he gave:
http://tuffhead.com/education/kalamazoo%20jan%202012.html
I can’t speak for our palaeolithic friends, but from Melanesian hunters to pilum throwing centurians, folks have known weight up front helps a stick fly straight 😉
-
FIBERGLASS
“Where are Olivia’s feathers?
“What?”
“Where are Olivia’s feathers?”
The flat pidgin was from Olivia. It has turned out that the third grade class (girls only – they don’t talk to boys) is now searching the roads for dead birst to fletch Arwen’s arrows. That explains why Olivia’s mom burst out laughing and turned away from me the other day. Strange, when I say “Get your shoes on.” She doesn’t hear me, but when she is watching TV, and I am talking to someone on the porch, she hears every word. Not so sure I want to pich her up from daycare, might be a good idea to stay inside, move to the city, change my name, and shave off my mustache…SAL
In the previous chapter I forgot to tell you that I made the riser just 5”. Since it is a short bow, I wanted to make the limbs as long as I could, and it didn’t need to be any longer. OK, it isn’t sexy, kinda short & plump.
This is the hard part. I doesn’t take all that long, and doesn’t require sitting there and staring at it for hours on end, like the recurvs. Putting the fiberglass on only takes an hour or two. This is where I had the most good ideas that didn’t work. AND after it is fiber glassed you can actually find out if it works ( ie if you did anything wrong). There is also the possibility that I told you wrong, in which case you can sue and get back all of the money you paid me…. Which is nothing. You can’t sue me for the time, or the material, because I don’t have either. I used the resin you get at the big box store, it is polyurethane, you can get epoxy resin at a marine store, or on the internet (make sure it is fresh). I read somewhere that the epoxy is more flexible. I started out putting fiber glass on the belly and back of the bow. Belly is the side toward you when you shoot it, the back faces whatever you want to kill. ALL of the fiberglass on the belly delaminated. NO exceptions. Actually fiberglass is better at stretching than compressing.
I believe that native Americans prayed a lot when making their bows. A word or two to the lord of fiber glass (or whatever spirit you think listens) may be in order here. Just remember that most spirits have a sense of humor.
As I have said, you need lots of ventilation. You wouldn’t be here if you had a lot of brain cells, so let’s keep all we have. That means outside or you are going to need an exhaust fan(s). I did the fiber glassing in the bathroom, with the fan on, and a fan in the window.
The first step is to prepare the fiberglass cloth. The best tool to cut it is a rotary fabric cutter (mine was made by Fiskars – you find them in sewing baskets) next best is a utility knife with a sharp (new) blade. You also need a straight edge. Since we are going to cut 2” strips an aluminum 4’ wallboard square worked for me, as it is just 2” wide. Spread the fiber glass fabric on a flat surface (NOT the dining room table, apiece of 2’ scrap wood), and cut 2” strips. It tends to unravel, do your best to NOT pull the loose threads. Handle it carefully, and put it aside. Assuming you are going to make a bow the same size, and draw as mine, you will need: 1 strip 10”, 1 @ 16, and 5 @ 24. Put these aside away from little fingers.
Get everything ready. Resin, mix containerS, brusheS, gloveS, cover the floor, turn on the fans. I put a bucket on my work bench, and put the bow on that.
Mix 2 Tbs. of resin with hardener.
WAIT!!! Back up. Remember to sand the back of the bow, and wipe down with a rag soaked in acetone!!!
Brush resin on the bow in the back of the riser, and place the 10” strip on it. Smooth it out and push out any bubbles with your fingers (tried with a wallpaper seam roller, didn’t work). You are wearing gloves, right? You want it to stick out over the sides, we trim that off later. Rule of thumb here is “If it is clear, don’t fear.” Now brush on another coat of resin, enough for the 16” strip. Same routine you did with the 10” strip, and again with the first 24” strip. Centering each over the center of the bow. The fabric has to be SOAKED with resin (no bubbles), and wrinkle free.
Now the 4 remaining strips go on the limbs starting at the tip, toward the center of the bow. You will have some overlap/build-up in back of the riser, that gets sanded down later.
This is the kind of thing where you have to be methodical, yet fast. Got that? Not that I want to put any pressure on. It is messy, you will have to mix several batches of 2 Tbs. of resin. Your mixing stick and brush will get messy, and you will have to replace them. Your gloves will get sticky, so you can’t put anything down. Remember methodical, and fast. You DO have extra stir sticks, mixing containers, brushes and gloves, right. If there is someone looking over your shoulder and making comments, tell them EXACTLY where to go, and SLAM the door. Did I tell you to have a trash bucket handy? Remember methodical, and fast. SAL
When you are finished, go wash the dishes, clean up the sink and stove. NOW the fiber glass should be at a stage where it is just a little flexible, not hard yet. At this point, if you timed it just right, you can slice the fiberglass off the sides of the limbs easily with the sharp (new blade) utility knife. If not, you can LABORUSLEY sand it off later. If the fiberglass is wrinkled, or has bubbles on the back of the limbs, you can sand them off later. Now go to bed. DON’T YOU DARE FLEX IT NOW!!! IT WILL COMPLETELY DELAMINATE!! WAIT AT LEAST 24 HOURS!!!!
Good Morning!!!!
I made the notches for the string with the same file I use to sharpen the chain saw (do a lot with that little file). You can also use the bastard file to clean up, fine shape the sides, and back of the bow. Have you waited the FULL 24 hours? The first bending of the bow is a very personal thing. If it breaks you don’t want little ears to hear what you are going to say (Remember being called to the principals office for swearing when you were a kid? It could happen again.) , and you want to prepare yourself for “I told you…” OK, put a string on it and put some flex in it. This is the moment of truth. If it flexes too easy, you can put additional layers of fiberglass fabric on the back. If you cannot flex it you need exercise. If it breaks/delaminates you did something wrong, or the wood had a week spot. Cest’ La Vie. The spirit is laughing. Try again.
If it works, don’t get cocky. It could break after 3 arrows, 30, or 300. Rest assured that someday it WILL break. Remember that every time you shoot an arrow. SAL
Tinning: Why is one limb bending more than the other? Beats me, maybe you didn’t put the fiber glass on right? Like 3 on one limb and one on the other? Blame that person looking over your shoulder, or whoever demanded privacy in the bathroom in the middle of fiber glassing. It could be that the wood isn’t consistent (blame God). Most bowyers remove material from the limb that doesn’t bend enough. You can if you want, but I didn’t. I put more fiberglass on the limb that flexed too much.
At one point I decided it would be more camouflaged if I stained the wood before fiber glassing. Didn’t work, completely delaminated. Have no idea why, should have worked. Now that it is glassed, you could stain the belly, but why bother, critters aren’t going to see that side anyway.
Oh, we tried to take pics, but all Arwen could get is the back of my head (we have a small bathroom) and you don’t need to see my bald spot.
-
grumpy wrote: The first bending of the bow is a very personal thing. If it breaks you don’t want little ears to hear what you are going to say (Remember being called to the principals office for swearing when you were a kid? It could happen again.)
Hahaha! Keep it comin’. This is good stuff.
-
Enjoyable read!
I often wonder how a feller comes up with an online user name .
So from all your trial and error , and the number of broken bows , can we assume that men of old had the same ‘TRY AND TRY AGIN’ ? and this is what actually brought to extinction the SAHARA FOREST ?
Bald spot ? My brother -in-law has one . He claims his vast amount of intelligents and knowledge has pushed his hair out .
-
OK, so it is spring vacation for my constant companion, weather is finally better, but we can’t do much because I’m seeing a physical therapist to fix muscle damage I did during 15 years of slate roof repair. I’ve been told to stay away from things like fly fishing, archery, kayaking, and everything else fun (well I suppose I could do IT but there is no one here to IT with, besides I have a chaperon). So while all of the sexy co-eds are at the beaches down south, I’m here with motor mouth telling me how to live my life.
Finally figured out how to measure pull weight. Strapped the riser to a ladder rung, and hooked a 5 gal bucket to the string and added water until it reached my draw (22″). Then weighed the bucket on a bath scale – 39 lbs. Close but not as strong as I was looking for. Since I have the time, I am building another bow (you didn’t REALLY think I was finished did you).
This one is 2″ wide instead of the 1 1/2″ of previous bows, and I am making the arrow rest in the exact center of the bow. Also changed the recurve a bit, and made the riser fit my hand better.
Now I have a question. If the arrow rest is at the exact center, doe’s that mean that I need less flex in the arrow, or is it that the spine is less important?
-
Good read.
-
Grumpy,
This, so far, has been an awesome, albiet humorous tale to read! I’m loving it! Keep up the good work, and continue on, my friend. As I read, I can just see in my mind’s eye, each step as you proceed. Excellent!
-
-
AuthorPosts

- You must be logged in to reply to this topic.