
Home › Forums › Bows and Equipment › Ashby on sharpening — posted!
-
AuthorPosts
-
-
Fellow Ashby students … Ed has just provided us with a most excellent set of directions for broadhead sharpening, and a Whole Lot More. Check it out in the tradbow.com Ashby library. The direct link is http://www.tradbow.com/members/303.cfm (you’ll likely have to paste in).
A personal note: This amazine gentleman currently is enduring medical hassles that would leave most of us sitting in a wheelchair feeling sorry for ourselves. Yet his enthusiasm for making us more efficient, humane and successful hunters is undented. I am constantly amazed, and grateful. Thanks you, Dr. Ashby!
-
Thanks for posting Dave, and thanks, Dr. Ashby, for such meticulously researched data. I love this stuff. You are one in a BILLION (actually, one in six billion :-).
Edit: oh, and am I missing something? I didn’t read anything in there about how to sharpen.
-
No Patick, you didn’t miss a thing. There’s plenty of ‘how to sharpen’ information, but not too many seem to understand what it is they are trying to accomplish, and why. Fewer yet grasp that, even when the edge is truly sharp, other broadhead factors can affect how efficiently the edge cuts. Besides that, Sharpster is the ‘how too’ sharpening expert. I think Ron can probably put a sharp edge on limp pasta!
Ed
-
Dr. Ed Ashby wrote: No Patick, you didn’t miss a thing. There’s plenty of ‘how to sharpen’ information, but not too many seem to understand what it is they are trying to accomplish, and why. Fewer yet grasp that, even when the edge is truly sharp, other broadhead factors can affect how efficiently the edge cuts.
I really eat that info up. I love the analogies you use too, makes it easy for me to explain it to others so that they grasp it, without having to try and explain the details.
Dr. Ed Ashby wrote: Besides that, Sharpster is the ‘how too’ sharpening expert. I think Ron can probably put a sharp edge on limp pasta!
Ed
That’s the area that frutstrates me most. Well, not so much with pasta. Lol! I’m getting better at sharpening my broadheads, but have a long way to go. I’ve always had pretty good luck with ceramic sticks for my knives.
-
Thanks very much Ed,
If you want to sharpen the edge of a lazagna noodle, doing it dry, (before cooking) is cheating! 😆 Actually, I’m working on a few different sharpening tutorials but, nothing complete just yet. (need to add some pics).
Patrick, are you shooting single bevel or double bevel heads? A good tutorial on sharpening either type of blade will be fairly lengthy. I do plan on posting both but which are you looking for right now? Thanks,
Ron
-
sharpster wrote: Thanks very much Ed,
If you want to sharpen the edge of a lazagna noodle, doing it dry, (before cooking) is cheating! 😆 Actually, I’m working on a few different sharpening tutorials but, nothing complete just yet. (need to add some pics).
Patrick, are you shooting single bevel or double bevel heads? A good tutorial on sharpening either type of blade will be fairly lengthy. I do plan on posting both but which are you looking for right now? Thanks,
Ron
Hi, I’m using, and will continue to use single bevel broadheads…and lazagna noodles (not ready for wet noodles yet though :lol:.)
-
Single bevel sharpening
Sharpening single bevel blades is actually easier than sharpening double bevels once we understand the “how” and “why” of the process. When sharpening double bevel blades it’s important to give equal treatment to both sides of the blade in order to keep the cutting edge centered on the blade. This is not the case with single bevels. When sharpening single bevels almost all of the work is done on the bevel side.
Step one is to true-up and flatten the unbeveled side of the blade. We don’t want any bumps, burrs or low spots, just a nice flat surface from tip to heal of the blade. Abowyer, Tusker and ABS heads are very flat right from the pack so, just a quick pass or two with a medium grit stone held flat on the unbeveled side of the blade will true them up fairly effortlessly. Grizzlies are a bit rougher out of the pack but, a couple of passes with a file will take them down pretty quick too. Grizzlies also need to have the tips filed flat as well. The bulge at the tip of a Grizzly broadhead is actually excess braze that has bled out during the lamination process. File flat across the tip of a Grizzly and you’ll see brass beneath the paint. Just file it flat till the brass is completely gone and you see only steel.
Step two is to work the bevel side of the blade with a coarse stone or file until a very small but pronounced burr is developed on the unbeveled side of the blade. Make certain that the burr runs continuously along the edge from tip to heal. Although it will be small, you should be able to both see and feel the burr. It is critical that we raise the burr at the beginning stages of sharpening because this is where the cutting edge is actually formed. The most common mistake people make when attempting to sharpen anything is: Progressing though the grits too quickly. If we don’t reach the point where the burr is developed with the coarsest stone or file, then progressing through finer grits will only polish the bevel, but it won’t get the blade any sharper.
We have all been taught that when sharpening, it’s important to move the blade into the stone as though we were trying to shave a thin slice off of the stone with the blade. This is generally true but, it’s less critical when sharpening single bevels except as a last step. So in the beginning, work the blade forwards and backwards on the stone, either parallel or perpendicular to the cutting edge, whichever you prefer. Because at this point, we’re only attempting to remove steel to shape the cutting edge, keeping the stone in contact with the blade on both the forward and back strokes will save time and effort, and will develop a good burr quickly. If you’re using an angle guide of any kind, you’ll typically work perpendicular to the cutting edge. If you’re free-hand sharpening, it’s generally easier to maintain a consistent angle if you work the blade lengthwise.
Step three- Once we have raised a burr with our coarsest stone or file, we can then progress through successively finer grit stones to refine the edge we developed with the coarse stone. Do this the same way- keep the blade and stone in contact with each other on both the forward and back strokes. At this point we’re simply polishing the bevel and refining the cutting edge so we can progress through successively finer grits fairly quickly. As we do this, the burr will continue to get bigger and heavier, which is exactly what we want.
Step four- final “tuning”. Now that we have developed a good burr and have refined and polished the bevel and cutting edge with the finer stones, the last step is to do the absolute minimum necessary to the unbeveled side of the blade in order to remove the burr. This will expose the blazing sharp edge which is concealed beneath the burr.
This is the most critical step. It’s fairly easy if you’re using an angle guide but if you’re free-handing, take your time and be very deliberate at this point. Flip the broadhead over and using the finest stone you have, make 3-5 passes into the edge of the blade to shear off the burr. Check the sharpness after this. The blade should feel pretty sharp. Then make a couple more passes into the edge of the unbeveled side… Now it should be getting very sharp… Then start doing single passes and check the sharpness of the blade after each pass. Before long, it will be extremely sharp. At this point if we make another pass or two, we can sometimes loose the sharpness because we’ve gone too far and now have begun to create a burr on the beveled side of the blade. If this happens, it’s an easy fix: just make a few individual, alternating passes on each side of the blade just like you would a double bevel. It should only take 3 or 4 alternating passes to get right back to “hair plowing” sharp. Again, this last step of removing the burr should be done with your finest stone.
Finish up by stropping the head on leather or my personal favorite, corrugated cardboard. Just a good sized flap off a plain brown cardboard box. I do 6-8 passes per side then follow with a series of alternating passes flipping the broadhead each pass.
Sorry about not having pics to go with this post. I’ll get a real tutorial with pics or better yet, video posted soon. Till then maybe Ed or Standing Bear might have some? Let me know if this wasn’t as clear as I hoped it would be or if anyone has any questions. Thanks,
Ron
-
Wow, thanks for taking the time to write it out in so much detail. I have two questions:
What is meant by “raising a burr”?
Just to be sure I understand, even on a single-bevel, it seems I will be “touching-up” both sides (bevel and non-bevel)…to a lesser or greater degree, right?
-
Absolutely great post Ron, if you need pics, just let me know which ones and I’ll post them for you, till then, keep blessing those with your knowledge.
SB
PS: Tried sharpening macaroni tube edges ( dry ), ended up boiling them and having Mac and cheese instead 🙂 LOL YUUUUMMMMMMYYY!!!!!!
-
SB, if you’ve got a good photo of an edge burr, could you post it for Patrick? I’ve looked through what I have here with me, and I have no ‘burr picture’ to post.
You’ll have to get Ron to demonstrate his limp noodle sharpening technique – a video perhaps!:lol::lol::lol:
Thank you,
Ed
-
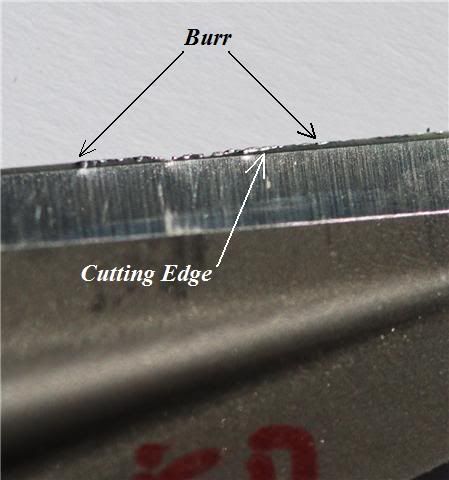
I located a couple. Here you go Patrick.
The burr is the wire edge that develops along the cutting edge once the bevel has been uniformly worked down to produce a thin edge.


Correct, careful removel of the burr, followed by honing and stropping results in a thin, smooth edge that is trult sharp.
Were the photos enough help?
Ed
-
Thanks for adding the pictures Ed. Hope you don’t mind but I stole one of them…(fair and square of course).
Patrick, about the burr… Remember the old joke- Q: “Why did the chicken cross the road? … A: “To get to the other side”.
When sharpening, we need to raise a burr for the same reason… to get to the other side of the blade. All sharpened edges have two bevels. In the case of a single bevel there are still two bevels, just that one of them is ground at 25 degrees and the other at or near zero degrees. The burr is the physical evidence that tells us that we’ve removed enough material from one bevel to have “reached the other side” of the blade and in so doing, created a true intersection of the bevels… a cutting edge.
Sharpening is really grinding on a micro level. We start with a coarse stone or file and stay with it until we have removed enough material to bring the two bevels to a true intersection. The burr is a coarse feeling ribbon of steel which develops on the edge of a blade when the two bevels intersect. The burr will develop on the side of the blade opposite from the stone or file. In other words, the side you not working with the stone. If you look at the pic I stole from Ed, you can clearly see that the true cutting edge is straight and uniform but, there’s a very thin, irregular ribbon of steel still attached to it. That’s the burr. Light burrs can be moved around with light pressure because they’re very thin like foil. It looks like this one may have been stropped or folded out in front of the edge for the photo because typically it would be on the underside of the blade. When sharpening a single bevel blade, one of the reasons we flatten the back of the blade first is to remove any burr that may be there from the factory. That way we’ll be able to tell when we have raised our own burr. Just lightly drag your fingertips straight out from under the unbeveled side of the blade. Before the burr is raised, the blade will feel perfectly smooth all the way to the cutting edge. When you’ve ground the blade enough to raise a burr, you’ll feel it. Just a light, coarse bump right at the cutting edge on the unbeveled side of the blade.
 [/img]
That’s the burr… once you have that, you’ve got it licked. All that’s left is to polish the bevel(s) and refine the cutting edge with finer grit stones, then remove the burr and that’s it. Done. One important note though… If we proceed to finer grit stones before the burr is developed, we’ll end up with beautiful, mirror polished bevels but the blade will be still be dull as a stump. Gotta raise that burr right in the beginning. Hope this helps,
Ron
-
-
AuthorPosts
 [/img]
- You must be logged in to reply to this topic.