
Wooden arrows provide many advantages to the archers who choose to use them. Wood is the lowest cost, most environmentally friendly material from which to make an arrow. The cost can be made even lower with every step of the construction process that archers take upon themselves to do. In fact, wooden arrows give the archer turned fletcher the widest opportunity for exploring the hobby. He can dabble with adding a crest to the arrow or go to the store and buy a board suitable for the manufacture of arrow shafts. If he goes so far as to make his own arrows from a board of pine, fir, or poplar, he will soon find they can be made for less than 50 cents each.
Wooden arrows are steeped in the history of archery and bowhunting. All of the fancy and famous shooting of old was done with wooden arrows. From the long-gone days of Robin Hood to the not so long-gone days of Howard Hill, wooden arrows were the only choice.
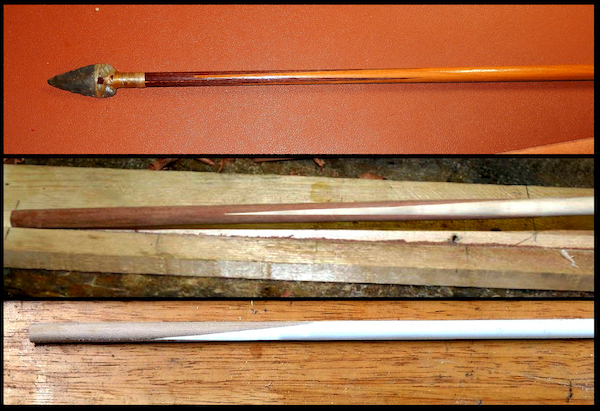
The two most common footing styles 4-dart(top), 2-dart(middle),and the 1-dart(bottom) footing produced by using the jig.
As for accuracy, I guess that can be debated. Many archers have made many amazing shots with wooden arrows. Have you seen the movie short Meet the Champs that shows Ken Wilhelm shooting a cuff link off his brother’s head with a wooden arrow?
About the only fault I can find with wooden arrows is that they will, from time to time, snap after a hard impact. I must admit that they do break more often than carbon arrows. If wooden arrows have an Achilles’ heel, breaking would be it.
While there are solutions to the problem of broken arrows, most involve expensive jigs and lots of time to implement some manner of splice (or footing) to repair the arrow. While I like working on arrows, I don’t want to spend any more time or money than I have to fixing them. I think others might also feel this way. That’s why most broken arrows get shot up into the sky for one last glorious flight.
Now we arrive at the point of this article, which is to describe an easily made low-cost jig that can be used to splice a broken arrow shaft to a new section and thus restore it to use. I hope that after you study the simple jig offered in this article, you will stick those broken arrows back in your quiver so that you can bring them home to fix.
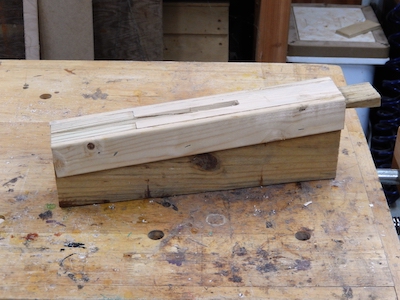
Side view of the jig with the wedge resting in the back.
A broken arrow (left), and a new footing ready to be glued in place.
Over the years I have tinkered with several jigs designed to repair an arrow, trying to reduce the time and effort it takes to restore that shaft to a useful condition. None of those jigs produced a repaired arrow reliably. While it might appear that each failure was its own waste of time, I have found the iterative process of discovery and invention to be highly reliable (in the end) at producing good results. I iterated a bunch to come to this handy jig, and because of all my previous failures, I knew I was onto something good when I tested it.
Aside from offering a quick and sturdy way to repair your arrows, this jig offers several other advantages to the owner of broken arrows.
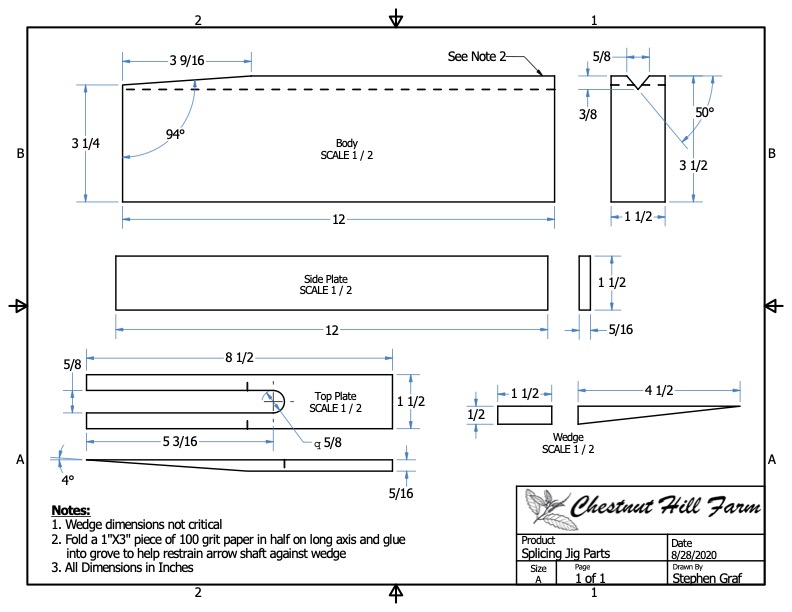
Splicing Jig Parts.
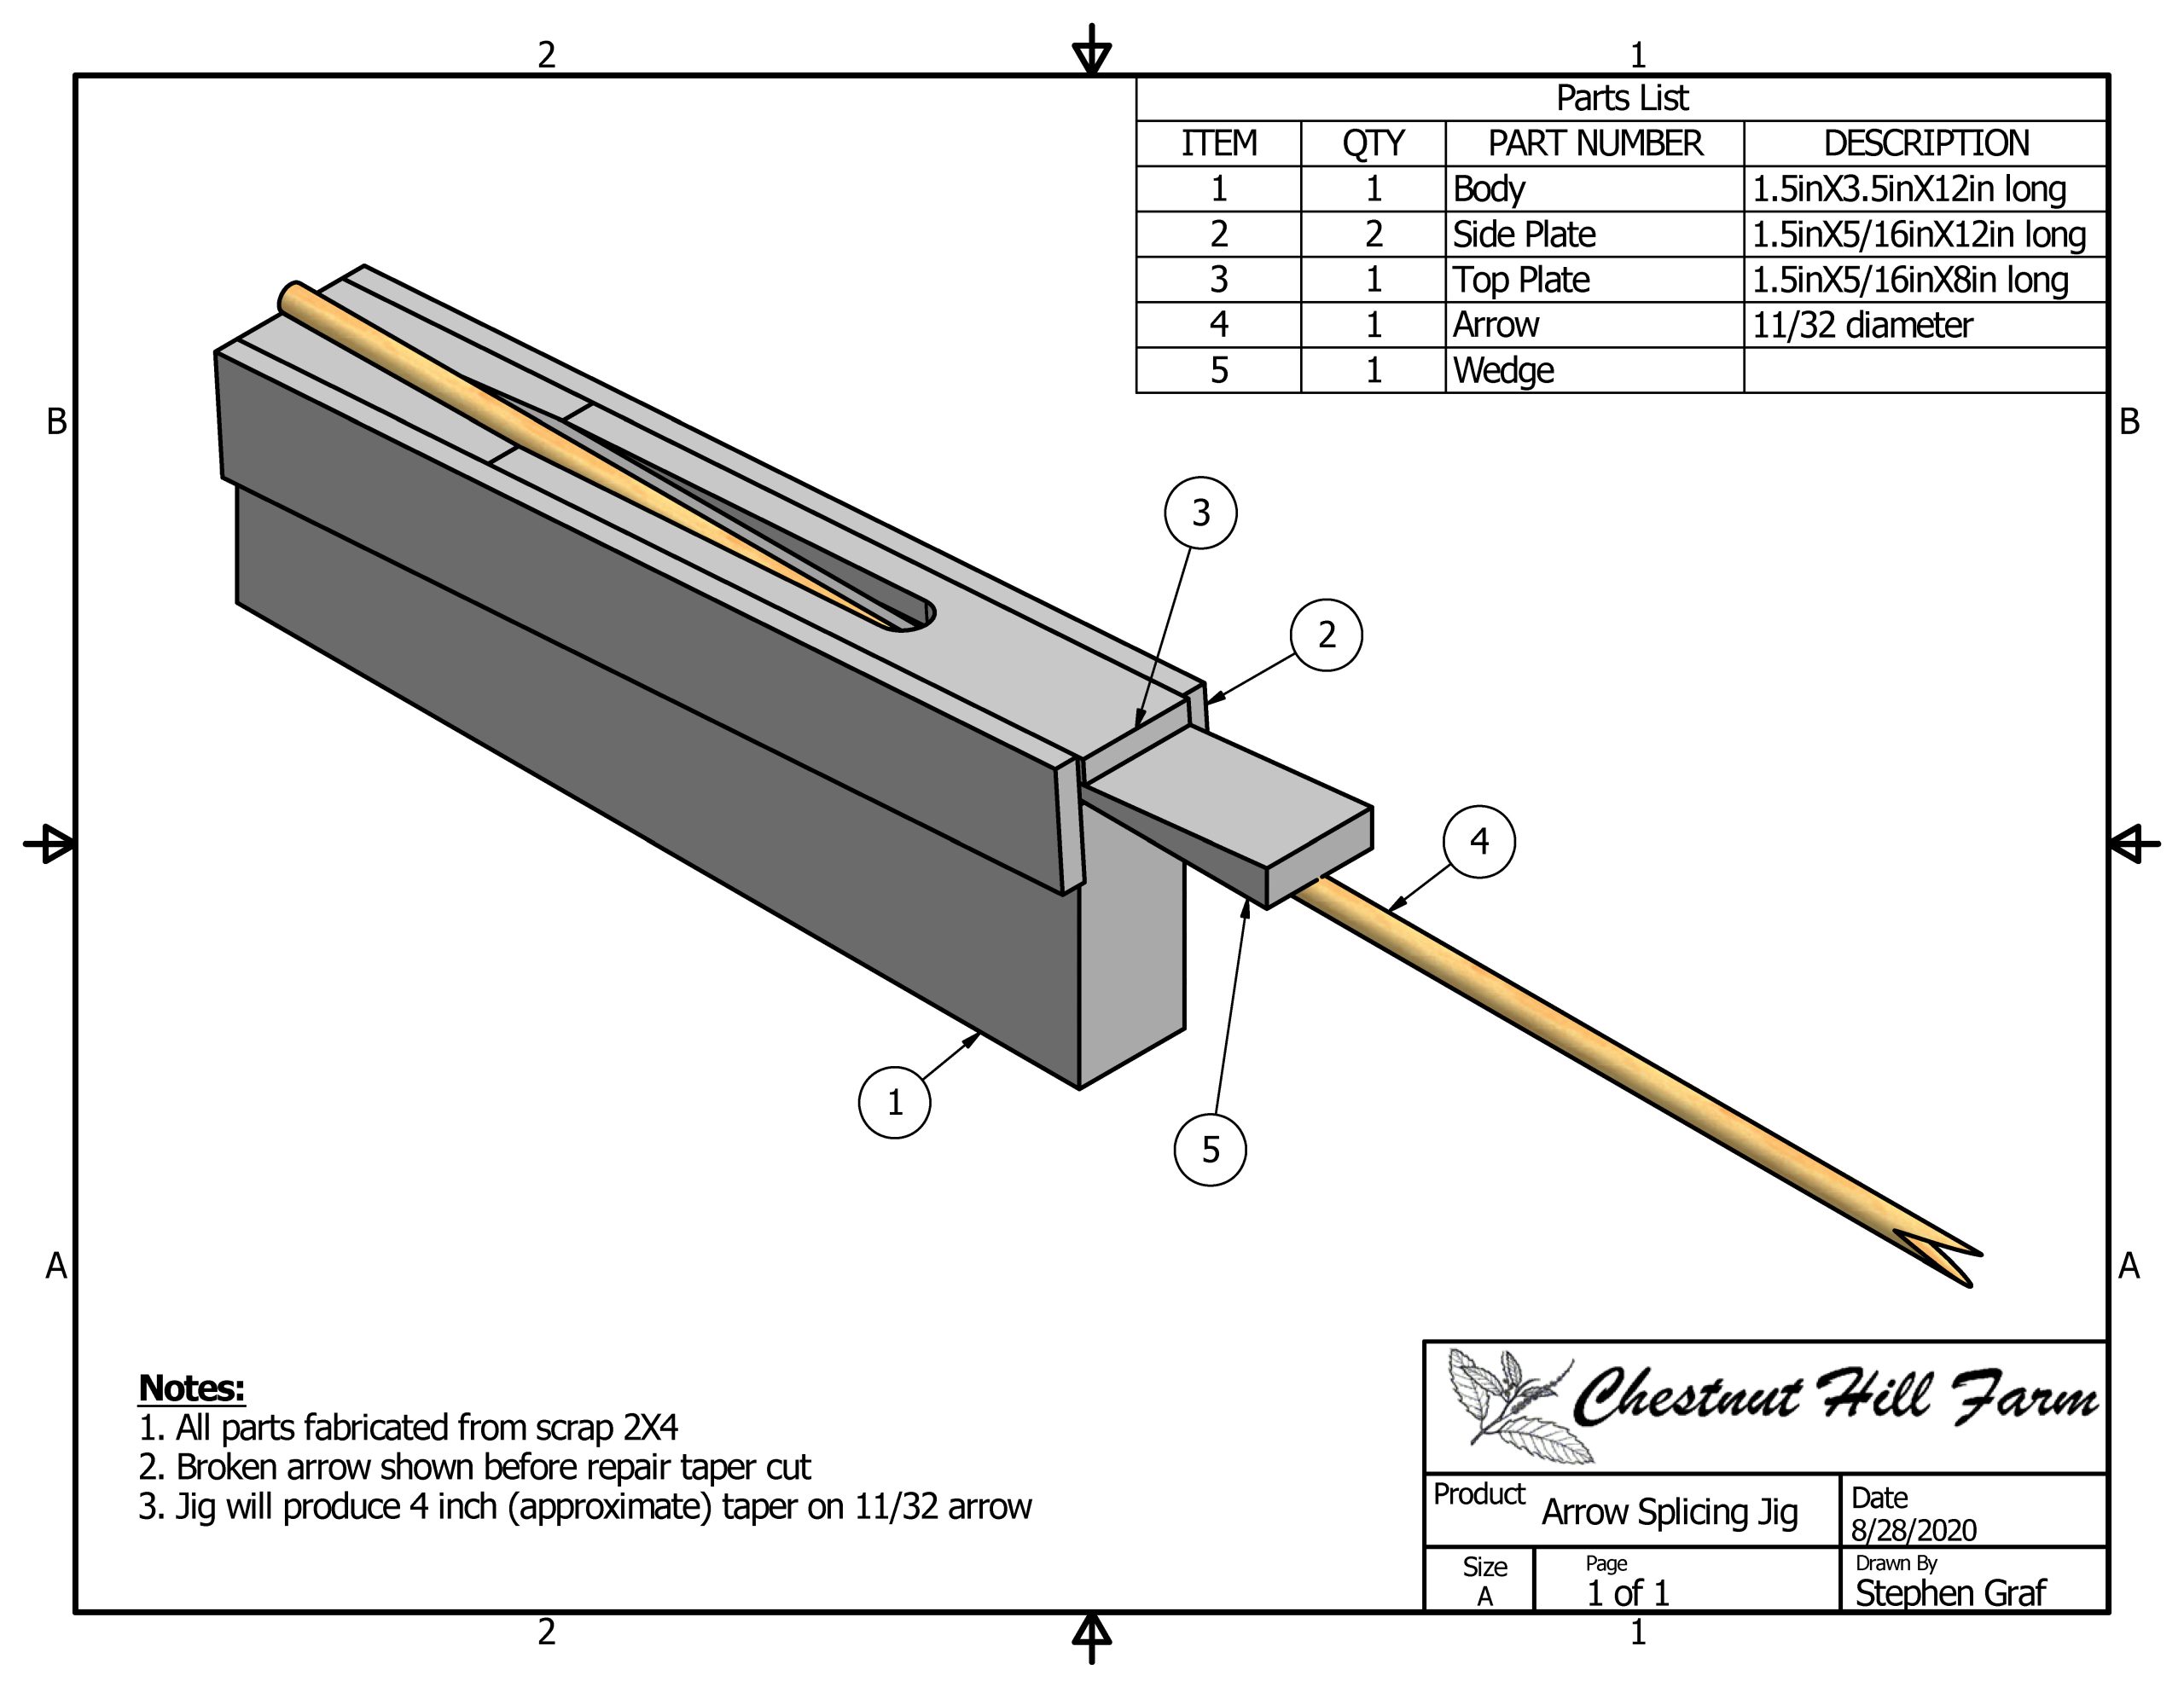
Splicing Jig.
First, the jig is easy to make. The only tools required for its fabrication are a saw and a hammer. That said, a table saw and a drill would reduce the effort even further.
Secondly, the jig can be cheaply made from some scrap 2X4 lumber. In fact, that’s what I made mine from. But I did have a table saw to rip the required thin strips. If you don’t have a table saw, then some thin strips can be purchased from the local lumber store.
Third, the splice that the jig helps create is durable. I have been shooting a half-dozen spliced arrows (daily) all summer and have not had any failures. These arrows serve as target arrows and roving blunts. I used Titebond III glue to bond the splice together.
Finally, and most importantly, the splice it creates is self-aligning. Those that make spliced arrows (otherwise known as footed arrows) differentiate between the two most popular methods of splicing arrows by describing them as “2-dart” and “4-dart” splices. The splice that this jig produces is a 1-dart splice. I have made a few 4-dart splices and many 2-dart splices and found that getting good alignment (so that when the arrow is finished it will be round and spin true) with multi-dart splicing can be challenging.
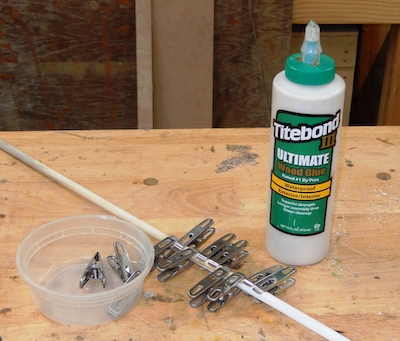
The broken arrow and footing are glued together and clampedwith clothes pins. Excess glue has been wiped off.
Only after going through the entire repair process can you know if your arrow will spin true. I spent a lot of time making 2- and 4-dart footed arrows that never really spun true. By contrast, the simply constructed 1-dart splice is trued up while gluing it together. I have found that if it feels right, it is right. As of the writing of this article, I have made about two-dozen 1-dart splices and have yet to make a spliced arrow that didn’t spin true.
The 1-dart splice is different from the 2- and 4-dart splices in that it is made by joining two like round shafts that have identical tapers. Thus, instead of needing a square piece of wood that has a kerf cut into it to mate to a taper cut onto the arrow shaft (that in turn must be shaved down to round after the glue joint is dry), the 1-dart repair needs another round shaft to mate to the arrow (that does not need to be shaved down after the glue joint dries).
If this splice has a drawback, I think it would be in the looks department. I have to admit that it isn’t as sexy as the 2 and 4-dart footings. Instead of highlighting the splice by using contrasting woods, the maker of a 1-dart splice might want to play down its appearance. Using woods of the same species will make the splice disappear in the eye of a casual observer. In my case, I dip my arrows in white lacquer, so the splice (no matter the style) is invisible.
The astute reader will now realize that the 1-dart splice offers a use for all those over-spined
shafts gathering dust in the corner of the shop. I have found I can get four or five good splices out of an old arrow shaft.
The jig is simple enough in design that build-along instructions are not necessary to get the gist and make the jig. That said, I will note that there is nothing magical about the dimensions given in the drawing. And I will further note that it doesn’t matter if the jig is built exactly to the plans because the same jig is used to create the “dart” on both the arrow and the foot. Therefore, both darts will end up being exactly the same, which is the important part.
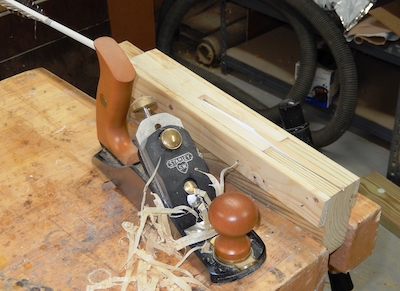
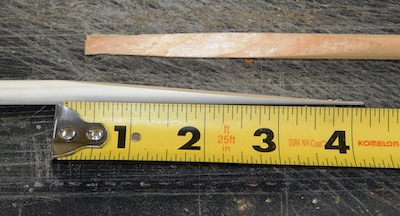
The arrow or footing stock has been tapered down in the jig.
I would finally note that the jig as described in the plans will produce a glue surface about 4-inches long. This yields plenty of surface area to create a joint that is stronger than the surrounding wood. If your jig ends up making a glue surface too much shorter than this, it may result in higher joint stress and potential failures.
I like to have a no-strings-attached relationship with my arrows. That means I don’t want to have so much time and money tied up in my arrows that I hesitate to shoot them for fear of loss or breakage. What fun is it to be worried about the fate of your arrows? How can you expect to shoot well if you are afraid your arrow will break or be lost?
This jig gives me even more reason to shoot my wooden arrows happily, for I know that if they do break, it will take but a few minutes to return them to my quiver, good as new.


Leave A Comment