
Home › Forums › Bows and Equipment › Internal Footings
-
AuthorPosts
-
-
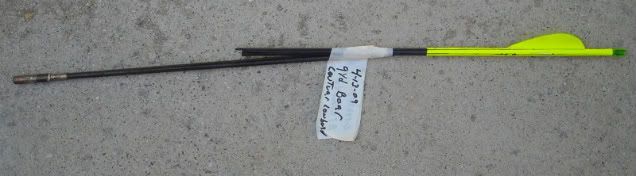
Someone email saying that the Internal footing (IF) photos on the thread at TradGang were no longer there. I’ll repost them here, for any folks interested.
First photo shows IF and Insert in place. Overall IF length can be anything over the ‘minimum effective’. That means: (1) length of parallel glue attachment of insert length + parallel section of IF needs to be a minimum of 3″ long. (2) The tapering, rear portion of the IF needs to be 5″ long. Increasing IF overall length can also be used as a way to increase the shaft’s dynamic spine.

Photo 2: The forward end of the IF is securely glued to the back of the insert.
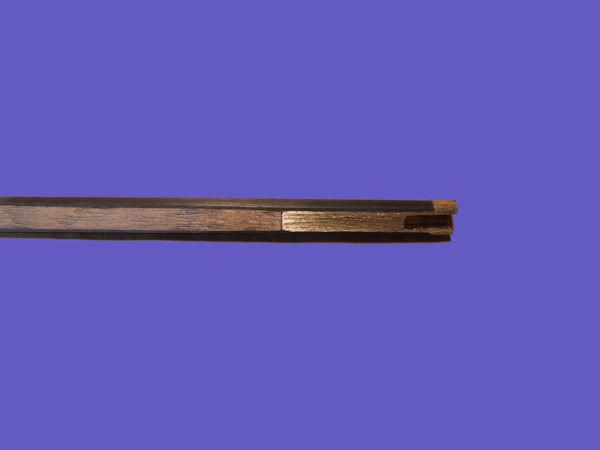
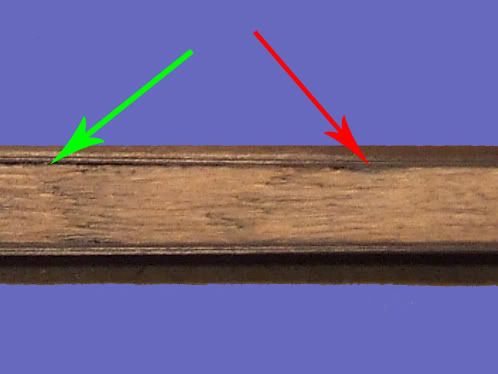
Photo 3 shows the ‘glue ring’ back of the IF’s parallel section. This is an important feature. To successfully create it (without ending up with part of the tapered section of the IF also glued to the shaft) requires a very slow curing epoxy. The Selley’s “Maximum Hold Epoxy” I get in Australia has a 3 day curing time, and remains very liquid for well over an hour. The epoxy is applied to both the IF’s parallel section and inner shaft wall. Holding the shaft vertical, the IF is inserted. This pushes a glue ring ahead of the parallel portion. The glue-coated insert is inserted into the shaft, pusing the IF adead of it. (Be sure to have glue between the IF’s end and insert’s end.) The shaft is then stored in a vertical, point-downward position until the epoxy is fully curred. To prevent unwanted glue in the insert, I screw in a grease coated broadhead adapror into the insert, leaving it in place until the epoxy is cured.
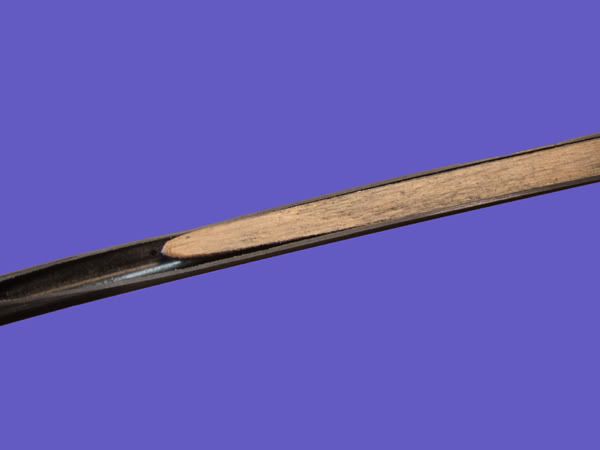
The next three pictures show the upper end of the IF, and my poor attempt to show the IF’s flex. The cut-away shaft was too limber to bend the IF’s back section. The IF needs to not only have the tapering profile, it needs to flex at the back. The best way I can describe the flex is that it should bend in the same profile that a good salmon rod does; and that’s how I test them as I make them, by holding the front end in one hand and bending the back tip to get a bend that starts out stiff and get progressively more curved as it approaches the rear tip.
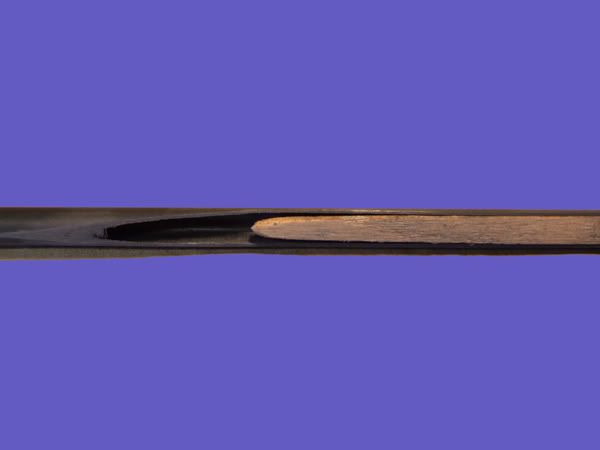
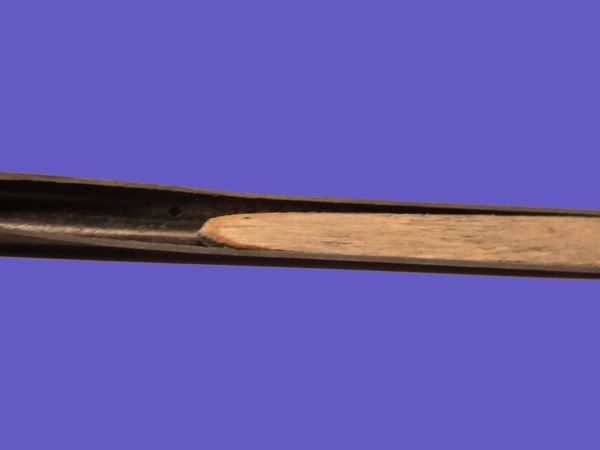
I make my IF’s from Oak, but any hardwood will work. The two OAL’s I commonly use are 7″ and 9″.
Ed
-
Hi Ed,
I have been working on using the info you have shared to make my next KILLER arrow.
I am using a sold carbon rod around 12″ long for the spine it adds to my arrow( I still need more testing ) so far, I like it more than doing 12″ of aluminum outsert footing.

-
This is the arrow I made for my Elk hunt this year, it might get some Hog action also.

-
Looks like a killer setup David. Structurally that should be a good, tough arrow. With so many variable component parts how hard was it to get the tuning right? It going to be interesting to see how it performs. Have you tried any adverse angle punishment test shots yet?
Ed
-
Dr. Ed, I am wondering what the advantages are in using the internal footing over outer footings?, I shoot fairly heavy bows,my personal bow is 100@28, and I’ve been using outer footed(1 1/2″) Beman mfx 340’s full length (I have a 30″ draw) and they have proven very durable, only breakages so far have come from being hit by other arrows and hits to steel plates… what keeps the internal footed arrows from breaking at the insert/foot glue seam?, and are these internal footings more for EFOC weight than strength?…..Thanks,Steve
-
Steve,
The IF was developed as a way to strengthen carbon shafts. The
2007 Update, Part 2 will give you a lot of the hows, whys, and what fors about the IF.I tried out-footings but found 2 problem areas with them. One, they increase the shaft diameter. Not a problem with some broadheads, but with others they reduced the ferrule diameter/shaft diameter ratio enough to affect penetration and, second, on really hard angular impacts they showed a tendency for the shaft to break right at the rear of the out-footing. There’s a reasonable discussion of why this happens in the aforementioned Update.
There are several factors critical to keeping the the insert and IF joined and preventing ‘backset’ on hard, direct impacts. One is the quality of the epoxy and the care in preping component parts for gluing. Next, the ‘glue ring’ back of the forward, parallel section of the IF is a very important factor. Third, and the most costly to determine, is that a MINIMUM of 3″ of shaft wall attachment to insert and IF is required. Less length of attachment and there was backset on direct impacts.
Now this amount of strength MAY be overkill of a hard, heavy bone impact, but that’s not a chance I want to take. Just look at the shaft damage rates that are shown in the Update. In many ways, a bone impact MIGHT be even harder on the structural integrity of the arrow system than the testing I used in the IF development.
During development, the IF durability/strength testing was done with direct and 45 degree angular impacts from 20 yards against a 3/8″ piece of armor plate (the hatch cover from an armored personnel carrier). Most bones have surfaces that are specifically designed to deflect and redirect impact forces. They have surfaces that simultaneously curve in more than one direction. This can cause some really wierd, fast directional change stress patterns on the arrow, pushing its integrity to the limit.
The ability to use the IF as a way of increasing FOC and fine-tuning dynamic arrow spine are just very useful side benefits. Total structural integrity of the arrow system is the BIG reason for using the IF. As you’ll also see in the upcoming 2008 Updates there appeared to be less stess on the arrow’s direct-impact structutal integrity with the Ultra-EFOC arrows; where shaft weight was reduced over the arrows previously tested, in order to get above 30% FOC. Far from conclusive though. Unless further testing shows something unexpected, I’ll keep using IF on my ‘serious’ hunting arrows.
Ed
-
Dr. Ed Ashby wrote: Looks like a killer setup David. Structurally that should be a good, tough arrow. With so many variable component parts how hard was it to get the tuning right? It going to be interesting to see how it performs. Have you tried any adverse angle punishment test shots yet?
Ed
My NEW “IF” has only been shot into the target.
My external footed arrow has minor testing, my target, a wall at 45 degrees and a young bull elk.
I have found that the small shaft diameter pays huge dividend as far as having little to no shaft drag, I have kill shots that had no blood on over half of the shaft.
The external footing ads to the shaft diameter and I think it’s going in the wrong direction, however I needed more spine in my shaft so, putting 15″ of 1716 over the shaft gave me the spine I needed to fine tune my arrow to handle the EFOC, actually the tuning was easy because I knew what direction I needed to go.
Ed I don’t like shooting my arrows into steal and walls at angles 😕 lol
I wanted to do some testing on my bull, but I shot it just before dark and did not get the first loud of meat back to camp till midnight.
Entrance SLIT “NOT”

This is the exit after hitting ribs on both sides, it also went through the foreleg.

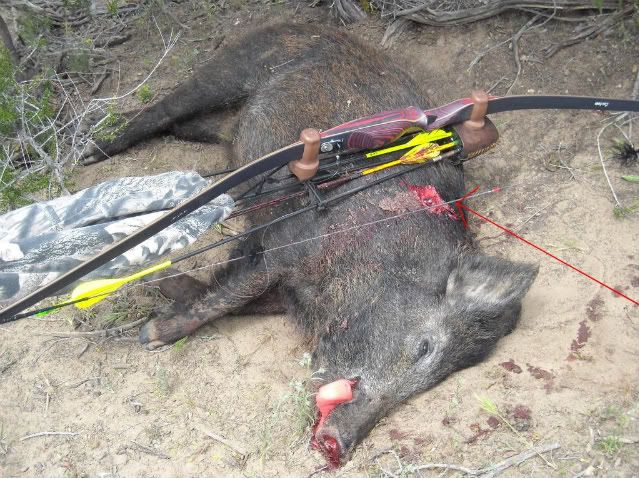
He did snap the arrow and I never found the front 3/4 of the arrow.Shot was around 27 yards, slight quartering away, down hill, 58″ Centaur 60lb @ 28″ arrow 765 grain with grizzly el grandy
I got to through in the hero pic yum! yum! spike.

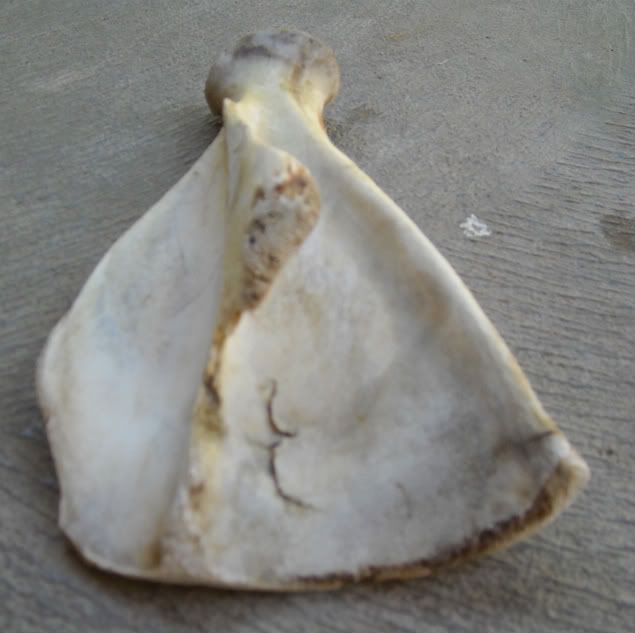
I hope to do a lot of testing this year on hogs, I want to develop an arrow broadhead combo that will consistently penetrate the double bone on the shoulder blade on a big boar, it is this ridge where the knife is sitting.

Not that I want to kill them by going through this double bone, I just want a set up that has the capability to do it.
After reading your study on arrow integrity, I also believe it is the most important ingredient, in cooking up a super deadly arrow.
I think internal footing is going in the right direction, and I look forward to setting up some 35% UEFOC arrows.
Thanks so much for all the work you have so unselfishly shared with us wouldbe’s
-
David,
You have no idea how much I appreciate the feedback I get from your field results. There’s a good number of folks using penetration enhanced arrow setups now, but few really LOOK to see the terminal performance, and fewer yet get the good ‘damage photos’ you do.
I started out the 2008 testing to look at FOC’s effect (or lack there of) on the Heavy Bone Threshold. but it morphed into Ultra-EFOC. I think that’s exactly where we need to be headed. If I can recover from all this medical stuff and get back to doing things more important (LOL) I want to get to at least 35% FOC for some testing.
I totally concur. That scapular ridge hit is the toughest one to deal with. I’t not so much the amount of bone thickness as it is the multiple angles of bone impact on a single impact. Penetration of the BH can get ‘redirected’, deflected on a secondary course, by impact with the scapular flat while it’s still trying to penetrate the first bone impact (the ridge). That tends to bind the broadhead. When testing with some softer 3:1 double-bevel single blades (the early model Tusker Concord – not the currently made version) I got huge BH bends occurring at a point between ridge-impact and scapular flat impact. Had them with some other, lower MA single blade BH’s too. I’m really looking forward to what you find on those shots when you start the pig testing!
Ed
-
Dr. Ed Ashby wrote: David,
If I can recover from all this medical stuff and get back to doing things more important (LOL) I want to get to at least 35% FOC for some testing.Ed
Glad you got your priority’s straight 😆 lol
This is a small boar that I shot in his bed @ 9 yards ( arrow was not internal footed, but just a short triple external footing, total arrow weight around 650 and 25% efoc )
The red line is the path of the shot, except he was lying on his other side, it went in the top of the shoulder blade and cut the ridge blowing the bone off and down through the flat into the lung.
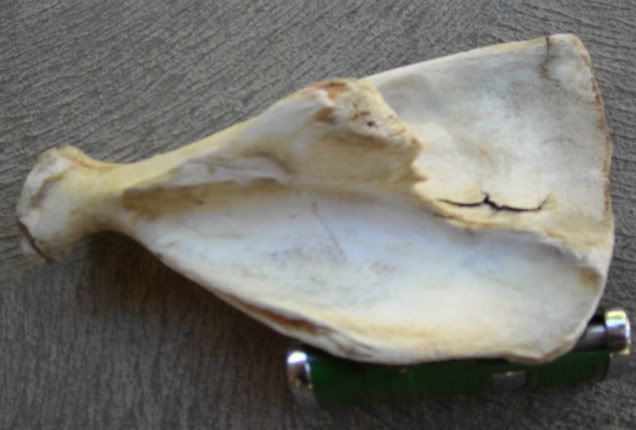
The broadhead completely severed the right back lobe of the lung off.

He snapped the arrow as he ran under a oak tree branch, you can see how much penetration I got even tho it went through the 2 bones ( about 17″ )I pilfered the grizzly 190
This shot made me a believer:shock: lol
Oh! cant forget the hero pic lol

-
Doc, it does some times amaze me how much negative comments get made, you my friend take a lot of heat for trying to help ALL of us, 😥 I don’t know how you do it.
I have tried the big broadhead thing, I think it’s a rookie mistake ( which; I also made )
The rookie thinks if I push this AXE head through this animal, I’ll cut a huge hole and it will, however it comes at a cost.
THE COST IS PENETRATION
I don’t want to give any penetration up for a big hole, it also imparts “IMHO” ten times the flight response in the animal.
The rookie does not understand it is penetration that is Paramount, if only soft tissue is contacted; I can push a flat edged shovel through 😯 but if bone is contacted your SOL.
I looked at the BIG AFRICAN game and what did it take to put one down, it does not take a giant hole, it take a hole stem to stern about the size of a broom handle.
The rookie thinks with a big hole I’ll get more blood on the ground, NOT TRUE, it’s what was cut, and how sharp was the broadhead IMHO that puts blood on the ground.
Buff, just shot a whitetail with a 2 inch wide broadhead through the lungs that ran 500 yards with the arrow sticking out of both sides, with vary little blood on the ground, here’s the video, copy and past it.
http://www.buffsblackwidow.com/videos/riorojo8point.wmvSome of the hardheads think because we have killed animals for thousands of years with real crappy equipment we should keep using crappy equipment.
If Fred Bear was hear he would be at the forefront of your study information, he never used crappy equipment, he used the BEST there was at the time.
We already know we can kill all kinds of big game with a self bow and stone head, that’s not the point.
Stay the course my friend, they might treat you like Picasso, after your dead they’ll appreciate your work. lol
-
Kingwouldbe wrote: … it also imparts “IMHO” ten times the flight response in the animal.
That’s spot on, and very, very few folks seem to realize it!
You’re right about Fred too. Everyone thinks of him and then the “4-blade Razorhead”. I personally heard Fred say that the bleeder blade was for one thing; to open the skin to reduce arrow drag, increasing penetration. The hard, blue steel in his bleeder blade was specifically chosen to shatter in bone impact and, as Fred said “let the broadhead penetrate like any other good single blade”. The famous “shooting them once with a Razorhead is like shooting them twice with other broadheads” was purely a sales gimick thought up by the advertizing agency.
Ed
-
Dr.Ed, Thank you for your very thorough and helpful reply, I will try internal footings as per your intructions and examples, also ,a BIG Thank You for what you have done and continue to do, I have read your early natal studies and found them very informative, but as I am no longer a member of TG, I have not kept up with the past couple years advancements, where can I find your newer studies?, I would very much like to read them.
-
Just to comment on the Doc’s internal footing, it is very easy to do. With just a little practice, a cordless drill, a scraper, and some sandpaper you can make the tapers and weight of the footing match perfectly. One word of caution… If you use Gorilla Glue to set the footing, make sure you give yourself a little wiggle room in the fit. That stuff swells up really fast and can set before you get it in position.
-
It’s worth mentioning that the tapered portion of the IF NEEDS TO BE STRAIGHT; that is, aligned with the center axis of the shaft. I start with a dowel rod and turn it down while it’s rotating (lathe, or lathe technique in a drill press or hand drill). The 6mm diameter hardwood dowels I get in Australia are ‘sopt on’ diameter for most of the commonly used carbon shafts, but I haven’t been able to locate them here in the States, so using 1/4″ as a start.
Unless done in a lathe, where one end can be supported by a ‘live center’, you’ll need to go slowly, using very light pressure against the dowel. They’re thin dowels, and too much pressure will just flex the dowel, instead of removing the material that is ‘off-axis’. When it’s ‘trued’ there will be no visible wobble as the dowel rotates. I try to true up the alignment before doing the final tapering of the back 5″ to get the degree of flex I’m looking for in the IF.
The IF’s takes a bit of patience to make correctly, and can be a pain at times, but well worth the effort if you’re after maximum shaft integrity.
Ed
-
Hi Doc, I have a few question for you,
#1. It looks like there might be a weak spot at where the insert and the dowel come together?
#2. Did you notice any change in the spine of the arrow with IF?
#3. What would be a better arrow of these two? ( by better I mean in penetration )
A: 650 grains with a 32% efoc
B: 765 grains with a 28% efocI want to cook up some new IF arrow and am looking for a target to shoot for.
With the carbon shafts I am using, if I go up in point weight I have to increase the spine of the overall arrow to handle the front weight.
I like the idea of a 650 grain arrow with the 30+% efoc
My goal is to be able to shoot through the pelvic girdle and exit the front shoulder on a big boar.
Thanks
-
Here we go, Dave, by the numbers:
#1. Initially I did have a problem with weakness at this joint, but only on the hard, direct impacts. The Insert would set-back; pushing up into the shaft. Determining how much support back of the insert was required, and determining the minimum amount of support that would work, was the most costly of all the testing (broke a lot of shafts). With the slow cure epoxy I use (Selley’s Maximum Hold) the MINIMUM combined length of glue attachment between insert/IF and the shaft’s inner wall is 3″. I THINK it will be similar with any of the quality slow-cure epoxies. There was no difference in back-set resistance between a 3″ attachment and the longer attachments. So, as long as the combined length of the insert and the parallel section of the IF is 3″ or longer, you should be fine.
#2. With the 7″ IF the spine change was not very much, but as the IF gets longer (by lengthening the parallel portion) the spin becomes decidedly stiffer. This can be a useful tuning tool at times.
#3. Perleminary information on what the data to date indicates about the relationship between FOC, mass and penetration will be upcoming in (I think) the Part 6 or 7 Update. For a quick answer, I THINK the 650 grain 32% FOC setup will edge-out the 765 grain 28% FOC setup. A SERIES of head to head test (so an average outcome can be determined) between these two setups would be real nice (hint, hint). I’ll be waiting for your results! 😀
When I’m up to it again, I’ll be trying some more work in the Ultra-EFOC range. There will be some initial test data upcoming (Part 3 or 4) with a 655 grain Ultra-EFOC arrow (31.4%) from the 82# longbow, along with how it compared to other arrow setups from the same bow; including the ‘traditional’ super-heavy buffalo arrow setups. It’s pretty eye-popping stuff, and shakes the traditional norms for “heavy game” arrows.
Hope that answered your questions. If not, fire away!
Ed
-
(hint, hint). I’ll be waiting for your results! 😯 😯 Ok that’s the least I can do, I’ll start cooking.:?
The only thing I need to figure out is how to get the UEFOC and still have enough spine.
Thanks so much.
-
Oh, another question I have been using Gorilla grip glue I like it and is swells to fill any empty space.
It might swell so much it could fill the tapered area, yet it does remain flexible.
I am wondering if I should go to a slow cure epoxy?
What do you think
-
That’s an unknow for me Dave, I’ve never used Gorilla glue. I suspect it might be a problem if it expands as it cures. I think I’d go with a slow cure epoxy.
On bows with the shelf cut deep I’ve been building the arrow plate out. That lets you tune with a weaker dynamic spine. If you’re going to keep the total weight near 650 grains at 32% FOC you’re going to need as light a shaft weight as you can get to tune. So far, I’ve had my best results with GT Ultra Light shafts.
Ed
-
See I have a problem, I have about 15 dozen left of these super skinny arrows that I love .230 outside diameter.
Bing the hard head that I am, I don’t want to buy any shafts, I just keep tweaking these to make them work, thus my 12″ aluminum out side footing to ad spine.
With the 12″ IF sold carbon rod, I have not yet found the limit for point weight 😀 so we will see.
Now I have another question.
If the IF is so long say 12-15″ do you think it still needs the back taped for the flex or is it so far back it no longer matters.
-
David, that’s a “I don’t know”. The tapered portion only matters on angular impacts, to spread the stress force across a longer section of the shaft. A parallel section 9″ long wouldn’t stop the shaft fractures on hard, angular impacts (I’m talking the 45 degree test shots on the armor plate). Never tried parallel sections longer than that on the angular armor plate shots. All the 9″ sections did was was shift the shaft’s weak spot back, and they broke right were to dowel rod ended. At 12 to 15″ inches? It might work; might not. Best to just test one on a few 45 degree impacts on something real heard; a concrete wall should work for the angular impact test. Then we’ll know!
Ed
-
Someone contacted me to ask why their Internal Footings rattled in flight and when tapped on a hard surface. Here’s my reply, in case anyone else encounters the same problem.
A couple of things will cause this to occur.
(1) If the IFR isn’t concentric and axially straight it will rest against one side of the shaft, rather than having the tapering section centered in the shaft. This causes uneven oscillation, and a rattle in flight, and when tapped on a firm surface.
(2) The other thing that can cause such a rattle is the shape (profile) of the tapered section of the IF. The correct taper is a long, slowly increasing parabolic curve. Along most of the tapering section the clearance between IF and shaft’s inner wall is very slight, and increases only at a very, very gradual rate. As the curve approaches the last (approximately) inch or so of the taper the rate of increase in gap size between the IF and the shaft’s inner wall speeds up a bit. Even with this speeded up rate of curvature at the taper’s trailing section, the clearance between the rearward end of the IF and the shaft’s inner wall (on each side) will only be about 1/4 the shaft’s inside diameter. (Or, you could say the very back end of the IF has a diameter equaling about 1/2 the shaft’s inside diameter.) Of course, since the back end is a curved surface I don’t mean a measurement to the very center of the IF’s curved rear end but, rather, the measurement a millimeter or so in front of that.
Keep the IF as linearly straight and concentric as you can. The IF’s profile is initially parallel, then it begins tapering very, very gradually, then a somewhat faster parabolic taper near the very back end.
I know that’s not an easy to understand explanation but I hope it helps you a bit.
Ed
-
-
AuthorPosts
- You must be logged in to reply to this topic.