For hundreds and probably thousands of years, native people of the southeastern United States used river cane for many important material goods. It was used to make dwellings, it was split and woven into strong mats and baskets, it was shaved on one side to make razor-sharp knives, and made into blowguns, spears, and arrows. Early Spanish accounts describe southeastern Indians armed with arrows “…made of certain canes…like reeds…” as well as the incredible force with which those arrows were propelled. River cane would split upon hitting the chain mail of the Spanish and create serious wounds when it impaled the wearer with long, sharp splinters.
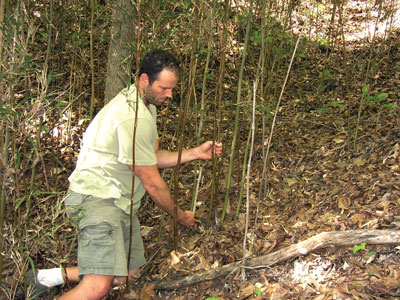
The author collecting river cane in the Appalachian Mountains. River cane should be cut at ground level with pruning shears.
River cane is the only bamboo native to North America. It’s commonly found along floodplains and river bottoms in many southeastern and midwestern states. In prehistory it was much more widespread, forming massive canebrakes that would stretch for long distances. Early settlers converted those fertile floodplains into farmland, greatly reducing river cane’s footprint.
The most relevant use of river cane today is for arrows, and for that it’s superb. Besides requiring minimal work to be made into an arrow, it’s incredibly strong, possesses a gradual taper for a natural forward-of-center balance, straightens easily, and stays straight. When properly matched to a bow it flies perfectly, achieves excellent penetration, and provides pinpoint accuracy. I consider myself lucky to live in Georgia, where I have unlimited access to this incredible natural arrow material.
To begin, a source of river cane must first be located. It likes bottomlands and floodplains where its tendril-like roots can spread easily through soft, silty soil. Not all stands of river cane are equal, however. Some cane has severe kinks at the joints, making it useless for arrows. Other stands contain very straight cane with almost perfectly aligned joints. I suspect genetics or local growing conditions may affect the straightness of certain patches. As in prehistory, you must search until you find the best, straightest cane.
I prefer arrow cane between 1/2 and 5/8 inch in diameter at ground level and seven to eight feet tall. That size gives the perfect taper and thickness for arrows. Sight down each cane to ensure there are no severe kinks, and then cut them at ground level with a pair of pruning shears. This doesn’t kill the cane, but actually stimulates new shoots since cane grows from long roots that spread like runners a few inches under the ground. I usually cut ten to twenty shafts, wrap them together with a spiral wrap of twine, and then take them home to let them season. I leave them tied in the bundle and check the tightness of the twine once a week. As the cane dries it shrinks, and the wrapping will loosen. To prevent the cane from warping with this new-found freedom, retighten the twine as needed so the canes stay straight. Retighten the twine as needed and let the cane season for at least six weeks.
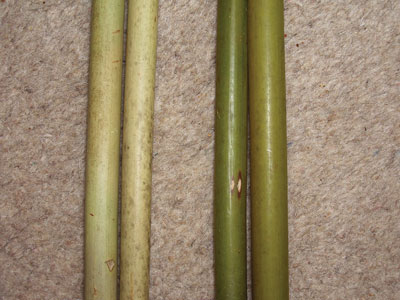
River cane needs to season for at least six weeks before arrow making can begin. Freshly-cut cane (right) is dark green, but will eventually season to the light green color of the seasoned cane (left).
Once dry, the cane will likely need straightening. This is a joy because cane straightens very easily and holds that straightness better than any other arrow material. I begin by first heating the joints over a small fire or gas stove. Move each section in and out of the heat, slowly but thoroughly heating the cane and taking care not to scorch it. When it reaches a certain temperature, it can be bent straight with surprising ease. Once that joint is corrected, let it cool and then move to the next joint. Cane gets hot, so use pot holders during this process.
Once the joints are straight, the sections between the joints will need attention. Using the same process as before, heat and straighten the crooked sections between the joints and then sight down the shaft as it’s rotated to determine which crooked spots still need correcting. This usually requires several straightening sessions. Once straight, leave the shafts for a day or two and then recheck them. Straighten any shafts that drift off course.
The joints on river cane usually swell to a slightly thicker diameter than the rest of the cane. Though it’s tempting to scrape them down so they are the same diameter as the rest of the shaft, leave them thicker. Reducing the joints to the same diameter as the rest of the shaft will severely weaken the shaft at that point. Early in my arrow making career, I broke several arrows while target shooting because I had scraped the joints down. The arrows couldn’t withstand any glancing shots that side-slapped the target. After inspecting the broken shafts, I realized my mistake. I now “leave ’em proud” and have never had one fail.
As stated earlier, cane has a gradual thickness taper from one end to the other. This makes it very easy to select the area of cane that will have the correct spine, or stiffness, for your particular bow. Need stiffer spine? Simply make your arrow from the thicker portion of the cane. Weaker spine can be obtained by making the arrow from the skinnier portion. A spine tester can be used, though experience will tell you, just by feel, what will work.
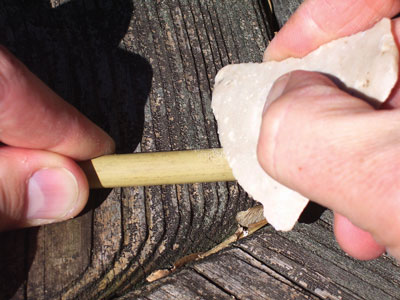
The author roughens the area where any sinew wraps will be with a flint flake so the sinew will grip. Coarse sandpaper can be used here as well.
I prefer my arrows to be several inches longer than my draw length. The extra length that protrudes beyond the bow at full draw acts as a counterbalance to the thrust the arrow experiences when it’s shot. This helps the arrow bend around the handle and fly true to the target. I cut my cane arrows so they are two inches longer than my draw length, and then I add a hardwood foreshaft to the tip to give it a bit more length. I recommend that you cut the arrow several inches longer than your draw length for the same reasons.
The thicker end of the cane should always be the forward portion of the arrow. This thicker, heavier end gives a natural forward-of-center balance point to the arrow, resulting in better arrow flight. I’ve examined countless Native American reed arrows in museums. All of them were done the same way, with the larger end forward and a hardwood foreshaft inserted, so we’ll follow suit.
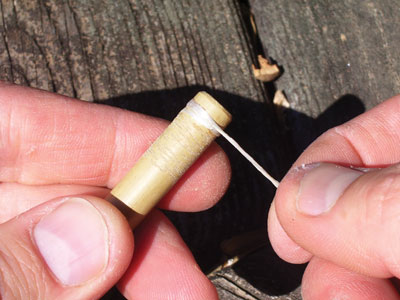
Cane is so slick that wrappings won’t stay put, so use a stone flake or coarse sandpaper to scratch up the forward inch of the cane in preparation for a reinforcing wrap of sinew. I’ve seen old reed and hardwood arrows in museums that were treated the same way. Soak a thin strand of leg or back sinew and then chew it for several minutes until it’s completely softened and rehydrated. Then wrap it around the front of the shaft. Tuck the sinew under itself on the last wrap, pull it tight, and set it aside to let the sinew dry thoroughly.
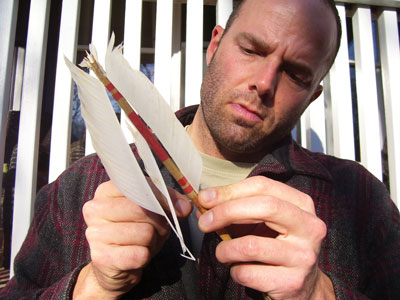
After the rear of the feathers have been wrapped on with sinew, the fronts are then secured.
Scuff up the area where the feathers will be applied with 120-grit sandpaper so the glue will grip. If you intend to paint under the feathers, this also provides a surface to apply the paint. Carve and shape the nock on the smaller end of the cane, then scratch up the area just forward of the nock with a sharp flint flake or coarse sandpaper so the sinew wrapping will grip. Scratch up the area where the forward fletch wraps will go as well. Wrap the rear of the feathers on with a strand of chewed sinew or nylon thread, taking care to space the feathers equidistant from each other. Tuck the sinew under itself and pull it tight on the last wrap.
To prevent the feathers from expanding and lifting away from the shaft, dip your finger in water and wet the underside of each quill for several minutes to swell the feathers. While the quill is still wet, begin wrapping the fronts of the feathers down with another wrapping of sinew. I gently pull the feathers forward with each wrap to ensure the feather is stretched and won’t pull away from the shaft. Offset the front of each feather in relation to the rear so the arrow will spin in flight and improve accuracy. When wrapping is completed, set the shaft aside to let the sinew dry.
To glue the feathers, push each feather sideways to expose the underside of the quill, then use a flattened toothpick to apply glue to the underside of the quill. I prefer hide glue or wood glue for this purpose, since it takes time to dry and lets me apply glue to all three feathers. However, Super Glue or modern fletch glue can also be used. Then I split the web of each feather and apply a spiral wrapping of thin thread to hold the quill tight against the shaft while the glue dries. This ensures a strong glue bond. Once the glue dries, remove the thread wrapping and trim the feathers to their appropriate height with a pair of scissors.
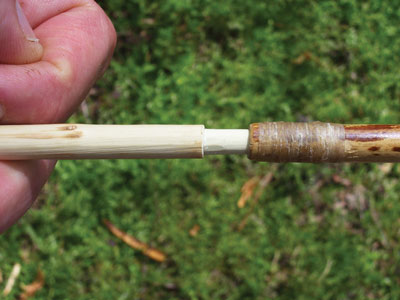
A straight dogwood shoot is scraped to fit into the front of the arrow. Other hardwood like hickory or oak can be used for foreshafts as well.
Now a foreshaft needs to be shaped and fitted into the front of the arrow. I prefer dogwood for my foreshafts, although any hard, dense wood like oak, hickory, or mesquite can also be used. It needs to be straight, and it needs to be carved so it has a smaller diameter end that fits into the cane for about an inch, with a shoulder that butts up against the cane. This shoulder prevents the foreshaft from being shoved into the cane when the arrow strikes the target.
Once the foreshaft is shaped and fitted, it can be tipped with a variety of points. It can be left blunt for practice or small game hunting, or it can be tipped with rubber blunts, steel trade points, or hunting points of stone or bone. Multiple foreshafts with different point types can be made for a single arrow, and different foreshafts can be inserted depending on the type of game you intend to hunt.
Properly made cane arrows will amaze you with their performance. They fly perfectly and are incredibly durable and amazingly accurate. I’ve used my own primitive cane arrows to pick squirrels off branches at twenty yards, shoot bumblebees off flowers, and shoot squirrels through the heart. I even made a perfect vital shot on a rabbit at forty yards with one. I’ve had deer drag cane arrows through thick brush and heavy wild hogs fall and bend them into horseshoe shapes and they haven’t broken. For me, there is immeasurable satisfaction in making a “primitive” arrow that matches and in some cases exceeds the performance of the most advanced arrow available today.
- Chewed sinew is wrapped around the front of the cane to reinforce it so it won’t split when the foreshaft is inserted.
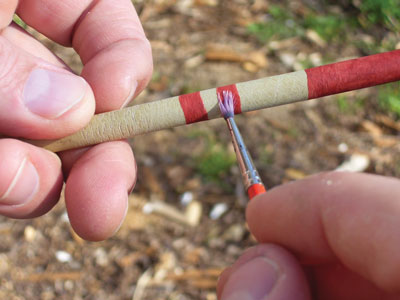
- The author paints the area under the feathers with earth pigments. The slick cane had to be sanded first so the paint would grip.
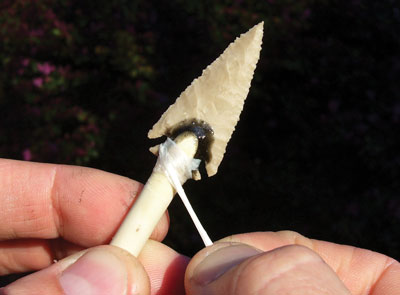
- To complete the arrow a stone hunting point made of Texas flint is wrapped onto the front of the foreshaft with sinew.
- The finished arrow is an example of the beauty and precision that primitive weapons can exhibit.




Enjoyed the article, I have river cane but its mostly crooked with short lengths between the nodes. Are you willing to sell any river cane?
Billy Berger does sell river cane arrows on his website, Primitive Pathways. Here’s a link to the river cane: https://primitivepathways.com/index.php?route=product/product&path=69&product_id=55